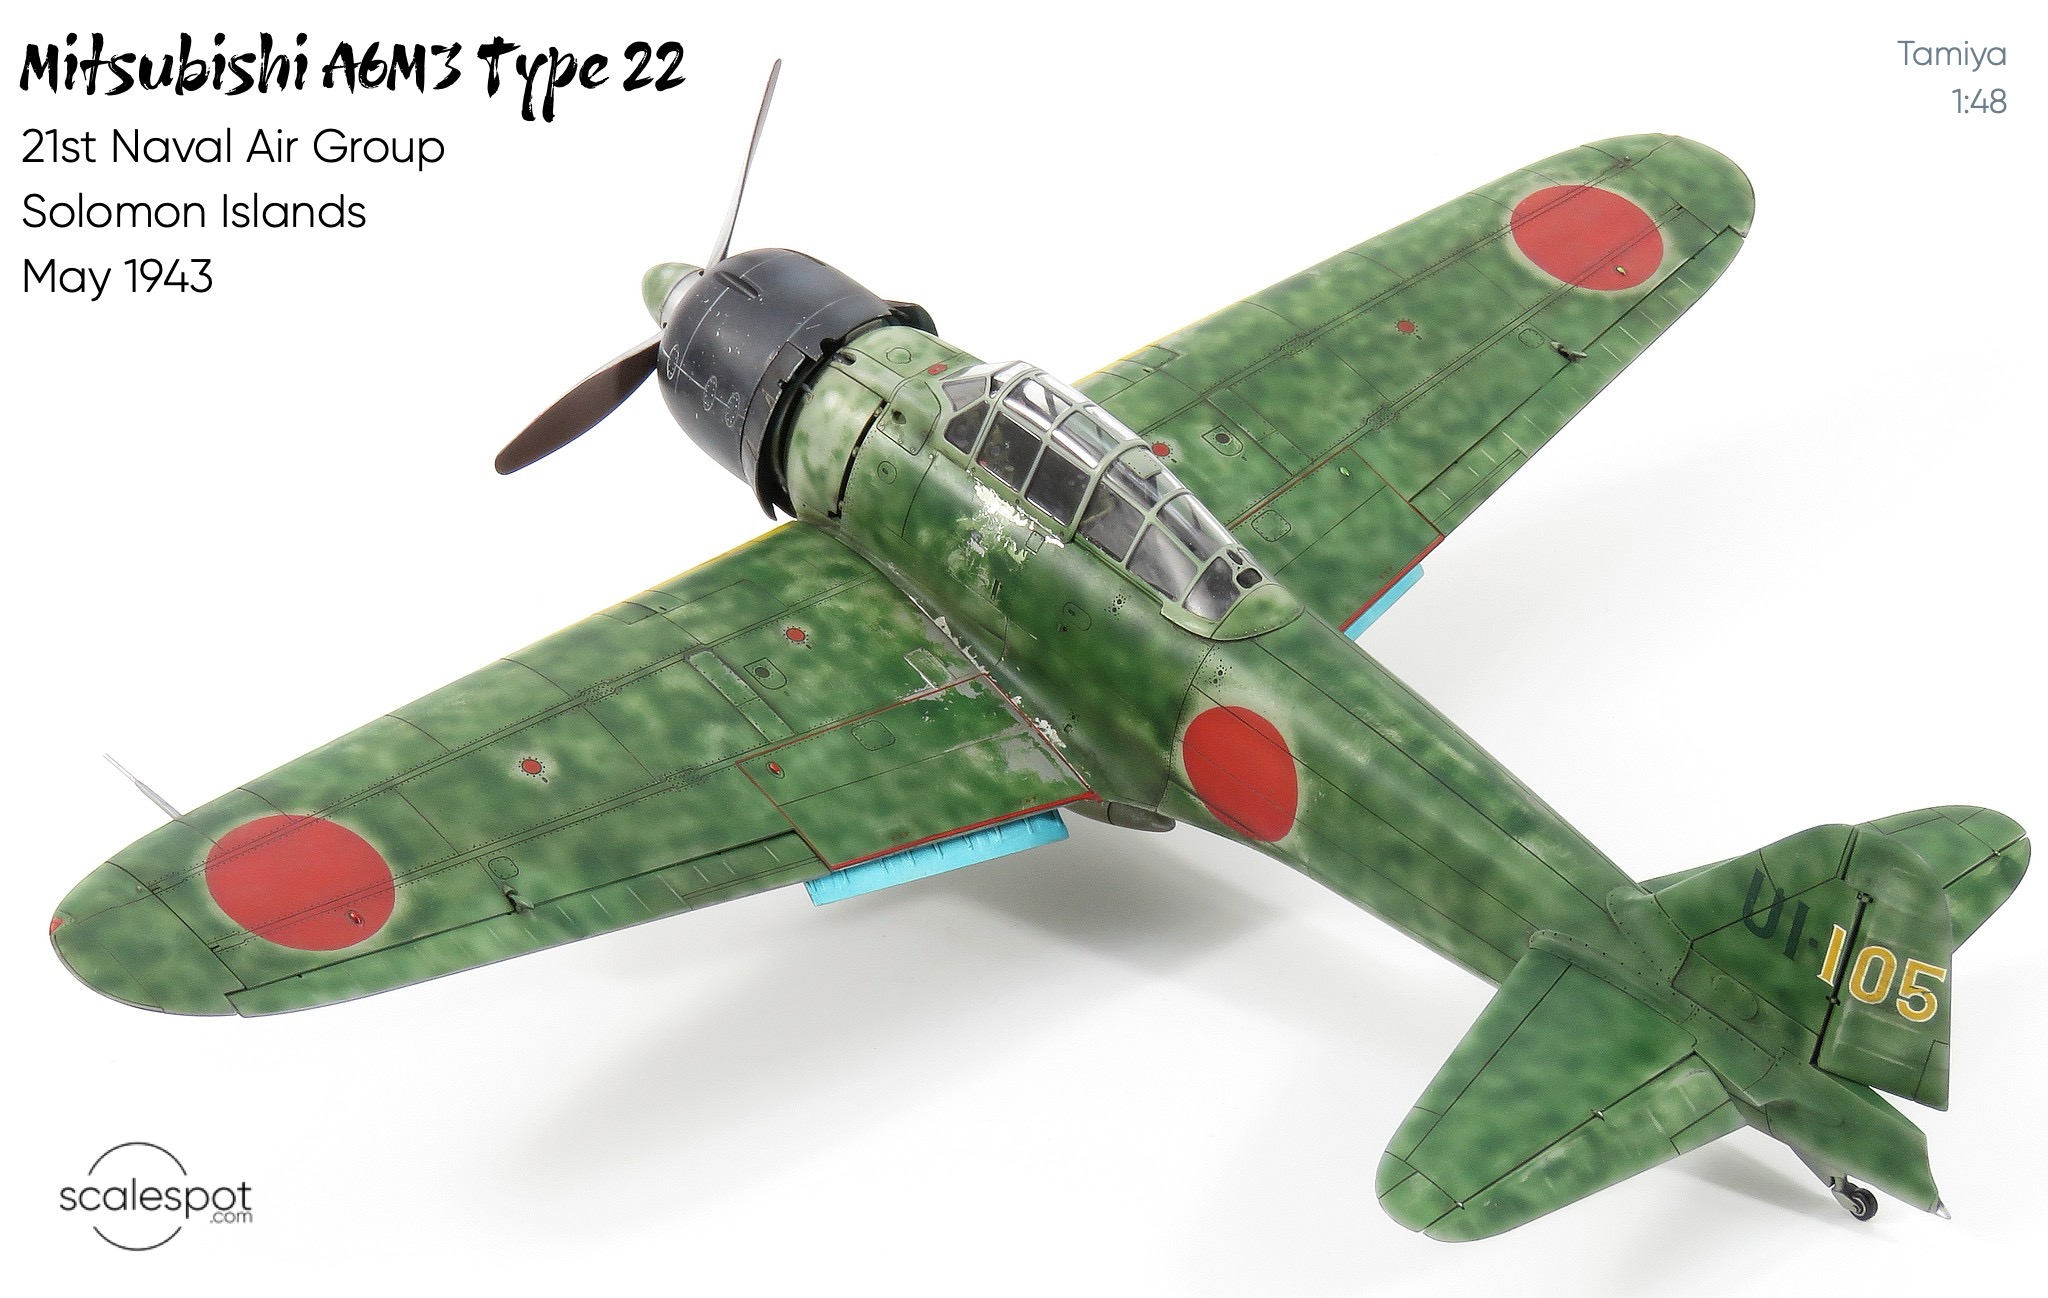
Mitsubishi A6M3 Type 22 Zero
Tamiya (61108)
1:48
Started: July 2025
Finished: July 2025
Link to Gallery

Released in 2010, this 1:48 kit from Tamiya still stands strong 15 years later. True to Tamiya's reputation, the build features exceptional engineering, with parts fitting together seamlessly.
This was a quick build for a local club event, finished in just under two weeks. Thanks to lacquer paints and fast-curing super glue, I was able to keep up the quality while hitting the deadline.
The Mitsubishi A6M3 Type 22 Zero
The A6M3 Type 22 Zero was a refined version of Japan’s iconic Mitsubishi fighter, introduced in early 1943. It restored the long wingspan of earlier models (after the clipped-wing "Hamp" Type 32) to improve maneuverability and extend range, addressing shortcomings of the previous variant. Equipped with the upgraded Sakae 21 engine and improved armament, the Type 22 struck a balance between agility and range, making it well-suited for long-distance operations in the Pacific. It served effectively in many key battles but was increasingly outclassed by faster, better-armed Allied fighters.

Inside the box, Tamiya includes a useful flyer that clearly explains the key differences between the major variants of the A6M Zero family. This informative guide helps modelers and enthusiasts understand how each version evolved in terms of design, armament, and performance characteristics. Tamiya’s commitment to accuracy and historical detail is reflected not only in the quality of the kits but also in this comprehensive comparison.


To date, Tamiya has released highly detailed model kits of all the major A6M Zero variants in 1/48 and 1/32 scales. These kits cover everything from the early Model 21 versions through to the later, more robust Model 52 and beyond. Each kit is carefully engineered to capture the unique features of its specific variant, such as differences in wing shape, engine cowling, armament layout, and structural reinforcements, making them popular choices for both casual builders and serious scale modelers interested in this iconic fighter.
BUILD - Tamiya 1:48 A6M3 Type 22 Zero (61108)
Given the tight deadline for this build, I made an early decision to stick strictly to what was included in the box and avoid the temptation of aftermarket detail or correction sets. Having built many 1:48 WWII kits over the years, I’ve learned that once the fuselage is closed up, very little of the interior remains visible. That’s not an excuse to cut corners or neglect the interior, but rather a practical acknowledgment that investing in expensive photo-etch, resin, or 3D decals often adds minimal value in such cases. With thoughtful painting and detailing, modern kits—especially those from manufacturers like Tamiya—really don’t need anything extra to look impressive.


The main interior was painted with AK Real Color RC306 IJN M3 (M) Mitsubishi Interior Green, applied over a black base coat. I’m a fan of the AK RC range—they’re lacquer-based and spray beautifully, even when heavily thinned. Staying true to the "out-of-the-box" approach, I even used the kit-supplied decals for the seat harness. While they look reasonably convincing from certain angles, it’s not a choice I’d make again, even under time pressure.

Speaking of AK paints, this build gave me the opportunity to try out their new range of paint marker pens for the first time. I had heard positive things about them and decided to pick up a few in commonly used colors. These markers dispense acrylic paint through a felt-tip-style applicator, making them ideal for precision work. To my surprise, they proved significantly easier to use than a traditional brush when it came to detailing cockpit elements like switches, knobs, and control panels. The control and accuracy they offered made the process faster and more enjoyable, especially in tight or intricate areas. I was particularly impressed by the metallic shades—the finish is clean and highly realistic, giving the appearance of actual metal in a way that surpasses what I usually achieve with a fine brush. Overall, these pens have earned a permanent place on my workbench.

Tamiya do include decals for the instrument panel, and my original intention was to use them straight from the box. However, the decals were provided as a single block rather than individual dials, which already made precise placement a bit tricky. To complicate matters further, as soon as I applied decal softener to help them conform to the panel, the entire piece shattered into multiple fragments—rendering it unusable. Thankfully, I had a backup plan in place. I turned to a combination of Mike Grant and AnyZ instrument decals, and in the end, these proved to be a significant upgrade. The individual dials were much crisper, easier to position accurately, and offered a level of detail and realism far beyond what the kit-supplied decals could deliver. While it's always nice to stick with kit parts when possible, this was one of those cases where aftermarket really made a noticeable difference.

The sidewalls and main cockpit tub were completed using the same general approach as the rest of the interior. After the base color was applied, I used a light enamel wash to enhance the depth and bring out the raised details. This not only added a sense of visual interest but also helped to convey a subtly weathered, field-worn appearance appropriate for a combat aircraft. The wash settled nicely into the recessed areas, giving a natural shadow effect and helping to break up the otherwise uniform finish.
All of the detail painting you see in this section—including switches, buttons, and various small cockpit features—was done using the AK Real Color paint markers. Despite some initial skepticism, I was genuinely impressed by the level of control and precision these felt-tip applicators offered. Even on fine details, the markers allowed for clean, accurate application without the mess or fuss often associated with using a fine paintbrush.

One product that’s become a regular part of my toolkit in recent builds is black CA glue. It’s incredibly versatile—serving not only as a strong adhesive, but also as an excellent filler. The addition of black pigment makes it much easier to see during application and sanding, which is a huge advantage when you're working on fine seams or panel joints. Unlike traditional putties or fillers, it sands beautifully and feathers out cleanly, making it ideal for precision work. Most major model brands now offer a black CA however the one I have found best "bang for buck" is Starbond Black Medium-Thick CA Glue
For this build, I decided to push its utility a bit further. Instead of my usual method of using polystyrene liquid cement to join the main fuselage halves—a technique that works well but requires extended drying and curing time—I opted to use black CA glue for the primary assembly. The quicker set time helped speed up the build process considerably, which was crucial given my tight deadline.
But beyond efficiency, I had another motivation: I wanted to test whether using CA glue could help eliminate the dreaded ghost seams that sometimes reappear long after painting and finishing. These are typically caused by slow shrinkage or solvent interaction in areas bonded with liquid cement. Because CA glue cures chemically rather than through evaporation, I was hopeful it would provide a more stable, permanent bond that wouldn’t betray itself later on.

The Nakajima Sakae 21 was a 14-cylinder radial engine producing around 1,130 hp, used in later A6M Zero variants like the A6M3 and A6M5. Featuring a two-speed supercharger, it offered better altitude performance while remaining compact and reliable—key to the Zero’s agility. However, its limited power became a drawback as Allied fighters grew more advanced.
The engine provided in the Tamiya kit is nicely detailed right out of the box, especially for a 1/48 scale model. The delicate cooling fins on the cylinders are finely molded and more than sufficient for the scale—striking a nice balance between realism and ease of assembly. For painting, I chose to follow the kit instructions rather than spend additional time researching exact historical finishes, given that very little of the engine will be visible once the cowling is in place. In this case, accuracy gave way slightly to efficiency, as the engine serves more as a structural and impressionistic element than a display feature. That said, the molded detail holds up well under paint and adds to the overall sense of realism, even if it’s mostly hidden in the final build.


The engine, propeller, and spinner came together quickly during the build. For these components, I primarily used Mr. Color lacquer paints, as Gunze’s range includes several highly accurate colors tailored for Japanese aircraft—such as C131 Propeller Color and C125 Cowling Color. For the natural metal finishes on the spinner and propeller blades, I turned to the Mr. Color Super Metallic range, which offers a convincing and smooth metallic sheen that's ideal for smaller-scale components.


Most wartime photos of IJN aircraft show them in a heavily weathered state, a result of the harsh conditions found across the Pacific islands. The intense sun, humidity, and rough operational environments led to significant paint wear, fading, and chipping. To replicate this realistic effect, I use a technique designed to mimic that kind of surface degradation as closely as possible. The process begins with a base coat of silver, followed by a layer of water-soluble chipping fluid (or even hairspray), which acts as a barrier between the base and top coats. After applying the final color—C125 Cowling Color in this case—and allowing it to dry, I use a damp brush to gently remove selected areas of the top layer, revealing the silver beneath. While the concept is straightforward, achieving a natural and convincing look can be tricky; the results are often a bit unpredictable and definitely require some practice to control effectively.


These days, I prefer to tackle external components—such as ordnance and landing gear—early in the build rather than leaving them until the end. As expected from Tamiya, the fit and alignment of the undercarriage parts were flawless, making assembly smooth and stress-free. For painting, I followed the kit’s recommendations, finishing the gear door interiors with Mr. Color C57 Metallic Blue-Green. However, I’ve since learned that Zeros produced at the Mitsubishi factory typically had their gear bays and door interiors painted in the same color as the aircraft's exterior, rather than the blue-green primer. I’ll keep that in mind for my next Zero build.

Shifting focus back to the fuselage assembly, it was time to paint and install the canopy and windshield. While Tamiya thoughtfully includes masking material in the kit, the masks themselves are not pre-cut. Rather than attempt to trace and cut them by hand, I scanned the provided mask sheet and used Inkscape along with Silhouette Studio to create precise digital templates, which I then cut using my Silhouette Portrait 3. An added benefit of this extra step was the ability to cut two full sets—one for the exterior and one for the interior surfaces of the canopy. Plus, I now have a ready-to-use digital mask file for any future Tamiya A6M3 or A6M5 builds, saving time down the line.

As expected from a relatively modern Tamiya tooling (2010), the fit of the kit is exceptional—everything comes together like a hand in a glove. I used black CA glue to assemble the wing halves, then attached the completed wing section to the fuselage by running a few drops of Tamiya Extra Thin Cement along the wing root joint. The tailplanes feature a solid interlocking design, which guarantees perfect alignment without any fuss. A light coat of grey primer was applied to check for any remaining seams or gaps, allowing for quick touch-ups where needed. The wingtip navigation lights were fitted in place, painted clear red and green, and then carefully masked in preparation for the main painting stage.

Since I was running slightly ahead of schedule, I took the opportunity to make a small modification while working on the horizontal stabilizers—I removed the elevators to pose them in a relaxed, neutral position. Fortunately, on the Zero, the fabric-covered elevators are separated by a clean, straight join, making this a simple and quick adjustment.
The only area that required more significant attention was the joint between the wing assembly and the rear fuselage. There was a noticeable step at the seam that disrupted the smooth profile of the airframe. To correct this, I used a combination of black CA glue and Tamiya Basic Putty to blend the surfaces. Once the area was leveled and sanded, I carefully re-scribed the panel lines and re-added the rivet detail to match the surrounding surfaces.


With assembly complete, I next applied a full coat of Mr. Finishing Surfacer 1500 Black across the entire airframe. To add visual interest and break up the otherwise uniform look of the undersides, I sprayed a variety of contrasting colors on selected panels. I've used this technique before with good results, and the lower surfaces felt like the ideal area to experiment with it again. Since the upper surfaces would eventually be covered with a dark green topcoat, I knew that any contrast applied there would mostly be lost. Instead, I concentrated my efforts on key areas where I planned to add paint chipping—specifically along the wing leading edges and wing roots—so the underlying tones would contribute to a more realistic weathered effect once the final layers were applied.


Are you enjoying and finding value in this content? If so, please consider supporting my work by Buying Me A Coffee. Your support ensures that I can continue to provide high-quality, accessible content now and in the future, keeping this space free from distractions and focused entirely on the hobby we all love. Every little bit helps, and I truly appreciate your generosity!

As is typical with Tamiya kits, the painting instructions reference colors exclusively from their own product lines, including both spray cans (AS and TS series) and bottled acrylics. While this approach ensures compatibility within their system, it can be a bit limiting if you prefer airbrushing or use paints from other brands. Personally, I’ve found the Tamiya AS and TS lacquer spray paints to be excellent in terms of color accuracy, coverage, and durability. However, the main drawback is the lack of control and precision when using them directly from the can—especially for detailed work or subtle modulation effects.
Fortunately, there's a simple workaround: the paint can be decanted from the aerosol can into a container for airbrush use. This allows you to retain the benefits of Tamiya's high-quality lacquer paint while gaining the control and finesse of an airbrush. The process is straightforward and, once thinned properly, the decanted paint sprays beautifully through the airbrush. It's a great way to get the best of both worlds—Tamiya's reliable color formulations with the precision needed for scale modeling.

The kit includes three marking options, each representing a different aircraft and period in the Zero’s operational history. Of the three, the one that caught my attention the most was the subject featured on the box art—a Mitsubishi A6M3 Zero flown by Japanese ace Hiroyoshi Nishizawa during operations in the Solomon Islands in 1943. Nishizawa was one of the most celebrated and skilled Japanese fighter pilots of the war, which added historical interest to the build. What particularly appealed to me was the distinctive appearance of the aircraft: the field-applied dark green upper surfaces, hastily brushed over the original grey, gave it a rugged, combat-worn look. This kind of improvised camouflage is both visually striking and well-suited to 1:48 scale, offering a great opportunity for expressive painting, subtle weathering, and tonal variation that adds life and realism to the finished model.

First up in the painting process is Tamiya AS-29 Gray Green (IJN), which serves as the primary color for the entire airframe—covering both the upper and lower surfaces. This shade represents the factory-applied color commonly seen on early-war Mitsubishi-built Zeros. It has a subtle greenish tint that can appear more grey or green depending on lighting, making it visually interesting and a great base for weathering effects.
Historically, as the war progressed—particularly in the Pacific theatre—Japanese squadrons began to apply dark green camouflage to the upper surfaces of their aircraft directly in the field. These overpainted schemes were often done hastily by ground crews using brushes or spray guns under less-than-ideal conditions, resulting in irregular, patchy finishes with visible brush strokes, overspray, and uneven coverage. This rough and improvised look adds a layer of authenticity and character to the model, and it presents a great opportunity for modelers to experiment with layered painting techniques and chipping effects that reflect the real-world wear and tear these aircraft endured in combat operations

The advantages of decanting spray paints like AS-29 become especially clear when applying thin, controlled layers to build up subtle modulation effects. Using an airbrush allows for greater precision, making it easier to preserve the underlying pre-shading and tonal variation applied earlier. It’s important at this stage to keep the coats light and gradual to avoid overwhelming the nuanced base work. While the colors may appear somewhat bold or exaggerated initially, I expect them to tone down and blend more naturally once panel line washes and weathering are applied later in the process.


Before applying the top coat of dark green, Tamiya’s painting and decal guide instructs modelers to first apply the decals for the yellow wing leading-edge identification markings and the red Hinomarus (often referred to as "meatballs"). These high-visibility markings were standard on Japanese aircraft and played a key role in identification during combat. While the kit conveniently supplies decals for these elements, I opted instead to mask and paint them by hand. This approach offers several advantages—most notably, it allows for a far more realistic finish that integrates seamlessly with the rest of the paintwork. By painting these markings directly onto the model, I can subject them to the same chipping and weathering techniques used across the airframe, creating a more cohesive and natural worn appearance. It also avoids the common pitfalls of large decals, such as silvering or poor conformity over panel lines, and gives greater control over the final look..

Using the kit-supplied decals as size references, I created a set of circular masks to replicate the various Hinomarus found across the airframe—specifically those on the wings and fuselage sides. This ensured that the painted markings would be the correct dimensions and placement, matching the original decal layout. To produce the masks, I used my Silhouette Portrait 3, which allowed for consistent and accurate circles in multiple sizes.
For masks being applied to smooth, flat surfaces, I prefer to use vinyl masking material. Vinyl adheres cleanly and securely to the surface, reducing the risk of paint bleed and producing crisper, sharper edges than paper or low-tack masking tape. This is especially important for markings like the Hinomaru, where any softness or irregularity around the edges can distract from the overall realism of the finish. Vinyl is also easy to reposition if needed, making it ideal for precise alignment before committing to paint.

With the main markings in place, I moved on to applying the rough, field-applied dark green overspray to the upper surfaces. Tamiya recommends using their AS-21 Dark Green 2 (IJN) or the equivalent XF-70 acrylic. I tested the AS-21 first but found it appeared too dark, particularly when compared to the tone shown on the box art I was aiming to replicate. Being something of a model paint “bower bird,” I rummaged through my collection and came across Mr. Color C124 Dark Green (Mitsubishi), which struck me as a much closer match to my reference. I thinned it with Mr. Color Leveling Thinner and applied it with my Iwata Eclipse 0.3mm airbrush in a deliberately random, blotchy pattern to replicate the uneven, hastily applied finish seen on many wartime Zeros.

Not all of the markings could be applied with masks, so finer details—such as the red warning lines along the wing trailing edges and most of the stencils—were added using the kit decals. Before moving on to the wing decals, I took the opportunity to complete the paint chipping I had prepared for earlier with a layer of hairspray. Using a brush dipped in water, I softened the hairspray layer, then carefully worked over the surface with a toothpick to chip away the AS-29 and Dark Green layers. The goal was to achieve a look that was intentional yet naturally random, replicating the wear patterns seen on operational aircraft. Light surface wear and fine scratches were added using an fine sanding sponge (1000 grit or higher). With this type of weathering, it’s best to work gradually, constantly checking the effect and knowing when to stop—going too far is all too easy.

For the tail codes, I opted to use the Tamiya kit decals rather than create masks, as replicating the fine white outline around the yellow “105” would have been a time-consuming task. As is typical with Tamiya, the decals were on the thicker side, so I used VMS Decal Softener—the strongest I’ve encountered—to help them conform. Fortunately, the mostly flat surfaces of the tail and rudder made application relatively straightforward.

With the major painting and markings now complete, the Zero was really starting to come to life on the bench. I was pleased with how the overall finish had turned out so far—everything had gone smoothly without any unexpected setbacks or problem areas cropping up. At this stage, however, the paintwork still looked a little too “flat” and uniform, lacking the subtle depth and tonal variation that gives a model its sense of realism. I wasn’t concerned, as I knew from experience that the upcoming panel wash and weathering steps would enrich the surface detail, bringing out the panel lines, rivets, and subtle contours while tying together the various painted elements into a more cohesive, visually engaging finish.

In the past, I’ve typically painted and masked the wheel wells early in the build, before tackling the main airframe colors. Recently, though, I noticed other modellers leaving this step until the end, and it made sense—masking the outer edges of a wheel well is far easier than trying to mask the entire interior. Following Tamiya’s instructions, the wheel wells and landing flap interiors were finished in the distinctive Japanese metallic blue-green primer. Gunze offers this shade as Mr. Color C57 Metallic Blue-Green, a highly translucent paint that benefits from a bright base coat. For this, I applied Mr. Color SM201 Super Fine Silver 2 before spraying the C57 to ensure a rich, vibrant finish. It's worth noting that I've had feedback since finishing the model that in most cases Zero's that were built by Mitsubishi had the wheel wells and flaps finished in the same color as the airframe. Something for next time.


With the painting stage finally wrapped up, the model looked—predictably—far too pristine for my liking. I’ve always enjoyed the transformation that happens during the weathering stage, when washes and grime start to breathe life into the airframe. This is the point where a painted model begins to shift from “miniature” to something that feels like a scaled-down machine with history and wear. For me, post-paint washes are easily the most satisfying part of a build; each pass adds depth, contrast, and a subtle narrative of use. Of course, this process is only as smooth as the groundwork you’ve laid earlier. A well-prepped surface with clean, consistent panel lines and properly restored recessed details will take a wash beautifully, letting it settle exactly where you want it. Skip that prep work, however, and the wash will fight you—pooling unevenly, clinging to rough spots, and drawing attention to every assembly shortcut you thought no one would notice. In other words, surface preparation isn’t just busywork—it’s the difference between a wash that enhances and one that distracts.

More than any other stage in model building, the “weathering” phase is, for me, a matter of instinct. It’s not something you can approach with a rigid formula—the ideal wash for one base color may not work for another. I’ve found that using at least two, and often three, different wash shades brings far more life and depth to the finish than relying on a single tone. Since this build used lacquer paints with painted-on markings, I skipped the usual gloss clear coat and applied the enamel washes directly over the paint. Lacquers are tough enough to handle enamel products and gentle clean-up with white spirit without any risk.
For this model, I used three shades of Tamiya Panel Liner: Dark Brown, Dark Grey, and a restrained touch of Black in select areas. It’s interesting to note that those high-contrast pre-shaded panels on the undersides are now far more prominent after the wash, with the subtle red and blue tones being the most noticeable.

For the dark green upper surfaces, I opted for a slightly darker wash to create enough visible contrast without overpowering the paintwork. It’s a common habit among modellers to reach for pure black panel line washes, but in my experience, this often results in an overly harsh effect that makes panel lines and rivets stand out too starkly—almost shouting for attention. The goal with weathering isn’t to highlight every detail in a way that distracts from the overall appearance; rather, the recessed surface details should play a supporting role, subtly enhancing the realism without stealing the spotlight. By using a more muted wash tone, the panel lines blend naturally with the paintwork, helping to add depth and interest without becoming the model’s main focus.

Here are some close-up shots to showcase just how much a well-executed panel wash can elevate the overall finish of the model. It’s always satisfying to see how a relatively small amount of carefully applied wash can dramatically enhance the depth and dimensionality of the surface. By settling into the recessed panel lines and details, the wash creates subtle shadows that bring out the contours and texture, transforming flat paintwork into something that looks much more three-dimensional and realistic. This effect helps to convey the wear and complexity of the aircraft’s surfaces, making the model feel more lifelike and visually engaging


The final assembly stage involved carefully attaching the smaller sub-assemblies, including the engine and cowling, the undercarriage, and the centerline drop tank. Thanks to Tamiya’s renowned engineering precision, each component snapped into place effortlessly with flawless alignment, making this phase smooth and satisfying. This level of fit and finish truly underscores why building Tamiya kits is such a pleasure. Bringing all the parts together so seamlessly was a rewarding way to round out what had been a thoroughly enjoyable and surprisingly quick build.
More photos of the finished model can be found in the Tamiya 1:48 A6M3 Type 22 Zero - Gallery


Are you enjoying and finding value in this content? If so, please consider supporting my work by Buying Me A Coffee. Your support ensures that I can continue to provide high-quality, accessible content now and in the future, keeping this space free from distractions and focused entirely on the hobby we all love. Every little bit helps, and I truly appreciate your generosity!