Horten Ho-229
Zoukei-mura (SWS03)
1:48
Started: Mar 2016
Finished: Aug 2016
Link to Gallery

The Horten H.IX, RLM designation Ho 229 (or Gotha Go 229 for extensive re-design work done by Gotha to prepare the aircraft for mass production) was a German prototype fighter/bomber initially designed by Reimar and Walter Horten to be built by Gothaer Waggonfabrik late in World War II. It was the first flying wing to be powered by jet engines.
The design was a response to Hermann Goring's call for light bomber designs capable of meeting the "3x1000" requirement; namely to carry 1,000 kilograms (2,200 lb) of bombs a distance of 1,000 kilometres (620 mi) with a speed of 1,000 kilometres per hour (620 mph). Only jets could provide the speed, but these were extremely fuel-hungry, so considerable effort had to be made to meet the range requirement. Based on a flying wing, the Ho 229 lacked all extraneous control surfaces to lower drag. It was the only design to come even close to the 3x1000 requirements and received Goring's approval. Its ceiling was 15,000 metres (49,000 ft)

Since the appearance of the B-2 Spirit flying-wing stealth bomber in the 1990s, its similarities in role and shape to the Ho 229 has led many to retrospectively describe the Ho 229 as "the first stealth bomber".
A static reproduction of the only surviving Ho 229 prototype, the Ho 229 V3, in American hands since the end of World War II was constructed in the very early 21st century and later tested by the U.S. military, who found the basic shape, paint and laminating adhesive composition of the mockup copy would provide for 37% reduction in detection range against the British Chain Home radar used for Ground Controlled Intercept (GCI) earlier in the war, but no significant stealth benefit against more modern radar systems in use when the aircraft was under development.

The Ho-229 V3 was larger than previous prototypes, the shape being modified in various areas, and it was meant to be a template for the pre-production series Ho 229 A-0 day fighters, of which 20 machines had been ordered. The V3 was meant to be powered by two Jumo 004C engines, with 10% greater thrust each than the earlier Jumo 004B production engine used for the Me 262A and Ar 234B, and could carry two MK 108 30 mm cannons in the wing roots. Work had also started on the two-seat Ho 229 V4 and Ho 229 V5 night-fighter prototypes, the Ho 229 V6 armament test prototype, and the Ho 229 V7 two-seat trainer.

During the final stages of the war, the U.S. military initiated Operation Paperclip, an effort to capture advanced German weapons research, and keep it out of the hands of advancing Soviet troops. A Horten glider and the Ho 229 V3, which was undergoing final assembly, were secured for sending to the United States for evaluation. On the way, the Ho 229 spent a brief time at RAE Farnborough in the UK, during which it was considered whether British jet engines could be fitted, but the mountings were found to be incompatible with the early British turbojets, which used larger-diameter centrifugal compressors as opposed to the slimmer axial-flow turbojets the Germans had developed. The Americans were just starting to create their own axial-compressor turbojets before the war's end, such as the Westinghouse J30, with a thrust level only approaching the BMW 003's full output. [source: wikipedia]

KIT OVERVIEW - Zoukei-mura 1:48 Horten Ho-229 (SWS03)
This is the first time I have taken a ZM kit of any scale out for a spin. I have a couple of their 1:32 kits in the stash and when this one came across my desk I figured it would be a good way to see how the ZM engineering held up under the knife. I will admit to being a tad intimidated when I first opened the box and leafed thru the assembly instructions. All that internal detail looked imposing but once I got to it was not a challenge at all

For the most part I was very impressed with the fit of the parts, I did have some issues with the wing to fuselage fit which may have been of my own doing but other than that the kit never fought me one bit. If I had to pick one thing I did not like at all it was having to deal with the use of clear plastic for the outer skin of the whole model. This made doing anything with those parts a major chore. I really had to push myself to get past that part of the build

I also had access to the ZM Concept Note book for the Horten (originally released with the 1:32 kit). These optional books are well worth the money as they provide excellent reference information and photos to help you during the build. In the case of the Ho229 they also gave some useful insight into possible (plausible) paint schemes and general information about the aircraft itself. Speaking of documentation its also worth giving a thumbs up to the layout and clarity of the kits assembly instructions, one important part of any model kit that we often overlook in reviews. Finally the supplied decals are well upto standard and I had no problems at all with them.
BUILD - Zoukei-mura 1:48 Horten Ho-229 (SWS03)
I rarely, if ever, closely follow the order of assembly suggested by the manufacturer in the instructions. Having said that I'll lay out the parts of this build review using the assembly instructions as a guide. I do this because I want you to see the quality of the instructions provide by ZM and how a build of this complexity could quickly come unstuck without them. By providing all the internal framework, most of which you have to assemble, its important to pay close attention to how each sub assembly relies on the ones surrounding it. Failure to plan ahead with this kit will end in tears (or worse).
ZM have logically sequenced the assembly by essentially starting from the center of the aircraft and working outwards (like peeling an onion in reverse). Buried deep in the heart of the Ho-229 are its two Jumo 004C engines. I'm impressed with how ZM have accurately identified each sub assembly (eg Intake and Compressor Housing, Turbine Nozzle etc) in the build thereby helping to educate the builder as well as guide them. Modelling to me is much more than just gluing and painting a bunch on plastic pieces, its a chance to learn about the machines themselves and the passion that ZM brings to the subject is evident.

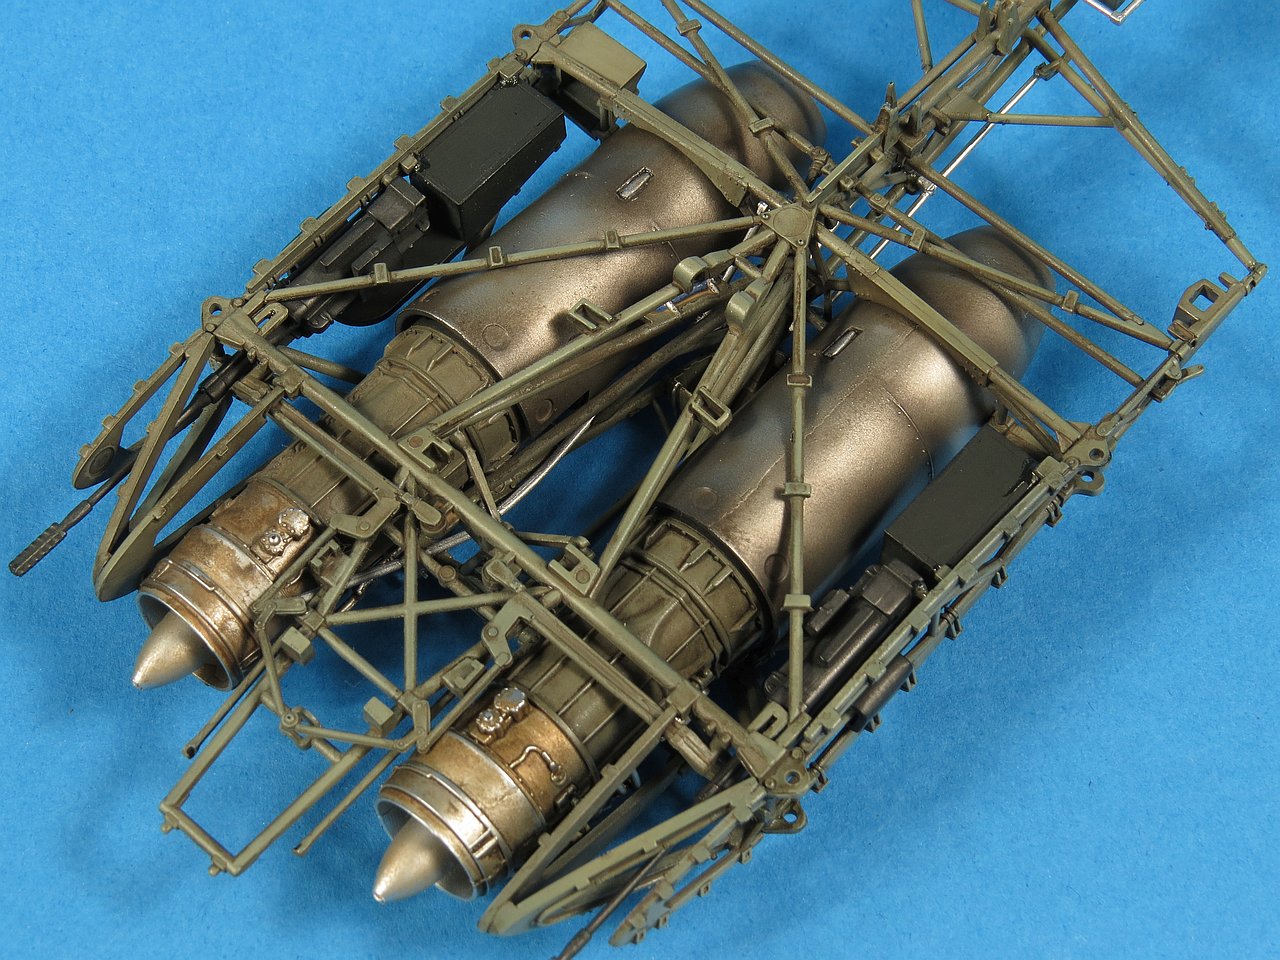
Straight off the bat I could tell that this was going to be an enjoyable build. Each part was a sturdy and accurate fit and despite the seemingly large number of parts the assembly went very smoothly. As I plan to leave at least one of the engine panels off to show off the engines I needed to treat the engine bodies with respect as they would be front and center on the top of the finished model eventually. Its a safe bet that any and all metal parts you see in my builds are finished with Alclad Metalisers.

Surrounding the engine body are a multitude of cabling, piping and actuating rods/shafts just like the real thing. These will be painted separately and attached last prior to weathering.

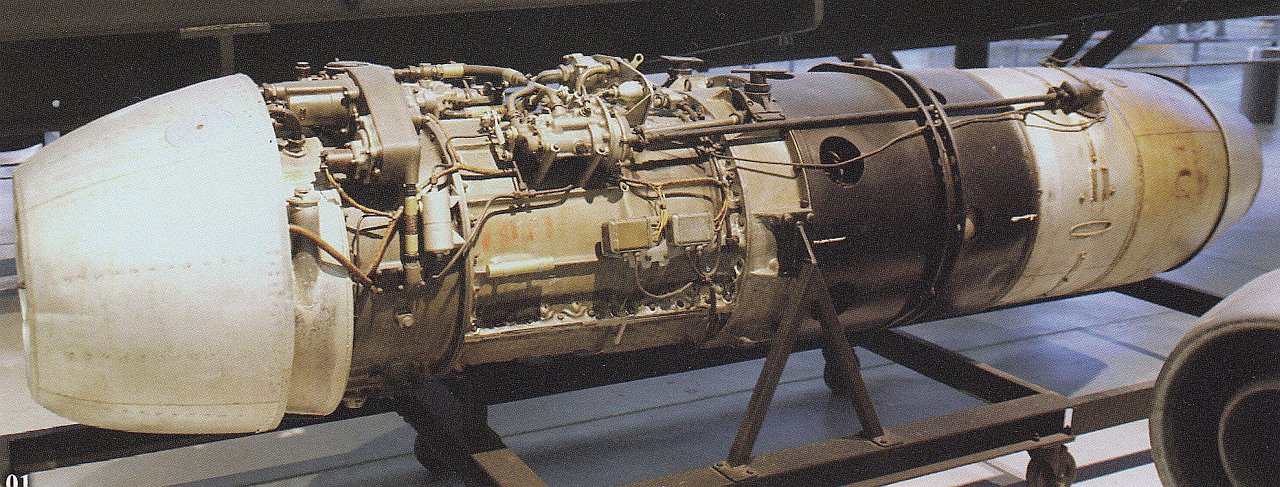
A useful reference photo of a real Jumo 004C provided by ZM in their 'Concept Note' book which is designed to accompany the 1:32 and now 1:48 kits of the Ho-229
I was interested to try and reproduce the discoloration effect on the unpainted metal parts of the engine body and exhaust. I started by spraying a very light coat of Tamiya XF52 Flat Earth and left it a couple of minutes to go off. I then took a small piece of soft foam, dampened it with thinners and dabbed it over the soft paint in a stabbing/stippling motion (not wiping motion). This resulted in random splotches of paint being lifted and giving me a finish close to what I saw in the photos. More weathering is needed to the engines but for now I'll put them aside and press on.

I have to admit that I was quite intimidated when I first got this kit and leafed thru the instructions. I had visions of extreme frustration trying to assemble and align what looked like a birds nest series of framing and connectors. When I got to this point I studied the instructions multiple times, took a deep breath and starting cutting parts from the sprue. It only took me a few steps to realise that I had been worried for no reason because each part I added attached solidly to the next with little or no alignment problems and before long the framing was starting to take shape in my hand

Its easy to think this is an overly engineered and complex model but my experience with building it has made me realise that is not the case. Each part requires minimal cleanup and if you follow the assembly sequence laid out by ZM you will find that with some liquid glue (I used MEK) and a minimum of fuss you will arrive at this stage very quickly. Note that I have dry attached the top framing to the model just for the photo.

I assembled as much of the internal fuselage framework as I could which was to painted in RLM 02. Any extra parts like linkage rods etc that would not be RLM 02 I left off to be painted separately and then attached last. It's important to read all the instructions thoroughly especially the footnote 'Warnings' which highlight to you when parts need to pass thru others or if they need to be cemented now or later. Ignore these callouts at your peril.

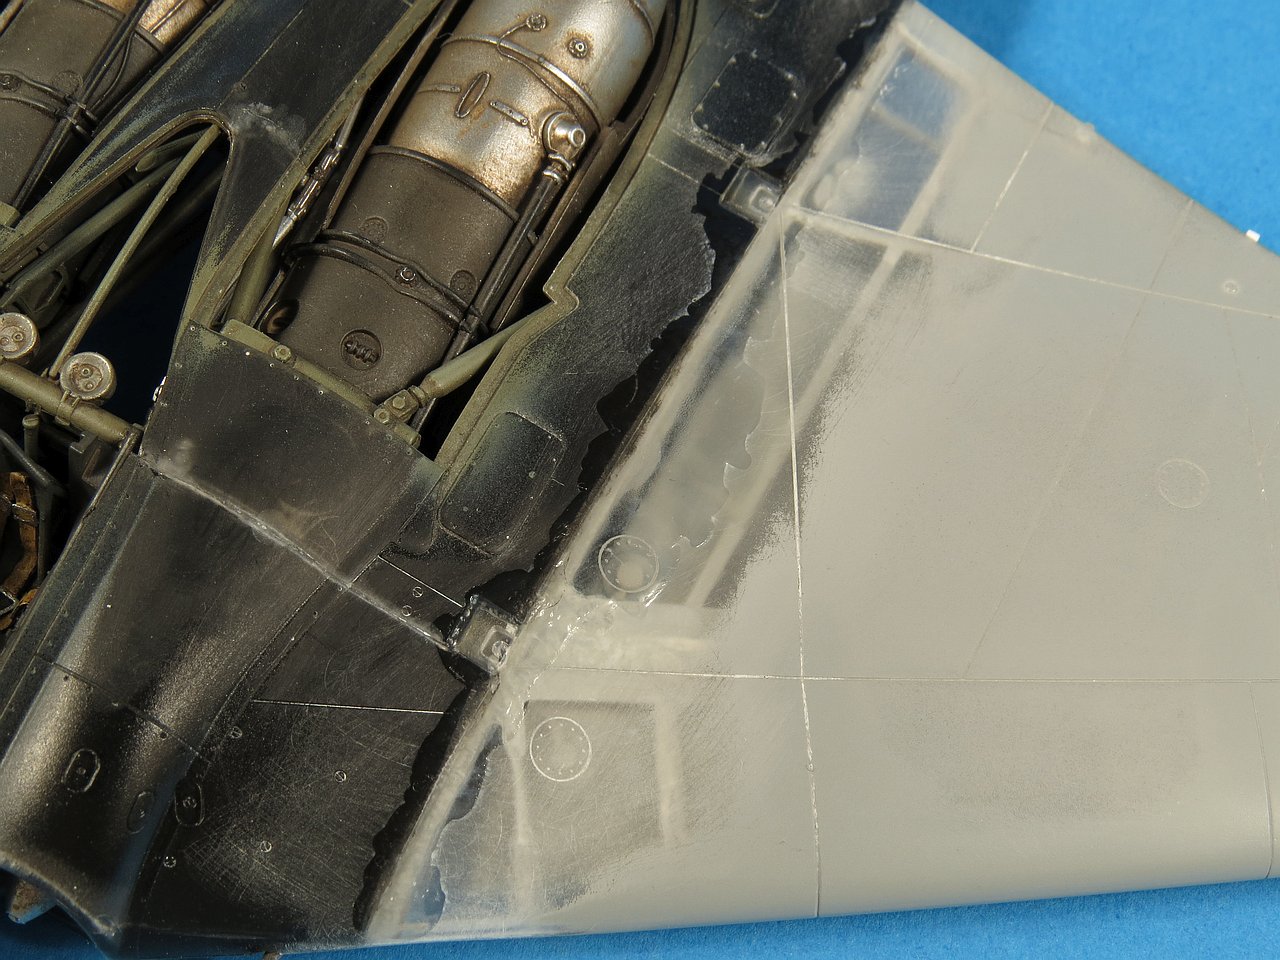
The skin of this model is provided by ZM in clear plastic, not my favourite thing let me tell you. Clear plastic is much harder and therefore more brittle and less forgiving than normal plastic. I had no intention of displaying my model with clear panels at all. With the bulk of the main framing now assembled I took the time to dry fit most of the outer skin panels. Without exception these all fitted like a glove.

The cockpit of the Ho-229 consisted only of tubular framing onto which the seat was attached. The cockpit of the Ho-229, unlike other aircraft, had no side consoles or floor boards. Switch and instrument detail in the cockpit is provided by ZM as decals.

Late war Luftwaffe cockpits were mostly finished in RLM66 Schwarz Grau [black grey]. Once again I used Gunze Mr Color paints with the switches and handles being picked out by hand with Vallejo acrylics. For hand painted metal parts I like to use the war gaming Citadel range as I find they look quite convincing when brush painted in small areas like the rudder pedals shown here.

As I was working on the cockpit I jumped ahead to step 34 and assembled the "ejection seat" now. Unlike its 1:32 cousin this kit does not get any belts provided.
The Ho-229 ejection seat is a simple affair (well it is when compared to modern day ejection seats). I was quite surprised that ZM did not provide any form of harness either in PE or moulded on. I quickly fashioned my own using lead sheet and some PE buckles.

ZM provides the main instrument panel in clear plastic, which seems to be a "thing" these days and I don't really understand why. Two decaling options are available, first up is a single piece decal containing all the instrument faces and the second option option is individual decals for each dial. Either works well enough in 1:48 in my opinion, I opted for the single piece decal which was liberally treated with softening solution (Micro Sol).

Here we see all the major parts of the cockpit. The canopy framing does not have its clear glass added yet.

The main landing gear was next on the build list and to make painting easier I decided to assemble each gear (minus the wheel) first.

To ensure perfect alignment with the mounting points on the fuselage I recommend you hold the parts in place with small pieces of tape and the glue them together using liquid glue. By gluing them together in this way you can avoid any fit issues later on when you go to mate them to the fuselage.

The oversized nose wheel of the Ho-229 helps give the aircraft its very distintive nose high stance. The wheel itself is massive when compared to more traditional nose wheels and is signicantly larger than even the two main wheels

Again using my philosophy of assemble as much as you can before painting I determined that the entire nose-wheel strut and guard could be assembled now even though the wheel needs to be sandwiched between the axle supports. You will normally find that by applying slight pressure to the plastic parts they can be widened enough to allow the wheel to be added and removed as needed. To make this a little easier you can trim some length (not too much) off the axle locating pins so that you don't need to spread them quite so far when adding the wheel later on after final painting

It was now time to focus a little on the outer skin of the Ho-229. On the real aircraft this was made from plywood and I have seen some interesting builds online where they have used wood-grain decals etc to reproduce this finish. That is not my plan and so the skin parts will need to be painted both outside and inside (remember they are all clear plastic).

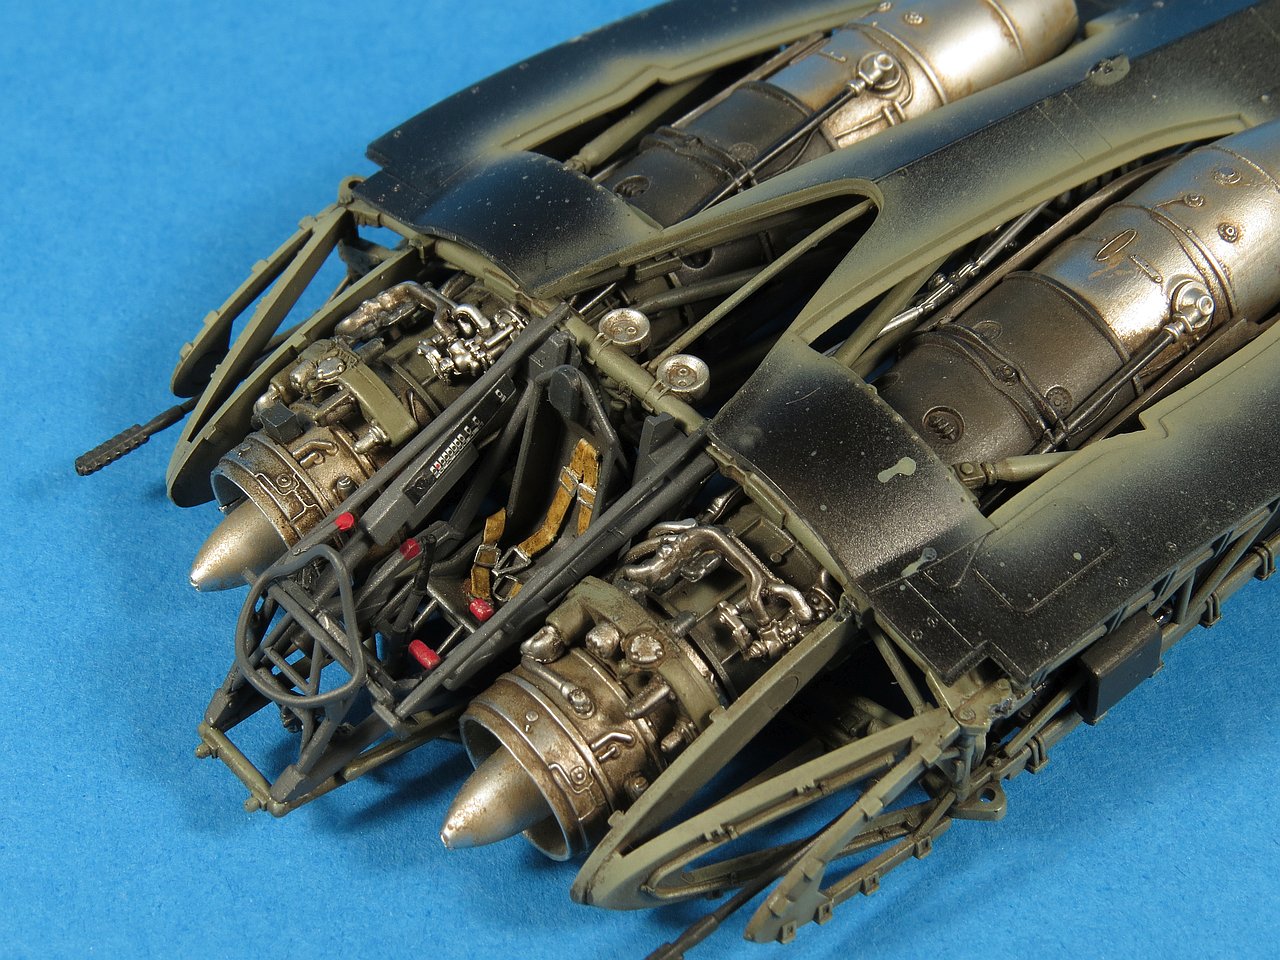
You can see here why providing all that interior tubing detail was not just ZM going overboard but its actually necessary as a great deal of the interior will be seen if you leave any of the outer panels off on your finished model. Each of the outer panels fits very well with no alignment issues being found during my dry fitting. As seen here I have already primed the framework with Alclads Black Primer paint.

A close in shot shows how the cockpit framework fits together. The ejection seast actually slides down on the rails and the the cockpit subassembly (as yet unpainted) interlocks with the main structure via small tabs making the resulting model sturdy with no warping or twisting evident when handling the model.

The top outer skin of the model in 1:48 is made up of a single piece with the engine covers (J1 & J11) being separately moulded to allow removal during display.

The interior of the aircraft was painted in RLM02. To give the paint some variation I once again undercoated with black (Alclad Primer) and them applied light coats of the Mr Color paint

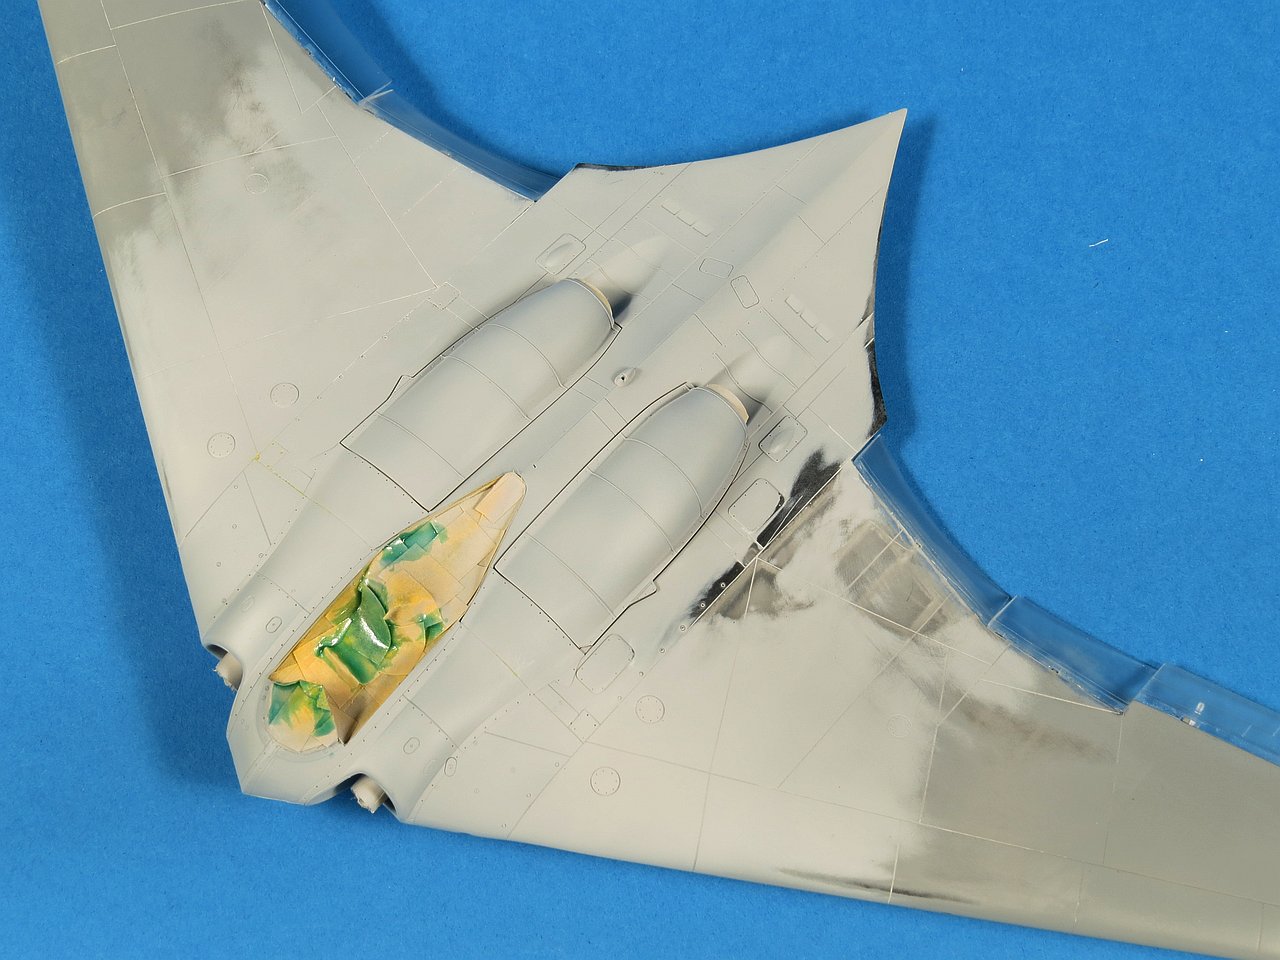
The Ho-229 wings are detachable from the center fuselage section by means of two locking bolts on the top and bottom. ZM have likewise engineered the models wings as independent sub assemblies, with their own accurate internal framing and fuel tanks.

Just like the fuselage the outer skin of the wings are clear plastic. As none of the internal framing in the wings would be visible once attached to the fuselage and the outside painted I did not feel compelled to paint them. The surface panel line detail on the wings was nice but I went over it anyway with my trusty Tamiya Scriber to ensure they would be sharp enough for the panel wash down the track.

Here we see one of the wings being dry test fitted with tape, something I would encourage all modelers to do more often. I have not yet added the trailing edge flaps and ailerons. I can report that no fit issues were found at all with the whole thing clicking together nicely.

ZM suggests that you add the outer skin to the wings after you join the internal framing to the fuselage. This did not seem like the best option to me and so I decided to assemble the wings separately (sand the joins etc) and then attach the them to the fuselage as a whole unit

A couple of good close up photos of the outer skin of the wing. I have lighted buffed the clear plastic which is why it does not look very clear here. I found the surface finish of the clear parts to be somewhat rough (by design I think). Lightly sanding the plastic will also help the paint to adhere.


All the assorted doors are once again provided in clear plastic. The Ho-229 used a drag chute to assist with braking on landing and ZM provide a detailed interior with optional open doors. Also note in this picture the deployed airbrakes positioned directly behind the main wheel wells.

I like to use tape to secure flat parts for painting. I paint one side, let it dry them flip them over to do the other side. Don't waste your expensive Tamiya Tape for this purpose instead obtain some cheaper painters tape from your local hardware shop.

At the time of writing I had not seen any figures released by ZM for this kit. I hope they will in the future much like they have done for most of their other models in the past. I dug into my stash of 1:48 figures and plan to use some Verlinden resin pilot and groundcrew figures along with the Tamiya Kettenkrad with driver.

With the bulk of the assembly complete it was time to load up the airbrush and start laying down paint. Here we see the Mr Color C60 RLM02 layered over a black undercoat. I have yet to apply a light wash to further accentuate the detail in the framework.


Alclad Grey Primer and Microfiller has been applied to the wings and then lightly sanded back with MicroMesh cloth. This has highlighted some blemishes present on one of the wings. Sink marks (left by the internal ribbing) need to be filled with putty and then sanded flush.

The primed wings are ready for mating to the center fuselage section. Note the empty bays for the spoilers on the wingtips.

The pair of Jumo 004 engines have now been painted and each section joined. All the piping and cabling shown here are provided by ZM in the box. If you look carefully you will notice that the lower engine has a oily wash applied. I like washes as they help to take away that (unrealistic) super new look of the parts and give more depth to the detail on the model. In this case I used one of the MiG Ammo pre-mixed enamel based washes

Its now time to start assembling the interior parts into the framework. First up is the cannons and ammunition storage.

The cannons have been painted basic black and then lightly rubbed with powder ground from a plain old HB lead pencil. This works remarkably well to represent the sheen of gun metal. Some of the control rods buried in the fuselage are painted natural metal and attached now.

Another view of the assembled cannons within the body of the aircraft. These need to be installed now before we add the engines which occupy the bulk of the interior space in the fuselage.

The completed engines assemblies have now been lightly wweathered using a mixture of washing and dry brush techniques. The heat shielding has been added to the lower half of the engine in preparation for mating with the framework.

I would suggest you ignore the assembly sequence here and assemble the heat shield halves (E16 + E13 and E12 + E17) together to allow painting as single units. You may be worried that once assembled the engine will not fit into the curved heat shield but I found that you could carefully spread the joined heat shield parts and slide the engines in with a minimum of fuss

The engines are now in place, held firmly with positive locking tabs on the framework. When gluing parts that have already been painted like these I tend to use CA (Super) Glue. If possible, try and remove some of the paint from the mating surfaces to give a stronger bond.

Next step is to attach the upper frame. There are several mating points so examine the instructions carefully before committing glue. I had no trouble at all with alignment which says a lot for the quality of engineering from ZM.

With the upper frame attached the model is starting to look very busy. I can understand now why ZM provides the outer skin of this model in clear plastic. I'm not into clear models but I can appreciate why someone would choose to build this model that way

The internal framework when viewed from the rear. Its true that not much of this specific detail will be seen on the finished model but remember that the Ho229 had no sidewalls in the cockpit or in the wheel wells. This means that a considerable amount of the interior can be seen on the model thru open panels (such as engine covers) and cockpit.

This view of the bottom shows the engine heat shields and lower detail of the guns. It occured to me that I could have spent more time fixing the seam on the heatshields when I saw this photo !! As luck would have it the lower panels cover most of this up so my laziness would not be so obvious.
It's now time to attach the cockpit framework assembly. Once again I deviated from the suggested assembly sequence and chose instead to build and paint the cockpit framing as a single unit.

Like most period Luftwaffe aircraft the Ho229 cockpit was finished in RLM66 Black Gray. For this I once again used Gunze Mr Color paint, specifically C116.
This phots provides a clear shot of the finished instrument panel and side switch consoles. For both these areas I used the kit provided decals. Under a light wash and some minimal dry brushing the cockpit looks weary but not overly worn.

This wider photo shows well how much of the internal framing will be visible thru the engine access panels. I did consider cutting some of the other panels away but to be honest got cold feet about the thought of working like this with clear plastic as it is much more brittle then normal plastic.

With the interior done it's time to attach the outer shell to the fuselage center section

Remember that the outer panels are all clear plastic on this kit. The panels here are black because I primed them on the inside with black and over that applied the interior RLM02 Gray Green. What you see here is the black primer thru the still clear plastic.

It's worth taking note just how much of the internal framing and engine detail is visible thru the wheel wells. If you thought you could build a Ho229 and get away without painting the interior, then think again.

To get a tight join between the upper panels I had to use a couple of clamps. This was the first time I could not achieve a perfect fit without some brute force.

Once the fuselage panels were set it was time to attach the wings. I had prevously assembled each wing, including its outer skin. I felt this would give me an easier time working on the wing seams than attach the out panels now as indicated by ZM

The wings and fuselage were secured with Tamiya Extra Thin liquid glue. The alignment of the join was easy to achieve thanks again to ZM engineering.

One thing that caught me by surprise was the small (but very noticeable) step that resulted on both left and right joins. The step was present on both top and bottom of the wing and I scratched my head for a while wondering what I had done wrong to end up here. Perhaps my earlier decision to attach the wing outer surface panels before joining to the fuselage had come back to bite me?

Regardless of why I ended up with the step on the wing join I now had to deal with it. I needed to use a filler that would be strong enough to be scribed (the panel line along the join had to be recreated at some point). For such situations I always turn to Super Glue as a filler. Here you can see the layers of super glue I have applied along the join to build up the depth to match the step.
Once the glue had cured (not hardened) I got stuck into it with 400 and 600 grade wet n dry paper. I knew that much of the recessed surface detail would be lost along the way but there was no alternative. Surface detail can always be added back later.

After several filling and sanding sessions the step on the wing join was dealt with. Panel lines were rescribed, rivets re-added and openings such as cockpits, engine intakes and exhausts were masked ready for painting.

The main wheel wells were masked with damp paper towel, which is a cheap and fast masking material for deep openings like these. One tip for easily removing the paper masks after painting is to re-dampen them. This softens the paper and makes it once again soft and flexible, allowing it to be gently pulled out.

To double check all my seam work it was time to apply some primer. As a rule I use either Tamiya Grey Primer or Alclad Primer. This photo is unusual as it shows both of these primers in use. Tamiya (the lighter grey) on the center fuselage with the darker Alclad grey on the outer wings
As a reminder the main reason we prime is to find surface work that needs more attention. In this case I found a couple of places which further filling and sanding. It's a cycle that sometimes needs to be repeated two or three times to get the desired result. By the way, the engine covers are being temporarily held in place for painting with a blob of Blu Tack.

More repairs on the underside. For the most part, the seam work I had undertaken on the troublesome wing join came up well under some paint

With all the hard core sanding done it was ok now to attach the delicate control surfaces. I chose to drop the flaps as I prefer the way this looked on the model

ZM have a done a good job a reproducing all the hinge detail for the control surfaces. Liquid glue was used to obtain a firm join here

With the flaps and ailerons dry it was time for a final overall coat of primer. The Tamiya Grey Primer (which I decant from the aerosol can) gives a beautiful smooth finish right out of the brush. I thin it pretty heavily with Tamiya's own lacquer thinners (87077).

Always take the time to have a very closeup look to make sure that there are no nasty surprises waiting for you. Now is the time to fix any issues. Don't be tempted to rush onto final painting before fixing all your problems

One thing to remember when using paper towel as a masking medium. When the paper drys out it shrinks. Notice here how the paper has pulled back from the edge of the wheel well. Before you start to paint just lightly dampen the paper again causing it to swell and close up those gaps.

For those of you building this kit I thought you like to see the alignments of the dropped flaps I used. Wherever possible I like to avoid having everything on a model aircraft perfectly all lined up. WWII aircraft in particular were mass produced and tolerances were fairly wide resulting in less than perfect fitting panels etc in lots of cases. Making your model not so "completely perfect" actually make it look more realistic in my opinion.

It was finally time to bite the bullet and decide on a paint scheme. I did some searches on the internet and just about every other ZM Horten had been built in the standard RLM 81, 82, 76 scheme. This is sensible as it matches what most Me 262 and other fighters of this period were being painted with. In this respect I wanted to do something a little different but still credible in its realism.
Luftwaffe fighter aircraft produced in the closing weeks of 1944 were usually camouflaged in schemes specified by the November 1941 issue of the Luftwaffen Dienstvorschrift (L.Dv.) 521/1. These were combinations of RLM 74 Graugrun (Grey-Green), RLM 75 Grauviolett (Grey-Violet) and RLM 76 Lichtblau (Light Blue). The two shades of grey provided segmented camouflage for the wings, tailplanes and fuselage decking, whilst the light blue RLM 76 covered the undersurfaces, as well as the fuselage and tailfin sides. went for a two grey splinter scheme based on RLM 74 Gray Green and RLM 75 Gray Violet. This painting scheme can be found on Messerschmitt Bf 109 Gs, Focke-Wulf Fw 190 As and early Ds, as well as on Messerschmitt Me 262s and Me 163s of early production runs. [source: kagero.pl]
Armed with this information my mind was made up.

As is usual I start painting with the underside color. As this was a light color, using a drak primer such as German Grey or in this case Semi-Gloss Black is called for. For the RLM 76 Light Blue I once again turned to Gunze Mr Color using C117 with their Leveling Thinners. These days I am working at including a weathered appearance in even early painting steps and so here I have thinned the paint more heavily than you would to achieve a solid consistent coat. In fact my aim here is to not achieve a consistent uniform coat of paint, in fact quite the opposite. I'm actually finding myself more and more striving to avoid uniformity in each facet of my modeling as it's something that rarely occurs in the real world.

For this paint work I use my trusty Iwata Revolution brush with a 0.5mm needle. Keep the airbrush moving in random small patterns trying to avoid a solid buildup of paint in any one place. Remember, you can always come back and add more paint, its not so easy to remove too much paint. This photo shows my first pass and yes, the wings looks too patchy to me as well.

After your first pass, let the paint dry for a little while (10 mins) as this will allow it to darken and give you a better idea of what the final result will be. This photo is taken after I had gone back over the surface a second time and then a third time with a lighter shade of RLM76 so I could get a surface that had darker and lighter variances. The idea is to keep each individual stage subtle and hopefully if it all works it all adds up in the end.

When looking thru various color profiles of Ho229's I noticed that the older Dragon kit painting schemes show a wavy wrap under demarcation between the upper and lower surfaces. Thinking that looked like a good idea I put it into action with some blu tack

Unless there is a compelling reason otherwise I tend to lay down the colours from lightest to darkest (darker paints cover better being the logic here). Notice that I have not primed the upper surfaces in black like I did the lower RLM76. Using a dark primer under darker colors like RLM 74 and 75 is more likely to result in them appearing too dark and an easy way to avoid that is to just use the existing light grey primer.
Here I have already laid down the Mr Color C37 RLM75 Gray-Violet and masked the hard edged splinter camo scheme with Tamiya tape. Don't worry too much about there being a little extra here as we need a bit of wiggle room for the masking.

Mr Color C36 RLM74 Gray Green is laid on now and I have tried to again vary the finish of the paint using darker and lighter shades to avoid a uniform finish. I still have much to learn about using my airbrush and how to coax it to do what I want (not what it wants). One thing I know is that practice makes perfect, so practice I will.

With the masking removed its time to assess the result. To me the effect on the green is too much and on the violet not enough. It's also worth noting that I use flash for lighting my photos and this has a tendency to enhance the contrast between shades on the model surface as it has certainly done here with the gray-green. To the naked eye the greens did not look anywhere near this stark.

Viewed from another angle. Overall I'm happy enough with the result. I'm expecting that the flat coat yet to come will help tone everything down like it always seems to do

A progress shot of the undersides. The leading edge demarcation worked well with the Blu Tack and adds an additional visual feature to the model.

With the main painting complete its time to deal with the small details. As the jet engines sat so far forward the Horten engineers had to come up with a method to deal with the hot exhaust gases as they passed over the wooden surface. The obvious solution was to use metal in these areas rather than wood. Here I have masked up the areas prior to painting with Alclad Aluminium. Note the small lumps of Blu Tack still present on the engines which I used to hold the covers on while painting

Once the masking is removed we can see how well the Alclad metaliser paints cover, even on darker base colours. Work slowly with any metaliser building it up single lots of thin passes. The grainy finish which is now quite noticeable on the Alclad sections is nothing to do with the paint but the underlying finish of the plastic itself

Pretty much all of the camouflage and markings on the Ho229 are speculative as none even entered service with the Luftwaffe. This gives us a bit of poetic license and here I have imagined that the squadron flying the Horten used a red band for identification. I've simply masked off a band around the tail, both and bottom and painted it with Tamiya XF7 Flat Red

A few things have progressed in this photo. Firstly you can see I applied some chipping to the red identification band to simulate wear from the heat of the exhaust. Secondly I have gloss coated the whole model with several light coats of Future and lastly I applied the decals to the model. The walkway decal you see to the left of the engine cover was provided as a single piece. I learnt a long time ago not to push your luck too far with decals and before dipping this one in water I cut it in half which made two smaller decals that were far easier to work with and position in place. The swastikas are provided in ZM in the box as two part decals for you to assemble yourself.

ZM provide a complete set of identification numbers in various colors for you to choose from. I picked red to match the tail band and the number 14 randomly. I often get asked how much gloss I apply before decaling? As you can see here the model is not super high gloss and this is the result of probably around 3-4 light coats of thinned Future (I thin roughly 1:1 with Tamiya Acrylic thinners, in case you were wondering)

With the decals applied and sealed under a second coat of Future I was ready to apply the panel line wash. Ever since I have started using the MiG Ammo pre-mixed washes I have become quite a fan. In this case I used one of the Dark Brown washes for the upper surfaces and a Dark Gray for the RLM76 under surfaces.

You don't need to be too tidy when it comes to panel washes. I find that leaving the MiG Ammo enamel washes for about 30 mins and then cleaning up with a dry tissue or paper towel works well. If you leave these washes overnight to dry then you may need to use some thinners to properly remove the excess.

After cleanup of the panel wash any model with accurate scale recessed panel and rivet detail (ie not too deep or too wide etc) really starts to come to life. Our scale models are 3D representations and properly shaded panel detail is just one way we can visually enhance the model and make it look closer to the real thing in my opinion.

It was now time to start adding all the "sticking out bits". Here we see the tricycle undercarriage parts prior to any any weathering. Washes were applied to enhance the detail and chipping was added using a sponge

A good view of the finished nose wheel undercarriage assembly once secured to the model. The lettering on the tyres has been very lightly drybrushed

The now completed model with the doors, airbrakes (spoilers) and undercarriage parts having been attached. I chose to leave the model surface mostly unweathered. Going too hard with weathering on every model you build starts to look a bit overdone and I feel that with the mottled paintwork and washes the effect is about right for what I was aiming for. Its very much a matter of personal taste.

Before removing the masking I applied a final coat of Flat Clear to bring the paint finish back to a realistic sheen. I have a good supply of the now discontinued Polly Scale Flat Clear (acrylic) and its by far my favourite flat finish product.

As a final touch I added some exhaust streaking over the metal sections on the tail. Several very light coats of Tamiya Red Brown and Tire Black hopefully give the right effect. Note how the flat clear finish has now toned down the patchiness applied earlier to the camouflage colors.

The finished model displayed on a simple round base. I'm happy with my choice of camouflage and markings. I don't think I mentioned it earlier but the kit decals performed very well, responding nicely to Micro Set and Sol and snuggling down nicely into panel lines and around raised details.

CONCLUSION - Zoukei-mura 1:48 Horten Ho-229 (SWS03)
This small brother to ZM's initial 1/32 release of the Ho299 is every bit as good. There does not seem to be too much they have omitted in the scaling down process which is pretty impressive when you consider how much detail they pack in. As I mentioned during the build I am not a big fan of the use of clear plastic parts instead of normal grey styrene. The clear outer skin parts of the model were by far the hardest to work with and I'll be thinking twice in the future before building another "see thru" kit.