Curtiss Mk.IIB Tomahawk (P-40C)
BRONCO (FB-4007)
1:48
Started: Apr 2017
Finished: Jun 2017
Link to Gallery

The Curtiss P-40 Warhawk is an American single-engined, single-seat, all-metal fighter and ground-attack aircraft that first flew in 1938. The Warhawk was used by most Allied powers during World War II, and remained in frontline service until the end of the war. It was the third most-produced American fighter, after the P-51 and P-47; by November 1944, when production of the P-40 ceased, 13,738 had been built, all at Curtiss-Wright Corporation's main production facilities at Buffalo, New York.
P-40 Warhawk was the name the United States Army Air Corps and after June 1941, USAAF-adopted name for all models, making it the official name in the U.S. for all P-40s. The British Commonwealth and Soviet air forces used the name Tomahawk for models equivalent to the P-40B and P-40C, and the name Kittyhawk for models equivalent to the P-40D and all later variants. P-40s first saw combat with the British Commonwealth squadrons of the Desert Air Force in the Middle East and North African campaigns, during June 1941. No. 112 Squadron Royal Air Force, was among the first to operate Tomahawks in North Africa and the unit was the first Allied military aviation unit to feature the "shark mouth" logo, copying similar markings on some Luftwaffe Messerschmitt Bf 110 twin-engine fighters [source: wikipedia]

The P-40 tolerated harsh conditions and a variety of climates. Its semi-modular design was easy to maintain in the field. It lacked innovations such as boosted ailerons or automatic leading edge slats, but its strong structure included a five-spar wing, which enabled P-40s to pull high-G turns and survive some midair collisions. Intentional ramming attacks against enemy aircraft were occasionally recorded as victories by the Desert Air Force and Soviet Air Forces. Clive Caldwell said P-40s "would take a tremendous amount of punishment, violent aerobatics as well as enemy action." Operational range was good by early war standards and was almost double that of the Supermarine Spitfire or Messerschmitt Bf 109, although inferior to the Mitsubishi A6M Zero, Nakajima Ki-43 and Lockheed P-38 Lightning.
Caldwell found the P-40C Tomahawk's armament of two .50 in (12.7 mm) Browning AN/M2 "light-barrel" dorsal nose-mount synchronized machine guns and two .303 Browning machine guns in each wing to be inadequate. This was improved with the P-40D (Kittyhawk I) which abandoned the synchronized gun mounts and instead had two .50 in (12.7 mm) guns in each wing, although Caldwell still preferred the earlier Tomahawk in other respects. [source: wikipedia]

KIT OVERVIEW - Bronco 1:48 Mk.IIA Tomahawk (FB-4007)
I went into this build without any real expectations either way. I had never built a Bronco kit before and as they focus mainly on armour I've had no real reason to keep abreast of their work. The first decent review I saw of this new tooled early model P-40 was by Bruce David on The Modelling News. Bruce found a number of shortcomings with the kit (most of which had been repeated in this boxing) and so I decided early on to make this one a 'pole sitter' mainly so I did not have to deal with the really obvious cockpit depth issue. I figured having a pilot in there would hide this problem.
The thing that appealed to me about this kit was the opportunity to do an RAF desert aircraft from North Africa. I love the colours of the desert campaign and as a rule the harsh conditions led to extreme weathering of the paint and airframe. I was also inspired by the box art (I intend to eventually build an Eduard Bf 109E-7 to go with this guy) and the opportunity to build an Australian Aces (Clive Caldwell) mount also appealed.

Of course things never (well almost never) work out the way you planned in this hobby and I ended up ditching the kit decals (they are a shocker but more on that later) as I preferred to build an aircraft with the distinctive sharkmouth applied (Caldwell had no shark-mouth on his Tomahawk). One little bonus that Bronco includes with this boxing is a very nice resin figure of a pilot in typical desert uniform.

A couple of firsts for me on this build were the use of the Mr Paint range of acrylic laquers (very impressed with these) and the use of oil dot filtering on the paint fading and weathering (I was happy with the outcome here but can improve next time). I'm also finding myself using a lot more of the AK Interactive or MiG Ammo washes and filters these days.
I suspect that this kit will be (unfairly) overlooked by a lot of modellers in favour of the new Airfix kit. Having now obtained my own Airfix P-40B I can say that I much prefer the extra surface detail (fully riveted) provided on the Bronco kit. There is no arguing that Bronco stuffed up a few fundamental things on this kit. As has been widely noted the cockpit floor is WAY too shallow, the fabric control surface were way overdone, the shape and thickness of the propellers are off and the decals are mostly unusable. I addressed each of these issues (plus some other smaller glitches) in various ways as you will see in the build.

BUILD - Bronco 1:48 Mk.IIA Tomahawk (FB-4007)
The Bronco kit is broken down in a pretty standard way. Initially I intended to display the model in a landing configuration with flaps and gear extended. This idea ended up being discarded somewhere along the way, probably when I changed track towards a dogfight double. Anyway with this in mind I started work on the kit supplied split landing flaps. Detail was pretty good for 1:48 and all I needed to tend to is the myriad of ejection pin marks.
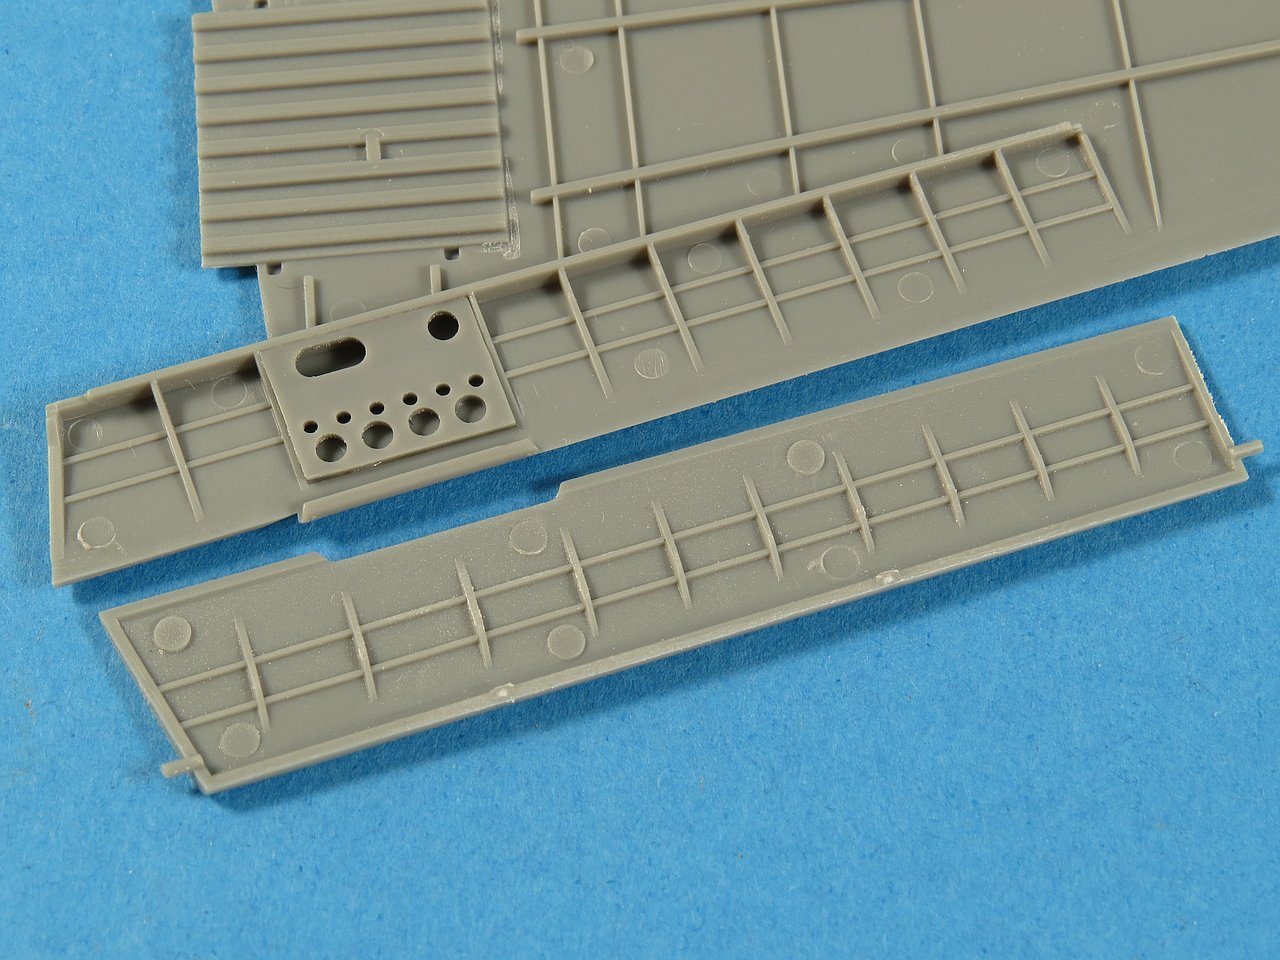
To properly mount the interior flap detail I needed to also assemble the main wheel wells as these held the upper wing at the correct height. The fit of the parts making up each wheel well was spot on with only a dab of liquid glue needed.

This photo shows nicely the way the wheel well holds the upper wing (and the top of the flap enclosure) suspended. The large visible gap at the rear of the wing in front of the flap is meant to be filled by the lower (moving) portion of the flap itself. You can see I have cleaned up (with a sharp blade) all the easy to get to ejection pin marks.

With everthing in place to my satisfaction it was time for some paint. Mr Color C351 FS34151 Zinc-Chromate Type I was applied over a black primer. I've glued the wing guns (4 x 0.30 cal) into the wing and then cut off the barrels to be inserted and glued back at the end of the build

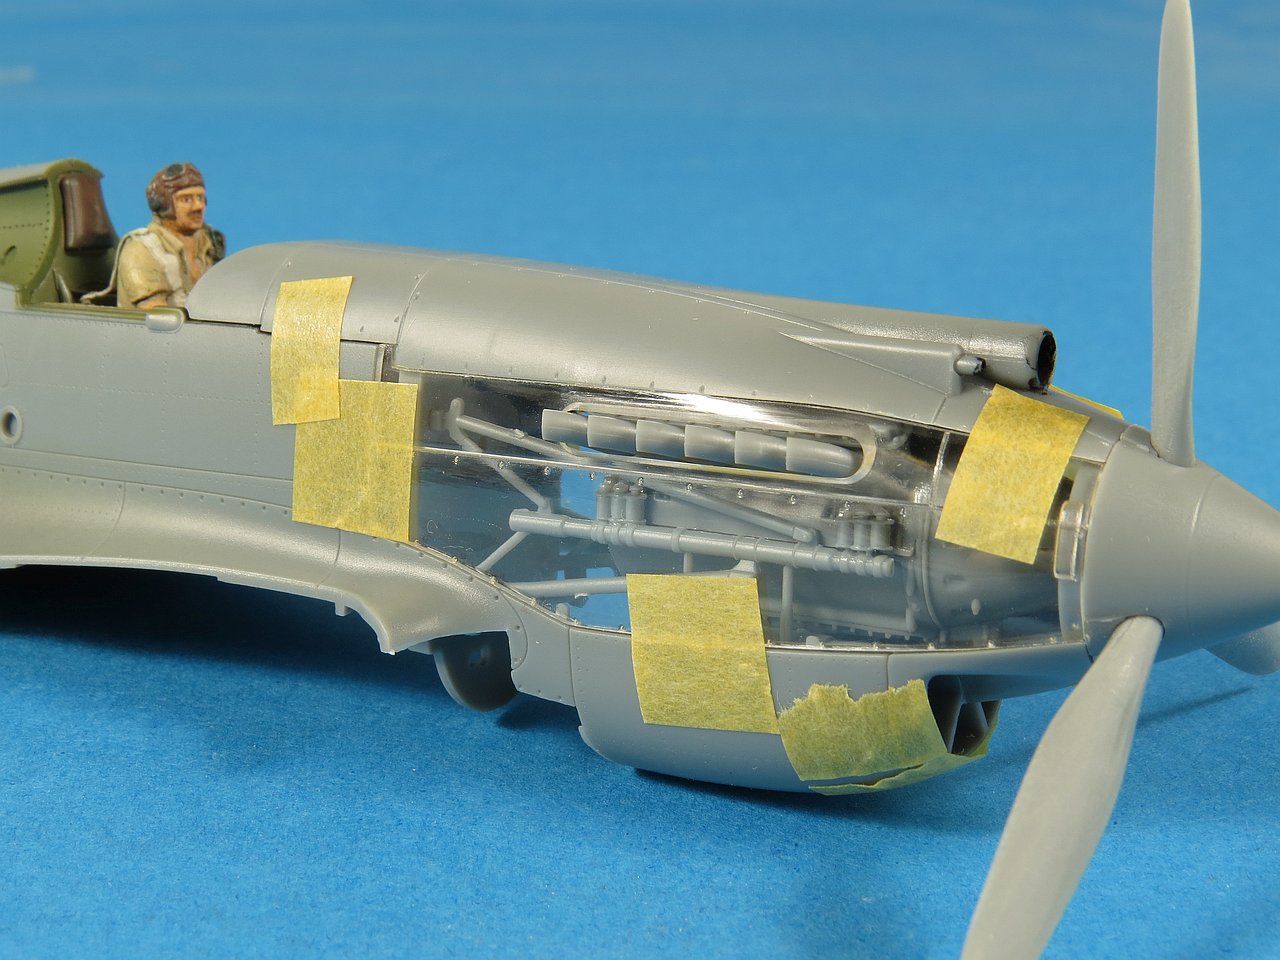
I was aware of the fundamental flaw with the kit cockpit going into this build and one of the reasons I wanted to have it in flight was to allow me to use a pilot figure to mainly hide the problem. The figure is from an ICM P-51, which is a nice plastic pilot, who unfortunately was dressed for European weather and needed some adjustment work to suit a desert deployment. I used a knife blade to trim his arms down to look like a short sleeved shirt and had to chop off the bottom of his legs due to the super shallow cockpit floor provided by Bronco.

A quick test fit confirmed that everything lined up and that it was next to impossible to even tell the pilot was 'legless'. So far so good, my plan was working.

With the cockpit more or less sorted, I assembled the main parts of the kit engine, just enough to have something for the exhaust stubs and spinner to attach to. If clear panels are your thing you can see here how Bronco have handled the side engine covers. The fit of the engine cowlings was very good all around. Its worth mentioning that the kit propellers were pretty thick and off shape wise. I initially planned to obtain some Ultracast resin replacements but after some simple sanding and trimming was able to get the kit blades looking good.
Assembly moved along quickly now and a coat of Tamiya Grey Primer was used to check for blemishes. I had wanted to try out the new Mr Paint range for some time now and decided to bite the bullet on this model. Mr Paint provided the three primary colors I would need for this RAF desert scheme. Middle Stone, Dark Earth and Azure Blue.

Are you enjoying and finding value in this content? If so, please consider supporting my work by Buying Me A Coffee. Your support ensures that I can continue to provide high-quality, accessible content now and in the future, keeping this space free from distractions and focused entirely on the hobby we all love. Every little bit helps, and I truly appreciate your generosity!

The kit does come with recessed panel line and rivet detail but I knew that the supplied rivets were far too shallow to ever hold a wash and so I undertook the time consuming task of re-riveting the whole model. This I did using a needle tool and sharpening/deepening each rivet. In places the kit detail was non existent and here I switched to an RB Production rivet wheel. Under a coat primer the extra riveting work can be better appreciated.

Tamiya tape was used to mask up the open cockpit, pilot figure and windshield. Notice the photo-etch 'ring and bead' gunsight provided in the kit by Bronco.

To give the Mr Paint a dark primer to build onto I now sprayed the whole model with Tamiya X-18 Semi-Gloss Black. I have taken to thinning all my Tamiya acrylics lately with their own Lacquer Thinners (87077) as it results in the paint drying harder and much faster.

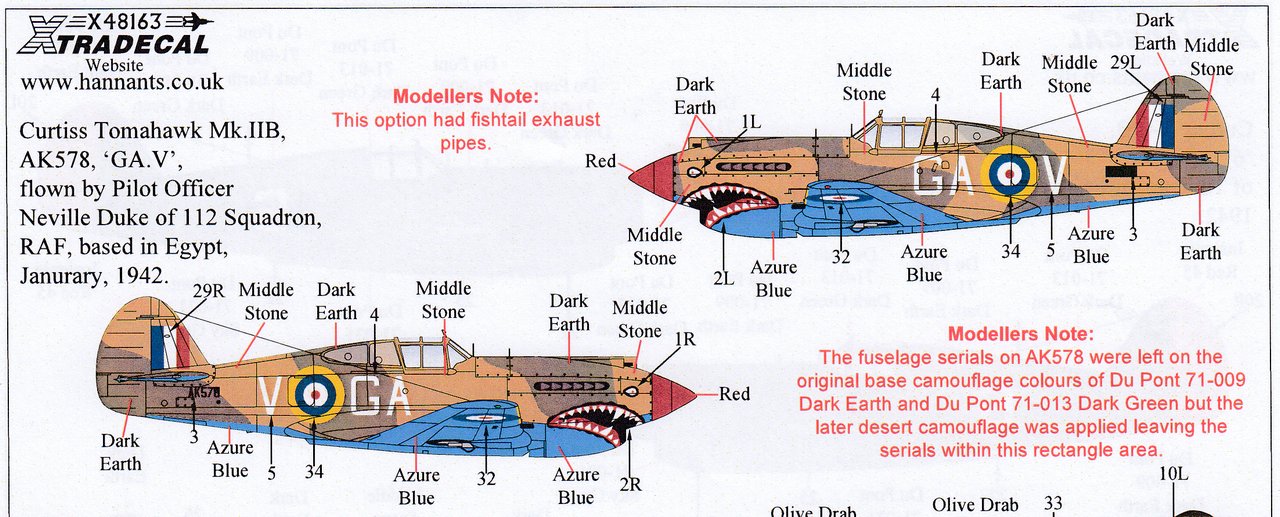
Before I started painting I needed to decide on a scheme. I had previously been suspicious of the accuracy of the Bronco decals in particular the colors and shape and so I ordered the XtraDecal (X48163) Early P-40's Part 2 sheet from Hannants. When it arrived I did a side by side comparison to the Bronco sheet and the difference was quite obvious. The Bronco decals were consigned to the bottom drawer and I settled on one of the 112 Sqn aircraft (with Sharkmouth).

Looking more closely at my chosen scheme I noted two things that would need addressing:
- This aircraft (AK578) had 'fishtail' exhausts fitted however the Bronco (and Airfix I believe) kit have only the tubular exhausts. To solve this is used a set of Quickboost (QB48683) resin exhausts from my A-36 Apache kit. I figured they were both Allison engines so would be close. The QB set fitted perfectly to the Bronco kit. The biggest challenge was removing the kit exhaust stubs from the now assembled and primed fuselage. This was done with pure brute force (yep I used some pliers !!)
- The location of the roundel and codes on the rear fuselage was too far forward. It looks to me like XtraDecal have postioned the codes/roundel in the location used on later aircraft that included a tail band. These earlier aircraft had no tail bands and so the codes/roundels were placed further back, closer to the tail.

My first outing with Mr Paint was the Azure Blue on the undersides. This paint is designed to be used by airbush only (pre-thinned) and comes in a tall glass bottle (complete with ball bearing) reminiscent of Alclad II. I applied several mottled coats as the paint flows very thinly from the brush so you need a few passes to build up a solid colour. The finish is a little semi-gloss but not glossy enough to be able to decal straight over it. The finish, once dry (which is very quick being a lacquer) is exceptionally smooth. To accentuate the patchy look I was after I mixed up some white with the Azure Blue and randomly applied it over the surface. Lesson learned here is that you can mix and blend Mr Paint with no problems.

The Azure Blue demarcation was then masked with Tamiya tape and the first of the upper colours, Middle Stone applied freehand to roughly approximate the pattern. When dry Blu-Tack was rolled into thin snakes and applied onto the Middle Stone to form the demarcation line. I use this technique a lot as it gives me complete control and results in a sharp, but not crisp, demarcation.
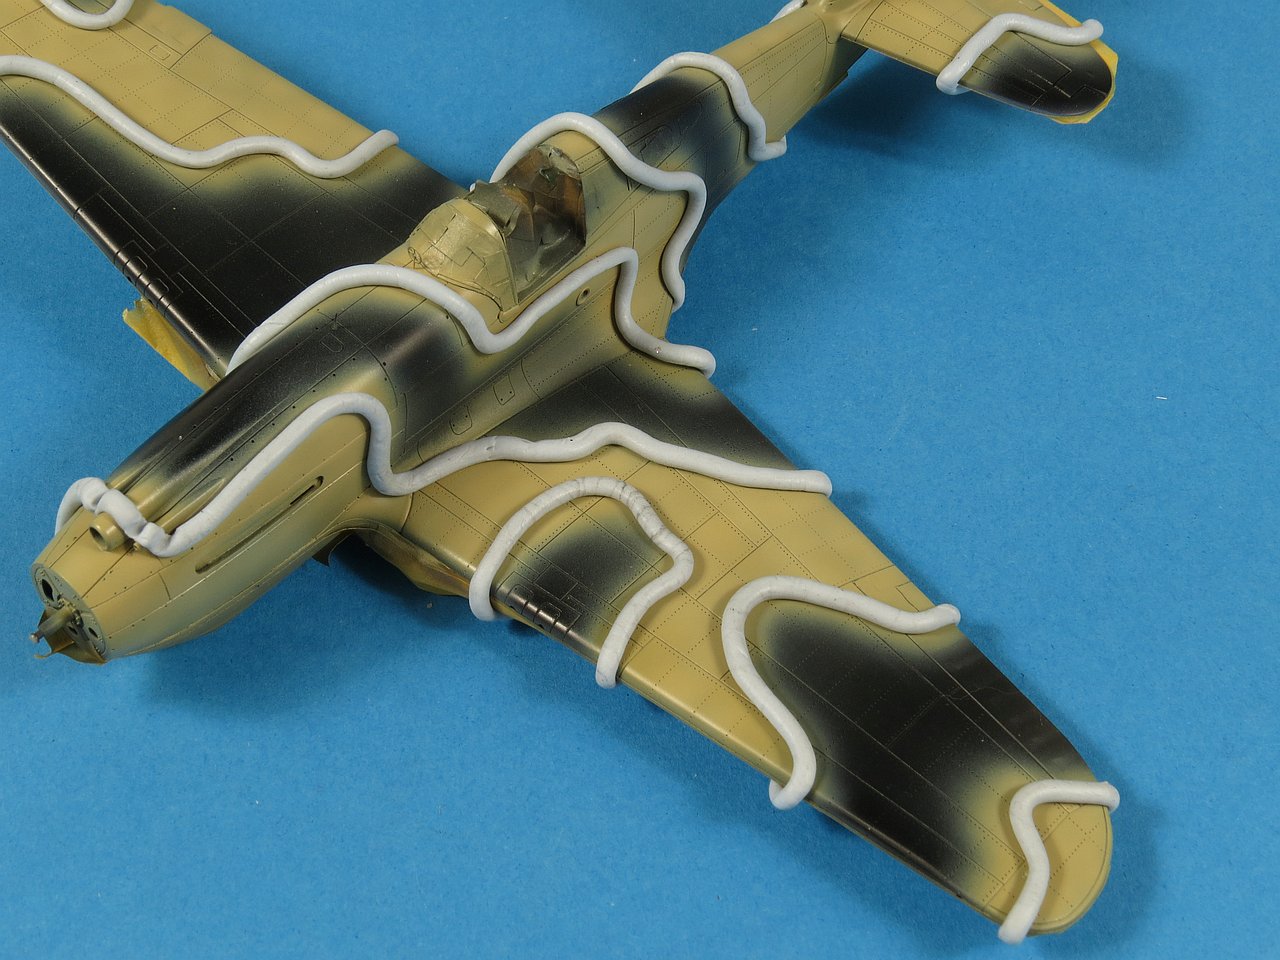
The interior behind the Blu-Tack is now filled with normal tape to protect from overspray. I tend to use cheaper 3M low tack painters tape rather than the more expensive Tamiya tape. All up this masking task (Blu-Tack and tape) took me about 45mins.

The final camo colur, Dark Earth, is now applied and once again I mixed some white to give me some variation in the coverage. Incidentally, I use an Iwata Revolution 0.5mm needle for all my airbrushing these days.

Once dry the Blu-Tack and tape come away easily and our model starts to take shape. It takes a bit of practice to get clean demarcatons like this with the Blu-Tack method first time around but its a technique I think you can get predictable consistent results with once mastered, regardless of what airbrush or skill level with it you happen to have.

At this point you can see the result of the extra work I did with the rivets. The black primer is almost enough to show the rivet detail through the top coats, it helps that Mr Paint coats are so fine yet provide excellent coverage.


Are you enjoying and finding value in this content? If so, please consider supporting my work by Buying Me A Coffee. Your support ensures that I can continue to provide high-quality, accessible content now and in the future, keeping this space free from distractions and focused entirely on the hobby we all love. Every little bit helps, and I truly appreciate your generosity!
With the main painting complete next up is a gloss clear coat. Contrary to popular opinion I still find Future floor polish to be my preferred acrylic gloss coat. I have noticed many modellers switching away from Future to using Tamiya X-22 Gloss Clear thinned with Mr Color Levelling Thinners. The Xtradecal sheet is actually printed by MicroScale in the US and I have historically always had good results with their decals (TwoBobs being a good example).
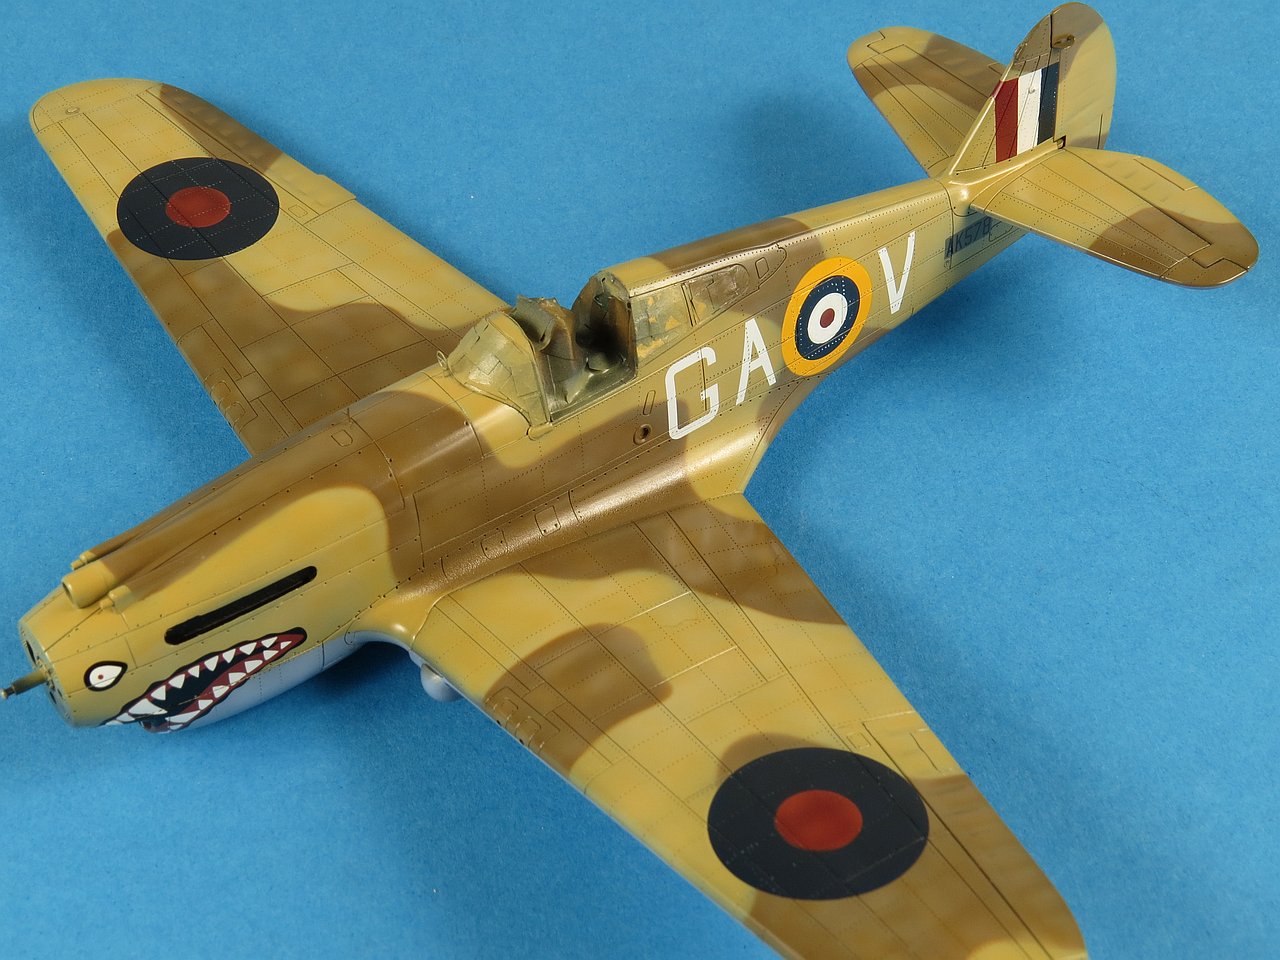
For the most part the MicroScale decals performed as expected when applied with MicroScale's own Set and Sol solutions. I did however find they did not want to settle down into the rivets and panel lines as well as previous sheets I had used. No matter, I find that you can use a sharpened toothpick and sharp blade to get the decal to conform to just about any surface detail. All the same I did take the easier option with the fin flash and masked/painted it on rather than try and get the decal to settle down over that navigation light fitting. Notice that for many of these RAF aircraft the serial number (AK578) was masked over and the desert paint scheme applied over top. To simulate this I sprayed a small rectangle of Dark Green over which I applied the decal. It's also worth mentioning that there was a lot of clear carrier film between the G and A fuselage codes that I cut away before applying those letters. I generally make a point of removing as much clear film from decals as possible.
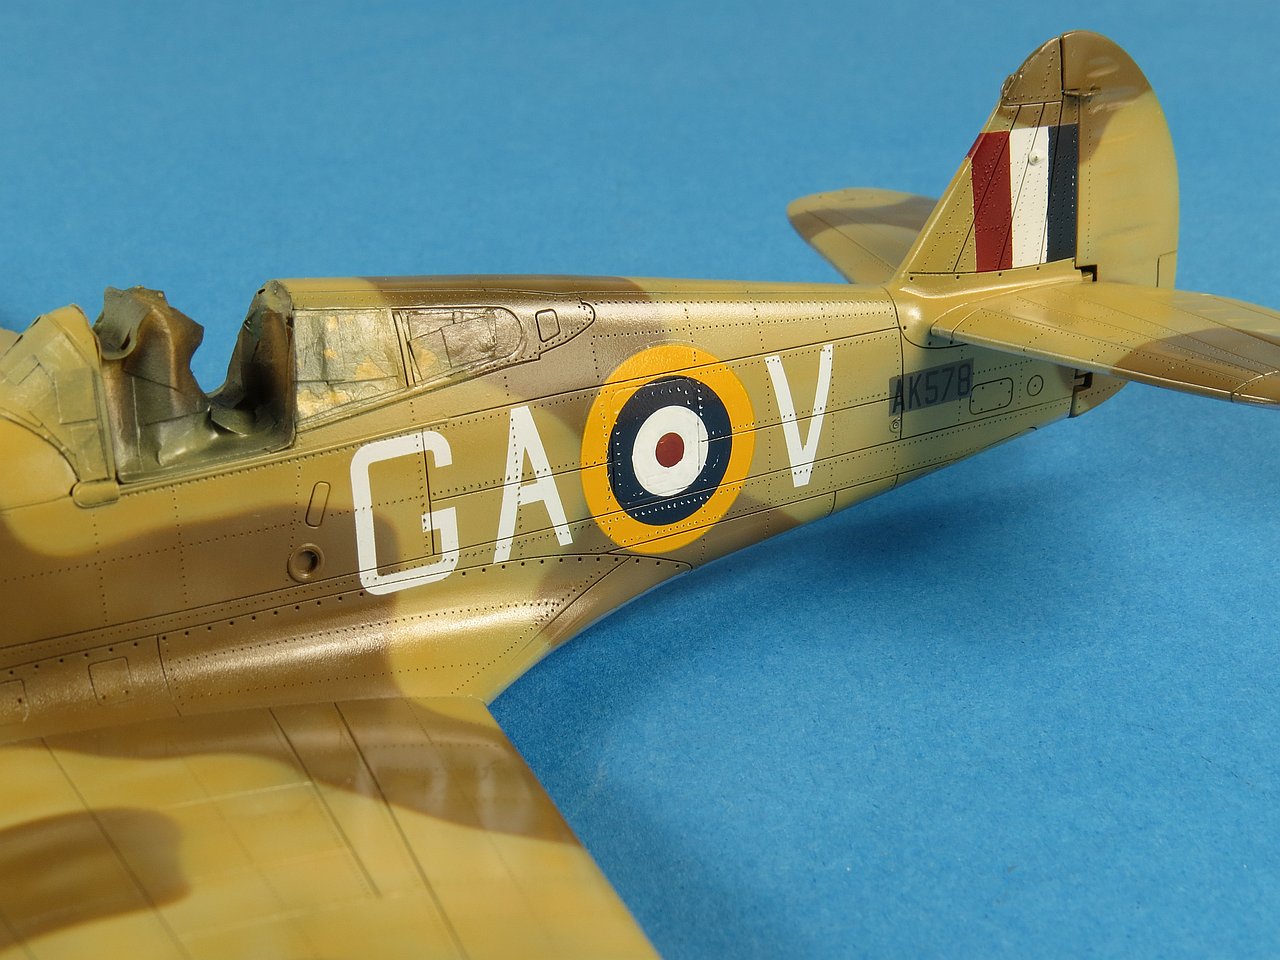
The sharkmouth two piece decal proved to be a bit of a challenge as the two halves did not meet in the middle when applied. I can only assume this is because the sheet has been sized for the Airfix kit and the Bronco kit is wider in the nose, by about 5mm it would seem. Normally I dread any hand painting but there really was no other option to fix this. In the end I was pretty happy with the result and think its a passable result.

With the decals dry and sealed under a second thin coat of Future it was time for things to get dirty. I have been using the MiG Ammo pre-mixed Panel Line Washes quite a bit recently and so I continued that trend on this build. I liberally applied a 'Deep Grey' #1602 wash to the entire airframe and was intentionally sloppy with were the wash went. These aircraft operated in very harsh conditions in the North African desert and I wanted to try a re-create something of this look. Of course this is meant to be a wash (not a filter) and so most of the excess will be removed.

The undersides received the same 'Deep Grey' wash as the top. Spot oil staining and deeper washes would be applied next around the engine cowl flaps area.

I find that the MiG enamel washes dry off fairly quickly and can be cleaned within an hour. Use a dry cloth or cotton bud to remove the excess. Unlike other washes you do not need to wet the cloth with thinners to remove the excess wash. I used a darker color, 'Deep Brown' #1618 on top of the Dark Earth camo color to provide some variety and contrast.

The trick i find with any kind of rivet or panel line wash is to not over do it. The often made mistake is to pick a color that is too dark and ends up making the surface detail too stark, unrealistically so. To my eye, at this point in the build the rivets on the wing are too noticeable, they are distracting, but I know that as I apply more weathering, filters and such over top that will tone it down. There are no formulas in modelling, sometimes you need to feel your way through a build and weathering is very much one of those areas where this applies.

Much like the top of the wing, the wash detail here is probably a bit over-powering right now but remember we are looking at an interim step, not the end result. Always keep the end in mind.

What's the best way to simulate paint chips on a model? You make your paint chip off like the real thing I would say. Based on the popular 'hairspray technique' the folks at AK Interactive have come up with a product that allows you to do just that. Simply apply a layer of their 'Worn Effects' fluid between the silver bottom layer and your red top coat, add water and you have instant chippable paint. A bit of practice is needed to get this to work the way you want (and not totally randomly) but you can't argue with the result. Using silver pencils or silver paint over top of the red just never looks as convincing as real chips to my eye.

One thing I was keen to try and re-produce was the chalky, faded look of the paint on these desert birds. One technique I had never used before was 'dot filtering' with oil paints. I read a bunch of 'how-tos' and watch plenty of YouTube videos and decided to give it a go. The process itself was easy enough and I already had a few suitable oil shades so on went the dots.

The oil dots were blended in with a small brush dipped in white spirit and slowly but surely I was able to get a feel as to how the technique worked. I probably could have gone harder with the effect but I decided on 'less is more' once I could see a visible change to the paint.

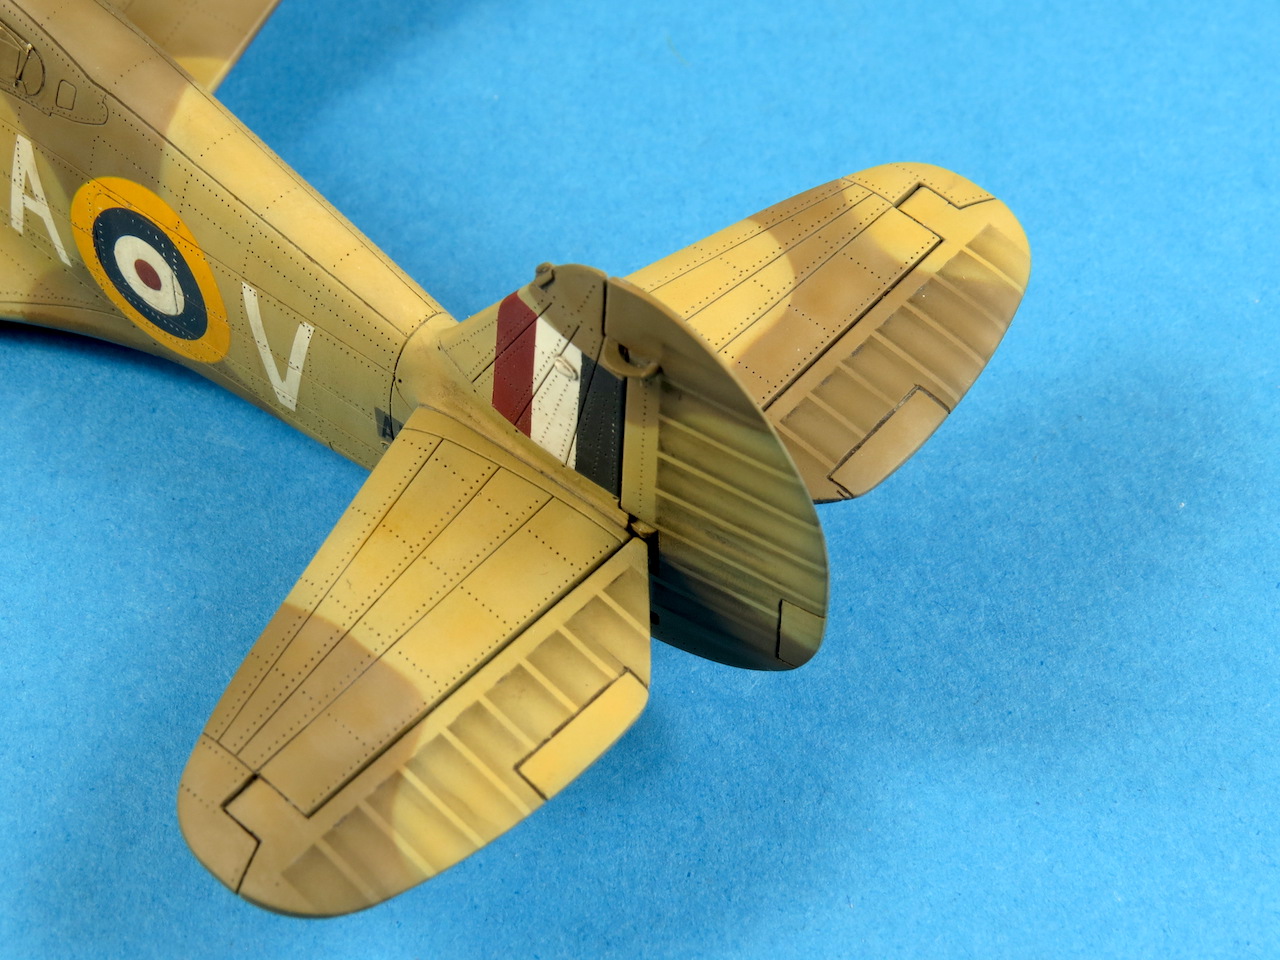
The last challenge the Bronco kit would throw at me was their treatment of the cloth covered control surfaces. I had previously sanded flat the heavily overdone scalloping on the plastic parts and now needed to re-create a visual effect to give some sense of cloth surface. Having learned some tricks from the JM Vilabala set of DVD's on using airbrushable filters I masked up the ailerons, elevators and rudder

A super heavily thinned mix of Tamiya Flat Black and isopropyl alcohol sprayed at a very low pressure was applied carefull over the edge of each strip to try and create a shadow visual effect. The end result once the tape was removed was a simulated scalloping based entirely on a visual effect. I thought it was quite effective
Wrapping things up I removed the masking from the clear parts, attached the sliding canopy frame and glued the fishtail exhausts in place. A final overall filter wash was applied to the airframe to simulate accumulated dust and sand. The gun barrels were painted black and some ground pencil lead applied to give a 'gunmetal' effect. The antenna wires were added using EZ-Line, an elastic line that comes in several shades are is very forgiving once glued in place.

To round out the build I placed the model on its stand and took some photos against a cloudy sky backdrop. I need to work on my Photoshop skills to simulate a blurred propellor but for now I hope you can enjoy these few photos of the finished model and use your imagination to perhaps visualise this predator cruising the North African sky in 1942 looking for its next victim.


Are you enjoying and finding value in this content? If so, please consider supporting my work by Buying Me A Coffee. Your support ensures that I can continue to provide high-quality, accessible content now and in the future, keeping this space free from distractions and focused entirely on the hobby we all love. Every little bit helps, and I truly appreciate your generosity!
CONCLUSION - Bronco 1:48 Mk.IIA Tomahawk (FB-4007)
As I said at the start this was a quick and painless build for me. I think Bronco did a good job on the kit with the major drawback for me being the decals, these are pretty much unusable, which is a pity given they went to the trouble (and cost) of including 5 options. The general fit and engineering of the kit is very good with no major issues encountered. Of course the cockpit depth issue will haunt this kit (and rightly so) but if you can see a way past that (plenty of resin after markets sets available) then you can turn this kit into nice model.
Does it represent value for money? Well at the time of writing it was selling for US$18.98 on luckymodel.com so I would say yes it does. Thanks to Bronco for the review kit, I look forward to more aircraft releases from them.
ASSEMBLY INSTRUCTIONS - Bronco 1:48 Mk.IIA Tomahawk (FB-4007)


