Northrop P-61A Black Widow
Great Wall Hobby (L4806)
1:48
Started: Jun 2012
Finished: Oct 2012
Link to Gallery
The Northrop P-61 Black Widow is a twin-engine United States Army Air Forces fighter aircraft of World War II. It was the first operational U.S. warplane designed as a night fighter, and the first aircraft designed specifically as a night fighter.
Named for the North American spider Latrodectus mactans, it was an all-metal, twin-engine, twin-boom design armed with four forward-firing 20 mm (.79 in) Hispano M2 autocannon in the lower fuselage, and four .50 in (12.7 mm) M2 Browning machine guns in a dorsal gun turret. Developed during the war, the first test flight was made on May 26, 1942, with the first production aircraft rolling off the assembly line in October 1943.

Although not produced in the large numbers of its contemporaries, the Black Widow was operated effectively as a night fighter by United States Army Air Forces squadrons in the European Theater, Pacific Theater, China Burma India Theater, and Mediterranean Theater during World War II. It replaced earlier British-designed night-fighter aircraft that had been updated to incorporate radar when it became available.
After the war, the P-61 was redesignated as the F-61 and served in the United States Air Force as a long-range, all-weather, day/night interceptor for Air Defense Command until 1948, and for the Fifth Air Force until 1950. The last aircraft was retired from government service in 1954.

On the night of 14 August 1945, a P-61B of the 548th Night Fighter Squadron named Lady in the Dark was unofficially credited with the last Allied air victory before VJ Day.[2][page needed] The P-61 was also modified to create the F-15 Reporter photo-reconnaissance aircraft for the United States Army Air Forces and subsequently the United States Air Force.
KIT OVERVIEW - Great Wall Hobby 1:48 P-61A Black Widow (L4806)
I have always liked the P-61. I've had a couple of the old Monogram kit in my stash for as long as I can remember, but never found the motivation to undertake the re-scribing and correcting project needed to bring that model upto speed. Along comes the Great Wall Hobby P-61.
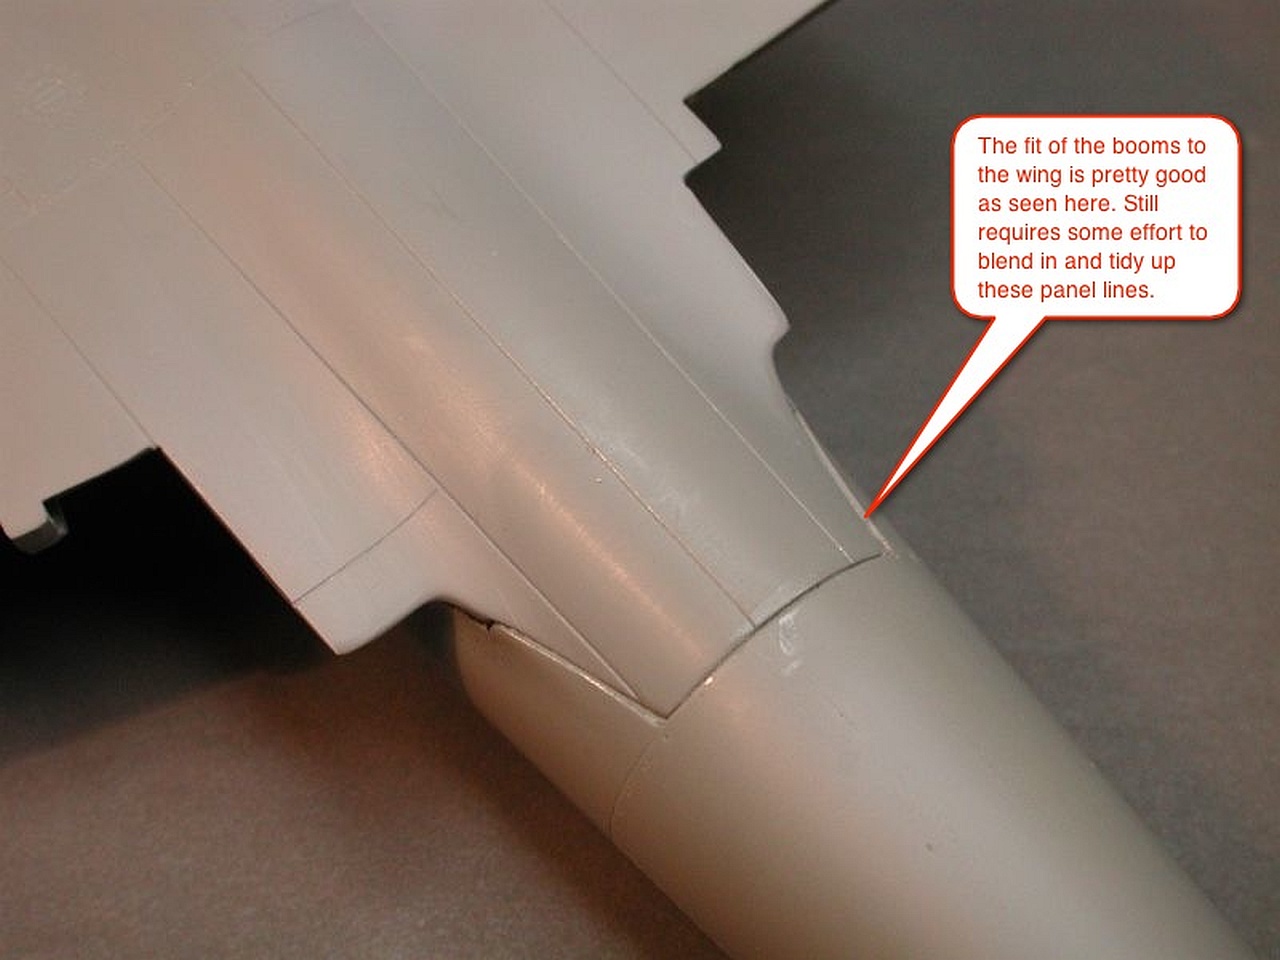
The first boxing received some justified criticism for glaring errors. To the great credit of GWH they corrected almost all of the problems in the second boxing (the so called "glass nose" P-61A). To date GWH have not released a P-61B. Having now completed this model I would classify the quality and fit of the kit as almost equal to Hasegawa (I know right !!).

BUILD - Great Wall Hobby 1:48 P-61A Black Widow (L4806)
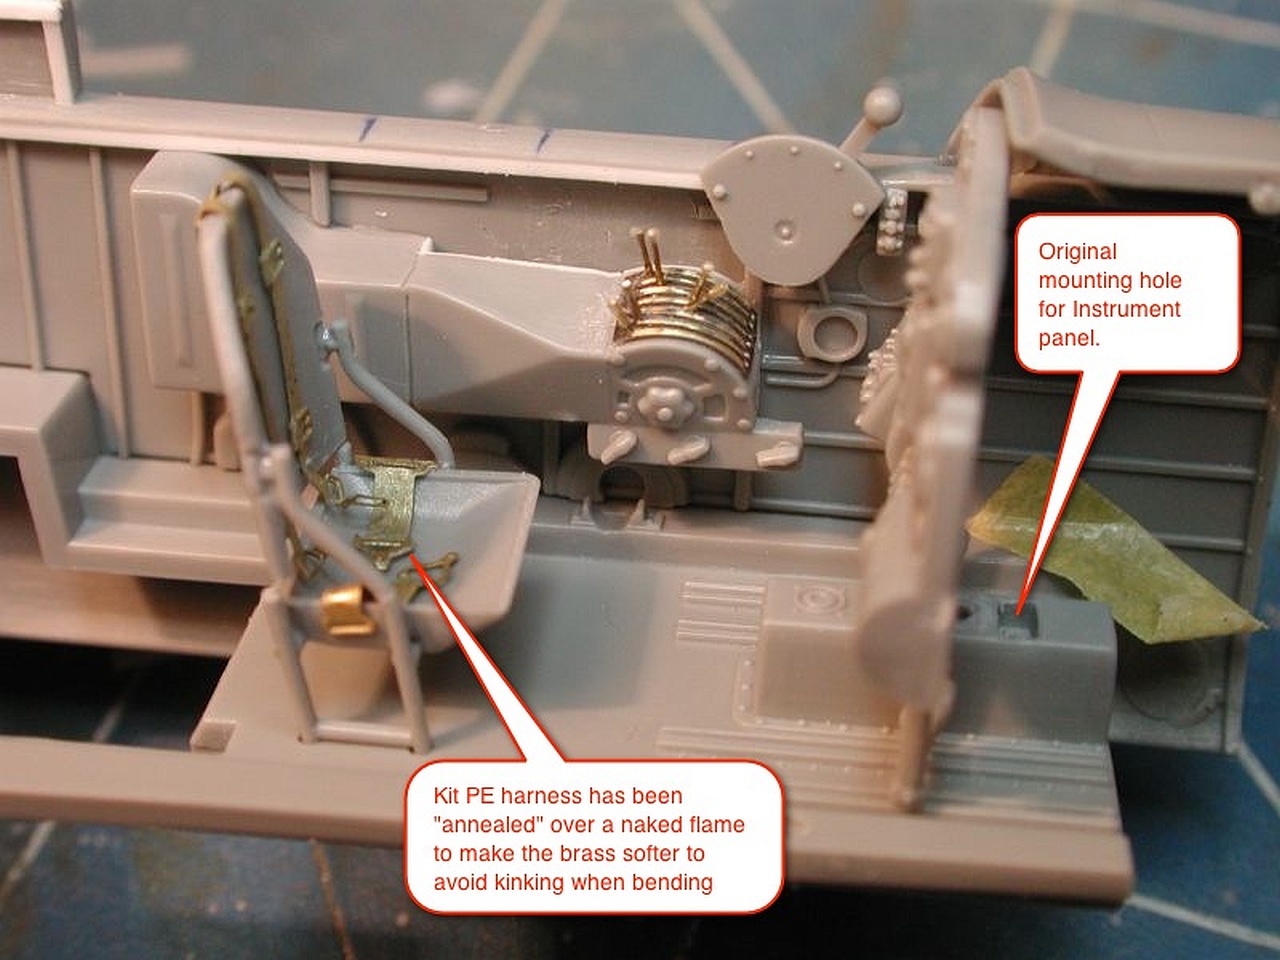
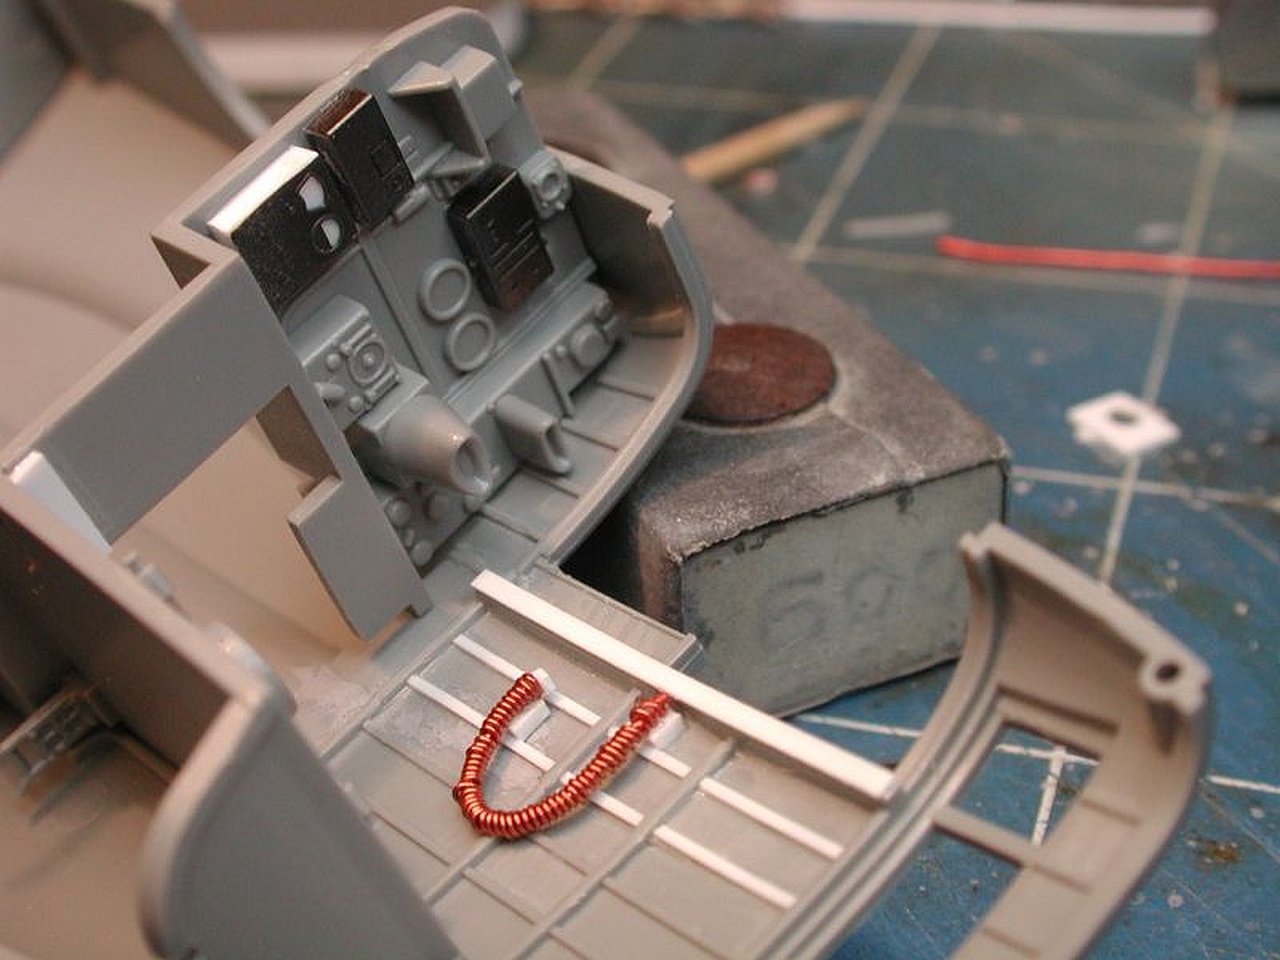
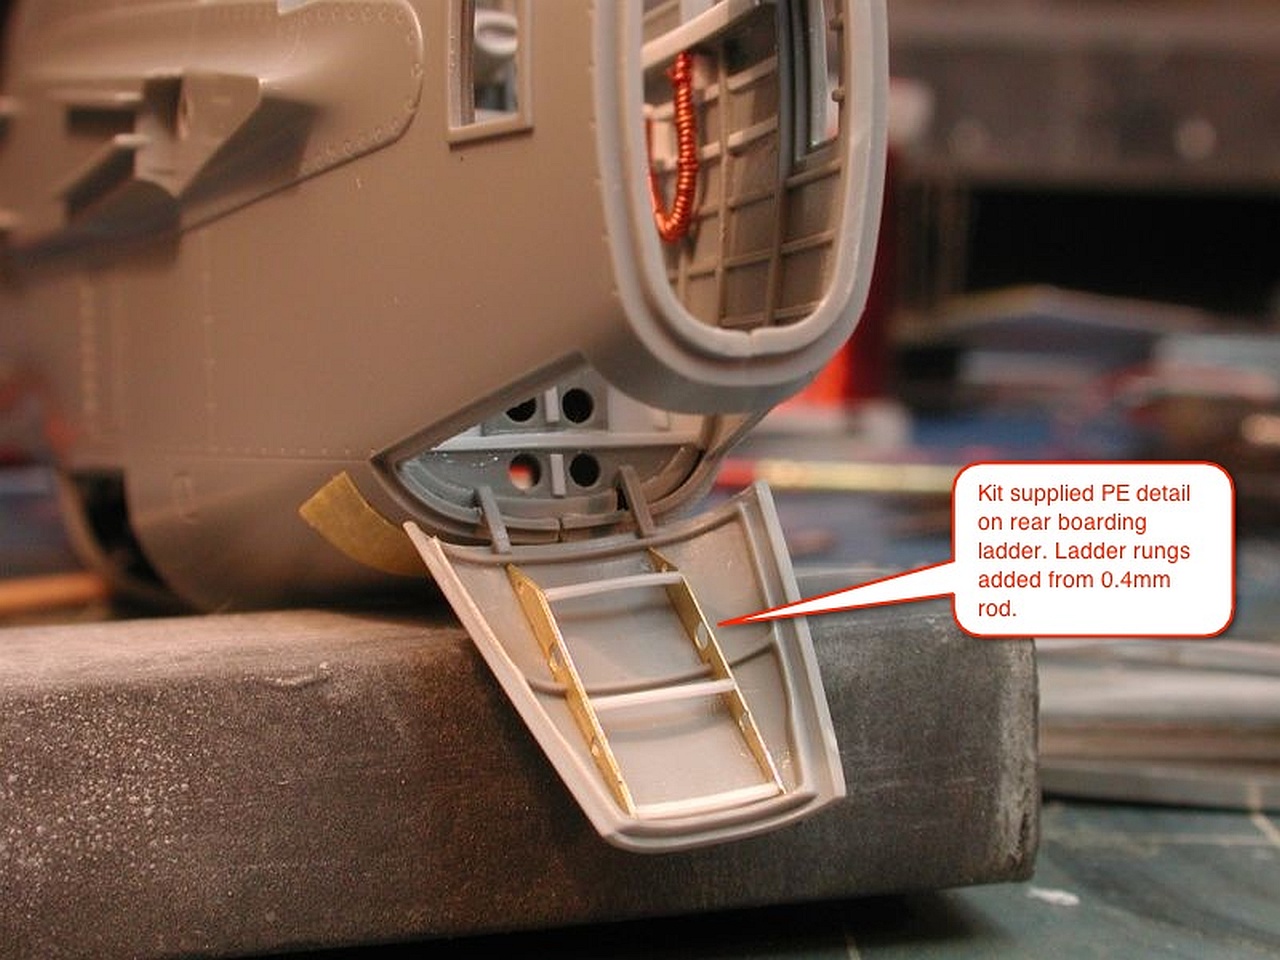
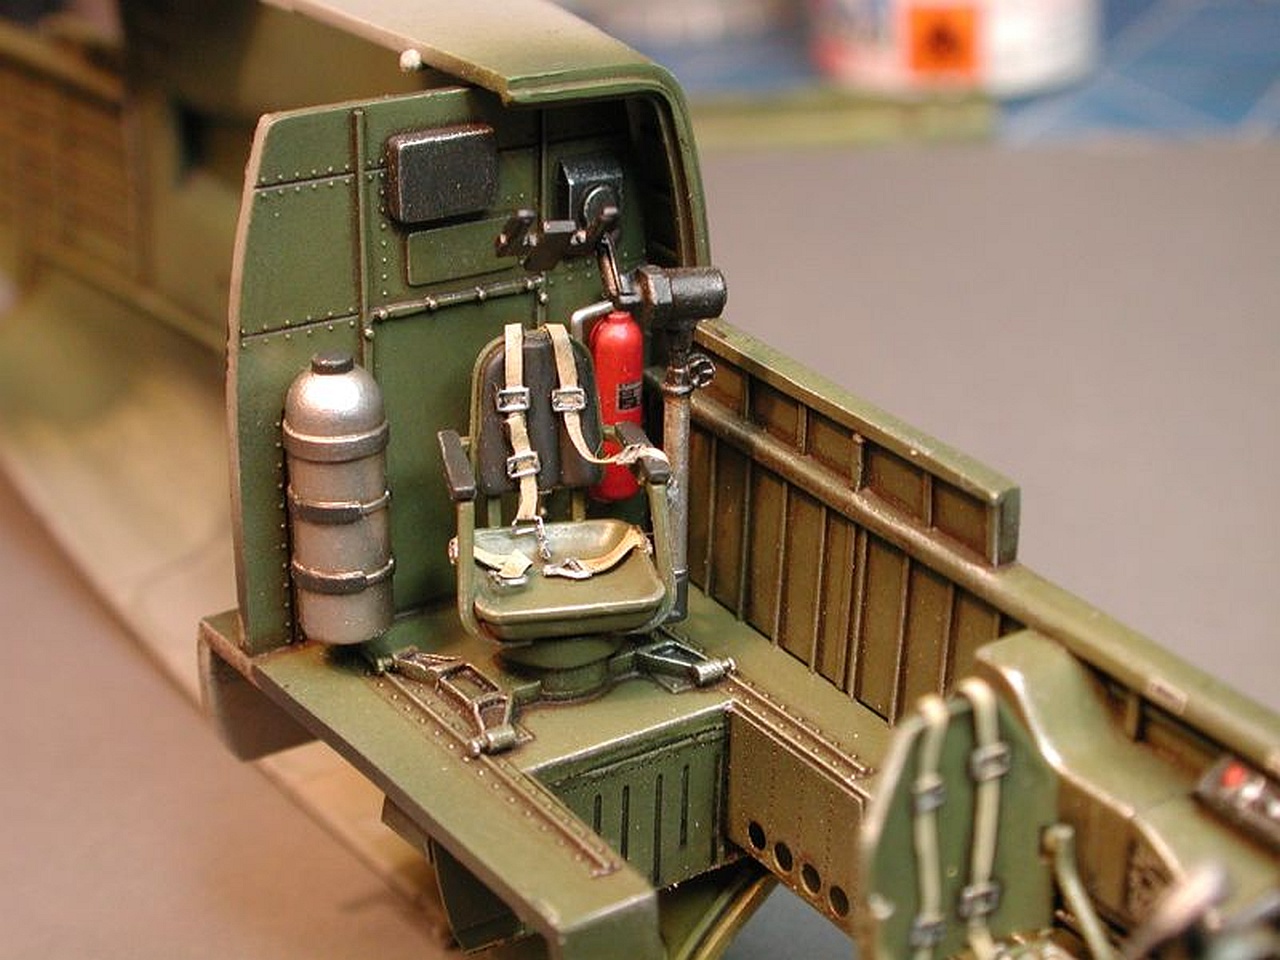
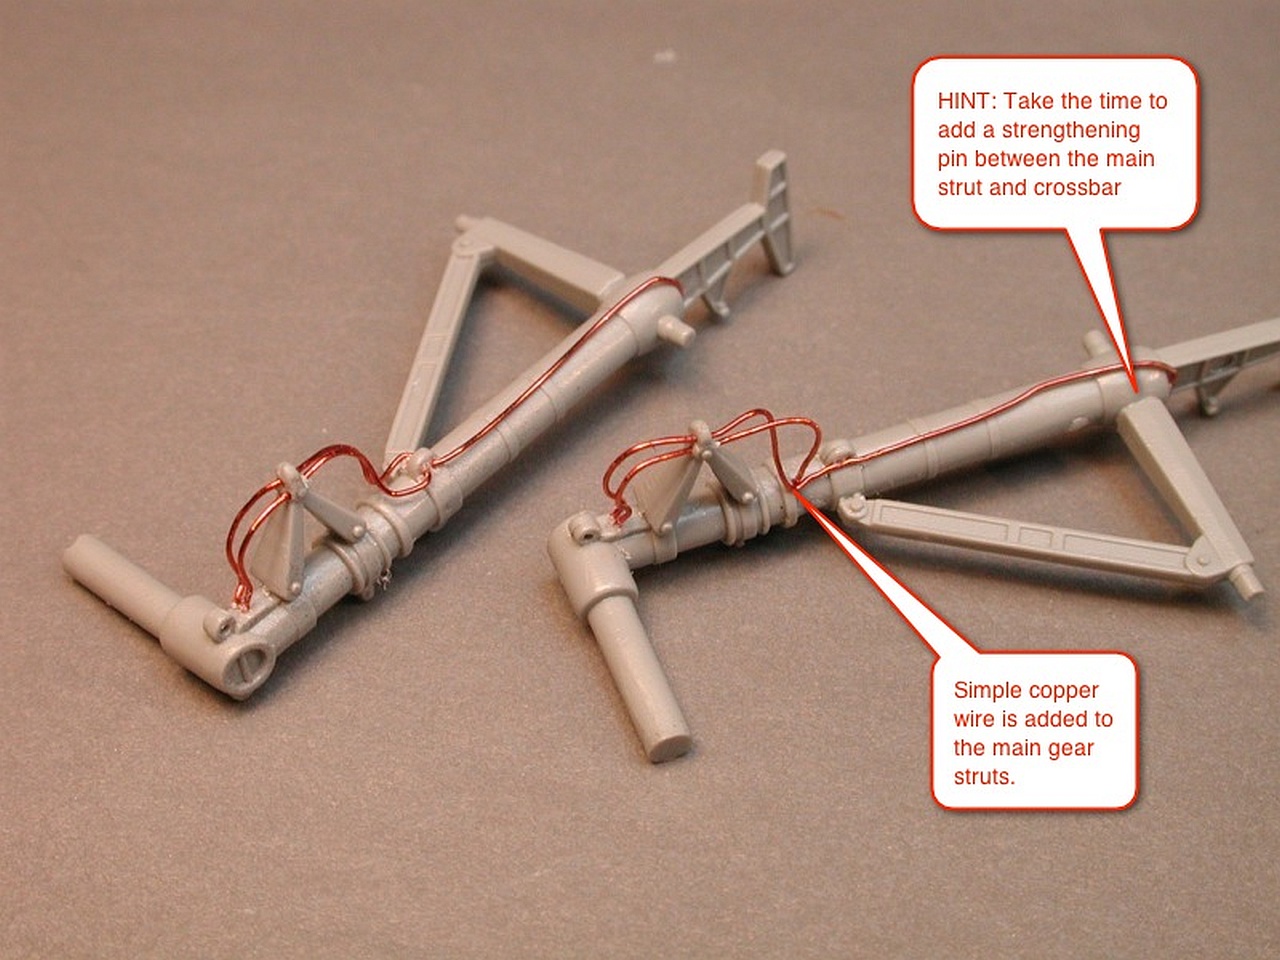
As with most aircraft models, construction begins with the cockpit. I was able to find a fair bit of reference photos of the P-61 interior and I was quite impressed with the job that GWH had done. The P-61 was designed to carry a crew of 3. The pilot and gunner were situated in the front cockpit whilst the radar/radio operator sat in the tail. Much of the work I did on the interior was really just adding more detail (oxygen hoses etc) to make it feel more busy.
Using the available reference photos my detailing work also re-arranged some of the kit provided parts to make the pilots area feel more cramped as the GWH layout feels too spacious. As I had the older Monogram kit along with just about every aftermarket detail set produced for that kit, I wanted to make use of as much of it as I could (selling it did not seem like a useful thing to do).


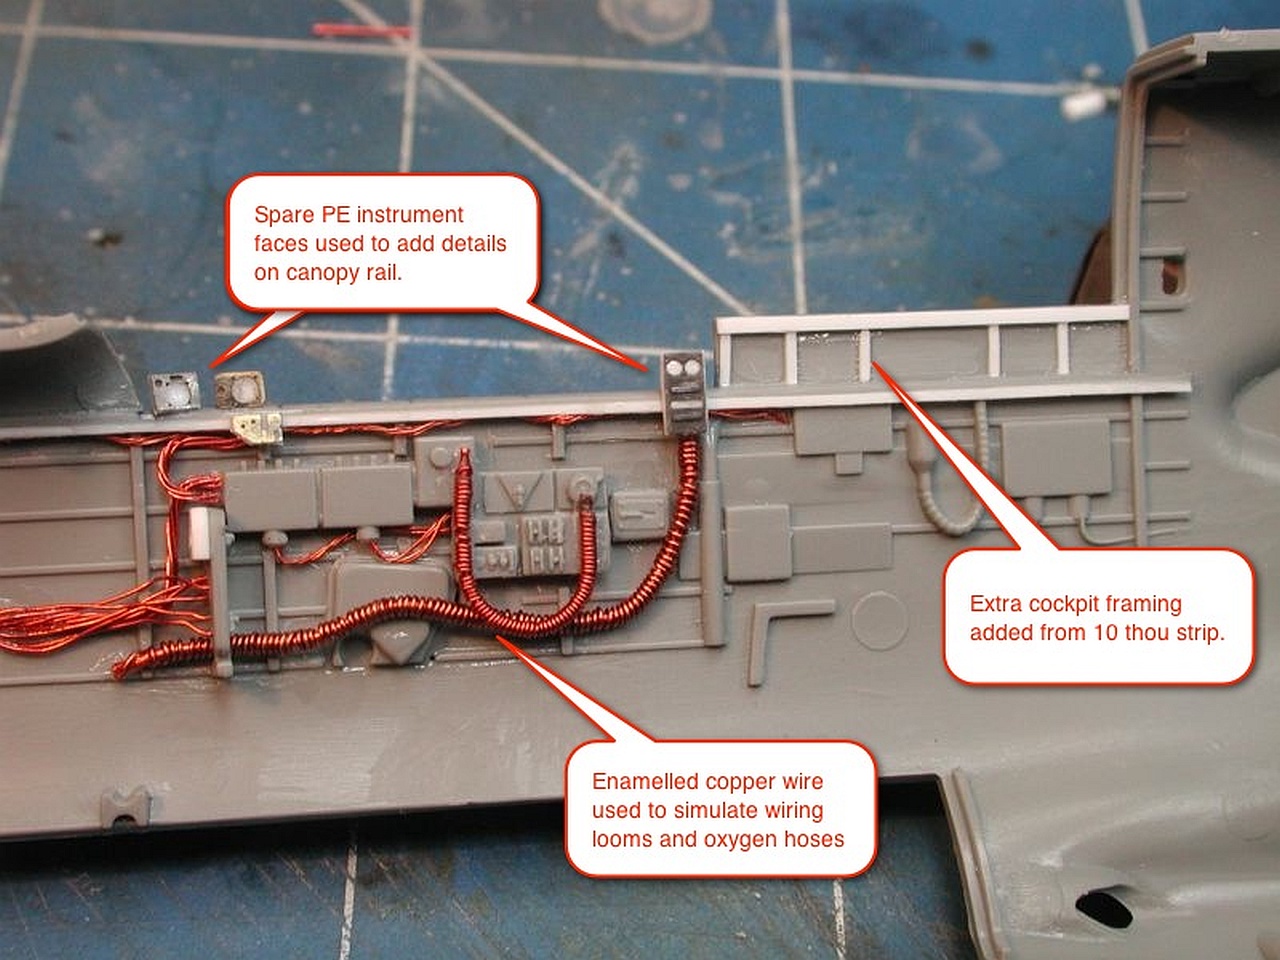

The completed pilots area now looks much busier than before. Nothing I have added was to correct problems with what GWH provides, it's simply to make the cockpit look more detailed (eg realistic)


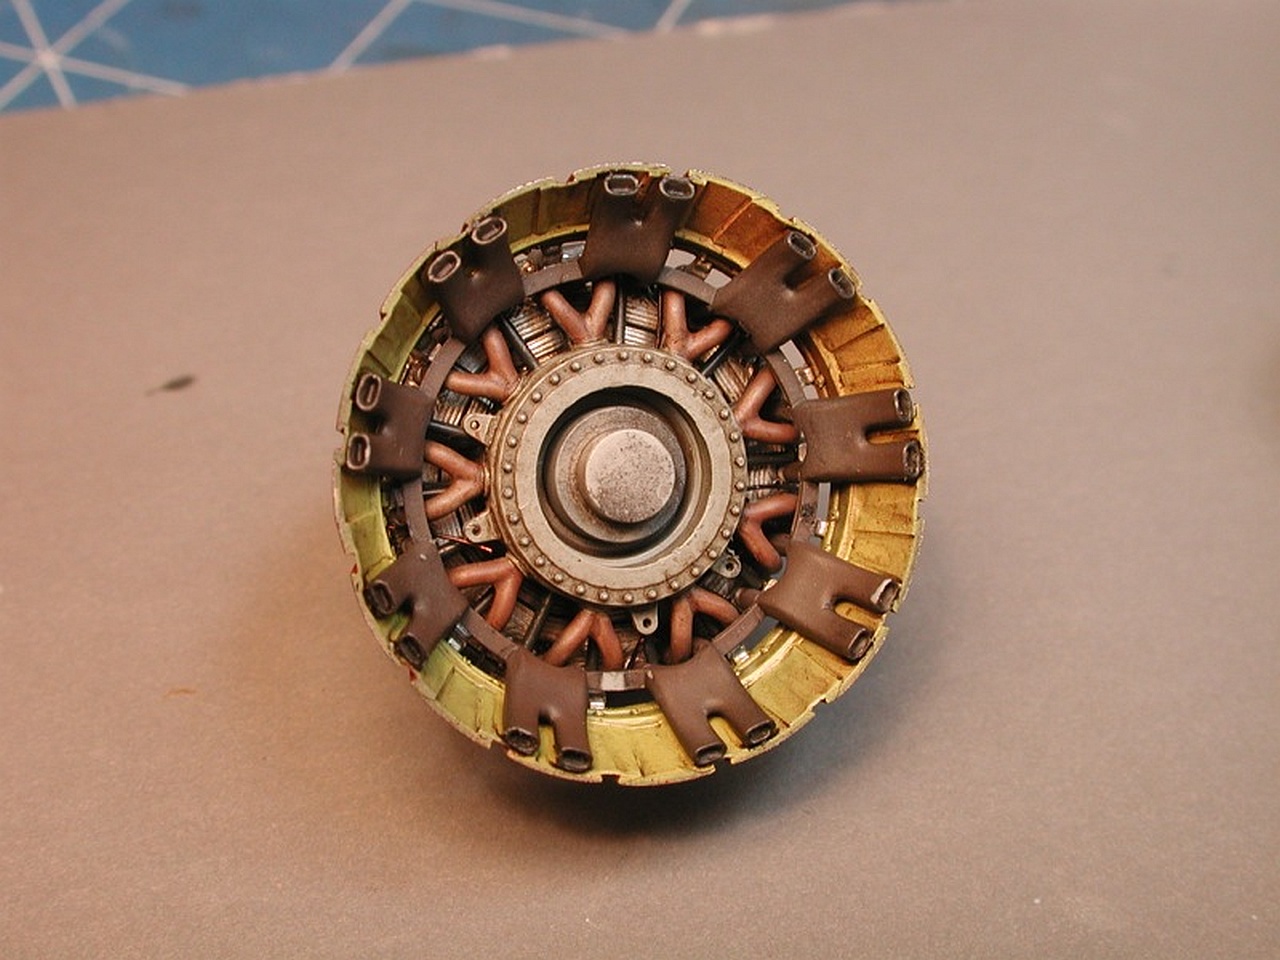
One of the "problems" with the GWH kit that was not fixed in the second boxing was the way they supplied the spinner and props molded as a single unit. This really was not acceptable to me and so my first idea was to cut the props off and drill out the spinner. In this picture you see the kit spinner with the props removed and plasticard inserted inside to provide something to drill into. Once I realised that True Details had released a resin spinner and props, I stopped work on the kit items and ordered the resin parts. This had the added benefit of being a more accurate size (see the noticable difference between the two spinners)


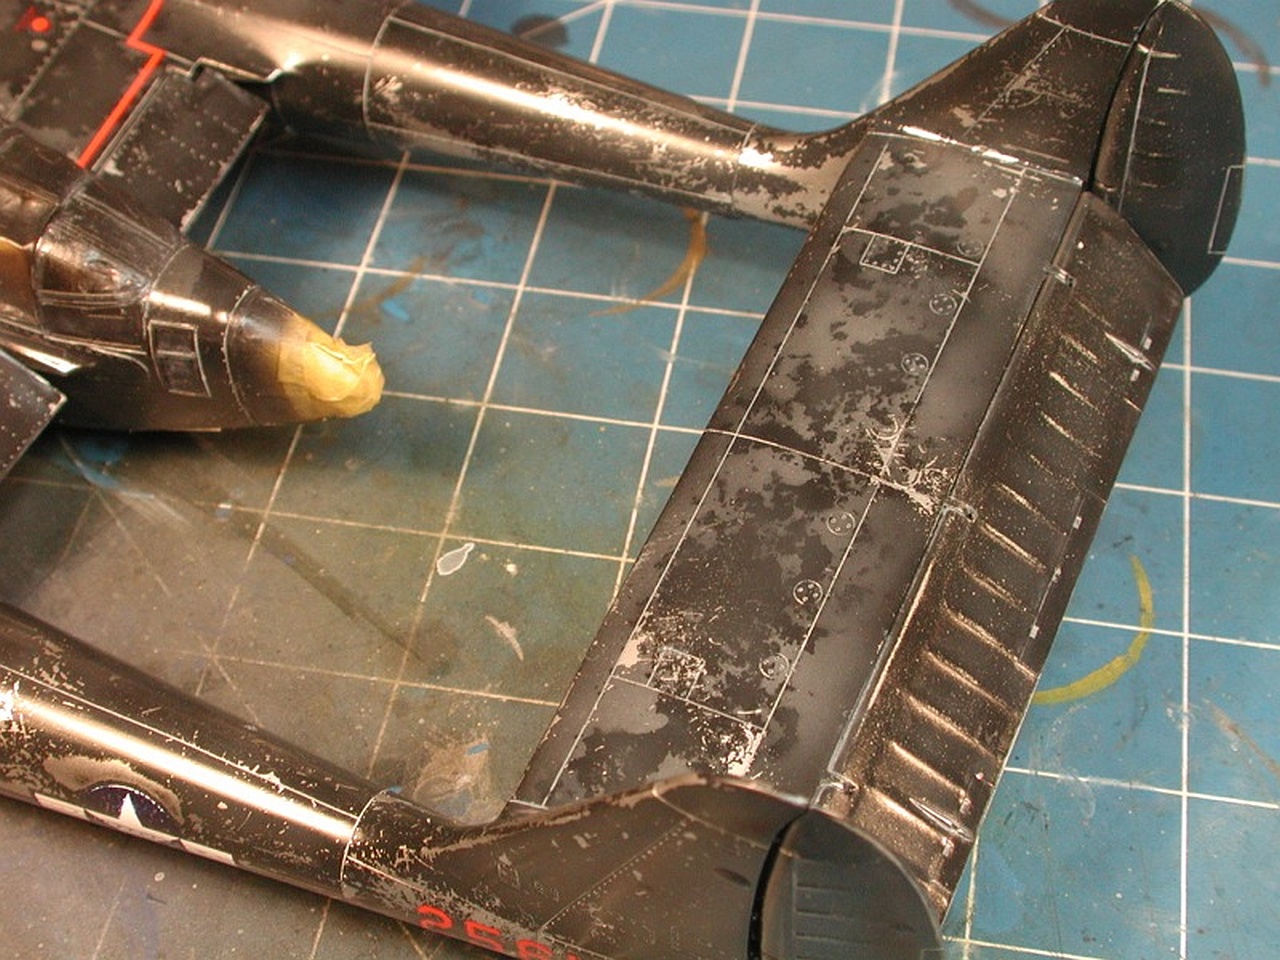
Despite all that had come before I was still not finished with the finish of this model. I wanted to give the paint finish a natural (ie random) faded weathered look and I had heard about the salt technique before but never had the courage to give it a go.
First step in this method is to cover the model with water (use an airbrush or spray atomiser) and then sprinkle Sea Salt over the surface. Just literally apply it as I've shown here. More is better and plenty will come off when you dry it.
Let the salt/water dry (you can use a hair dryer to speed things up like me just be careful to keep it moving or the model will start to react badly). Once the salt is dry you mix up the paint you want to apply to your base color (in my case black) to give the faded/patchy effect. I chose to use a very dark grey (Model Master Enamel Gunship Grey) as I I did not want it to contrast to much with the black. Make this paint very thin and lightly mist it over the model. The whole idea here is that the salt grains act as a random mask. This photo was taken AFTER I had sprayed the Gunship Grey and so you can see its not very heavy. You don't want this layer to over power the base black paint.


Once the Gunship Gray had dryed (assisted again by the hair dryer) you simply rinse the salt off over the kitchen sink under luke warm water. Dry off with a paper towel and hope for the best. I was very pleased with the result being my first attempt. If you wondered why I sometimes use Arylic paints and then switch to Enamel paints its because by using Model Master Enamel Gunship Gray for this layer, had it all gone wrong I could have wiped it all off with white spirit and not affected any of the paint below, because it all acrylic and sealed by a coat of future. Call it an insurance policy.
The tail boom came up particularly well. Theres no doubt that this sort of "extreme" weathering will give many modelers a moment of pause when that consider doing it themselves. I have to admit my heart was in my mouth when I was covering my pride and joy with salt, but as they say you can't make and omlette without breaking a few eggs. Luckily this egg was not rotten :)

I had always intended to display this model on a dedicated base. Eduards PSP matting base was used this time around. The various figures are taken from the Monogram P-61 kit and the General (it actually Douglas Macarthur if you look closely) from the Tamiya set. The drums and can, boxes etc are from a Verlinden set and the very nice Willys Jeep is again by Verlinden (much nicer than the Hasegawa Jeep imo). The guns are all from the kit and the tarp is made from lead foil.


CONCLUSION - Great Wall Hobby 1:48 P-61A Black Widow (L4806)
This was a project I had to work hard on from time to time as I had a very specific idea in my mind of what I wanted the model to look like, in particular the weathering. Paint chipping and salt masking were two entirely new techniques I used here and I'm very glad I did because not only has it improved this model but given me the confidence to use them again in the future.