Mitsubishi T-2 "AGGRESSOR"
Hasegawa (09679)
1:48
Started: Nov 2006
Finished: Nov 2010
Link to Gallery

The Mitsubishi T-2 was a supersonic jet trainer aircraft used by the Japan Air Self-Defense Force. Introduced in 1975, it was the first Japanese-designed aircraft to break the sound barrier. It was the basis of the Mitsubishi F-1 military aircraft. All T-2s were retired by 2006.
The T-2's configuration was clearly reminiscent of that of the two-seat Jaguar, with the two aircraft having the same overall configuration and some resemblance in details. In particular, the T-2 was also powered by two Rolls-Royce Turbomeca Adour turbofans, the same engine type used by the Jaguar, license-built by Ishikawajima-Harima Heavy Industries under the designation "TF40-IHI-801A".

Despite this similarity, the T-2 was not a copy of the Jaguar, and the two aircraft could be distinguished at a glance, the T-2 having a more dartlike appearance, being noticeably longer and having a distinctly shorter wingspan than the Jaguar. The T-2 also had many detail differences. For example, since the JASDF had no rough-field requirement, the T-2 had conventional single-wheeled landing gear and not the distinctive heavy duty landing gear of the Jaguar
The "Blue Impulse" aerobatic display team of the JASDF re-equipped with the T-2 in the winter of 1981–82. T-2s were also used by a dedicated Aggressor squadron, being replaced by the McDonnell Douglas F-15 Eagle. T-2s were also used as conversion trainers for squadrons operating the Mitsubishi F-1, a development of the T-2.

The T-2 was retired by 2006, being replaced as an advanced trainer by the Kawasaki T-4 and as a conversion trainer by a two-seat version of the Mitsubishi F-2, which had replaced the F-1 in the anti-ship strike/ground attack role
KIT OVERVIEW - Hasegawa 1:48 JASDF T-2 Aggressor (09679)
This model was probably my longest build (calendar wise) to date. First started in 2006 when the F-1 and T-2 kits hit the market, it has been picked up and pushed aside multiple times for literally years.

I finally got up a head of steam this year (2010) to finish it off (and I'm glad I did). Being a modern Japanese subject, I know it will not be to everyone's taste, but I like the lines of this aircraft (reminds me of a Jaguar) and the aggressor scheme makes it look special.
BUILD - Hasegawa 1:48 JASDF T-2 Aggressor (09679)
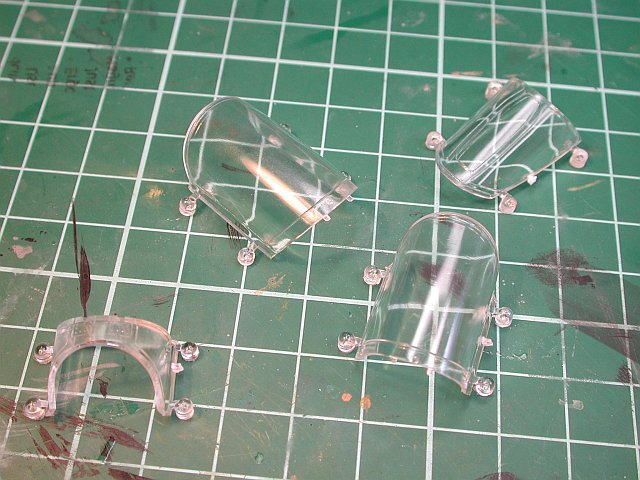
Being a two seater the T-2 has a lot of canopy on display. A careful inspection of the Hasegawa parts showed some minor scratching and a general hazy appearance to the clear parts. The first task in preparing these is to remove them from the sprue. A careful hand, side cutters and a sharp knife do the job.
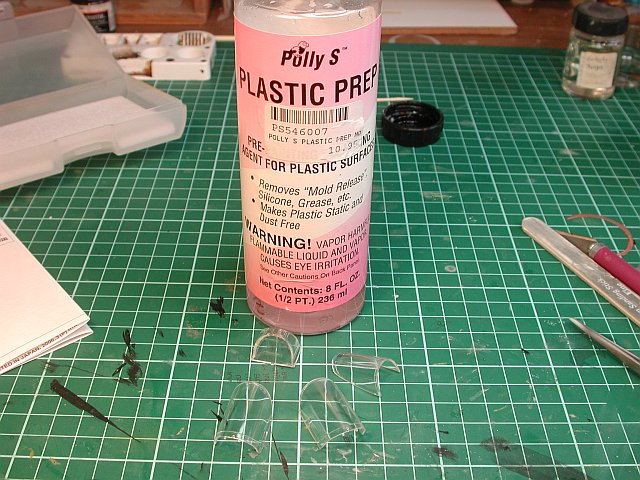
To bring the shine on the clear parts up a little, I will be dipping them in Future floor polish. Before doing so, I like to remove any grease or dirt from the surface using Polly S Plastic Prep
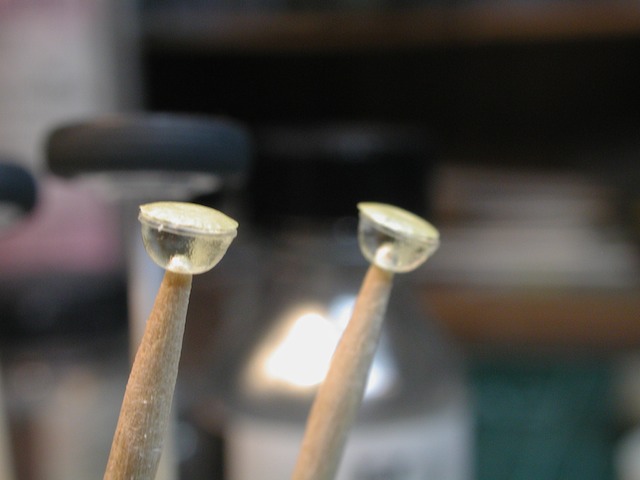
As I use Future extensively, I keep a small bottle on hand at all times. Dipping the canopy is very simple, just clasp it firmly (normally on a frame section) and dip into the undiluted Future. Swirl it around a little to remove any air bubbles etc. I picked up several bottles of Future last time I was in the USA.

Future, being floor polish, is fairly thin. After dipping a part like this canopy, Future will tend to pool on the bottom of the part. To drain off this pooled Future, I touch the edge of the part to an absorbent paper towel (or tissue). The towel will drain away any excess as shown here. You can see the damp pool on the towel closest to camera, whilst the far side of the canopy still has a large glob of Future waiting to be drained. If left on the part this would dry and leave an unsightly blob

Final step is to place all the parts you have dipped into a dust free container. I like to leave them covered for at least 24 hours for the Future to harden to a point where it will not stick to dust etc. The reason I did all this to the clear parts as the first step in the model build was to allow it adequate time to dry fully before I need to mask it. The longer you give it, the less likely to have trouble you will have. As a rule of thumb, I always leave parts at least 3 weeks before masking

After a long break (holidays and work travel), I'm back at the bench. Having plenty of time to dig out my reference on the T-2, it became apparent that almost all photos of the A/C show the leading edge slats partially deployed. I figured if I was going to do the slats I may as well do the flaps as well. Here both (top and bottom) have been cut from the wing. Some minor work (with plasticard) will be needed to re-attach these

Unfortunately no-one has fronted up as yet with a resin cockpit for the F-1/T-2. The kit seats are pretty basic, but luckily have the right shape and will form the basis for some detailing
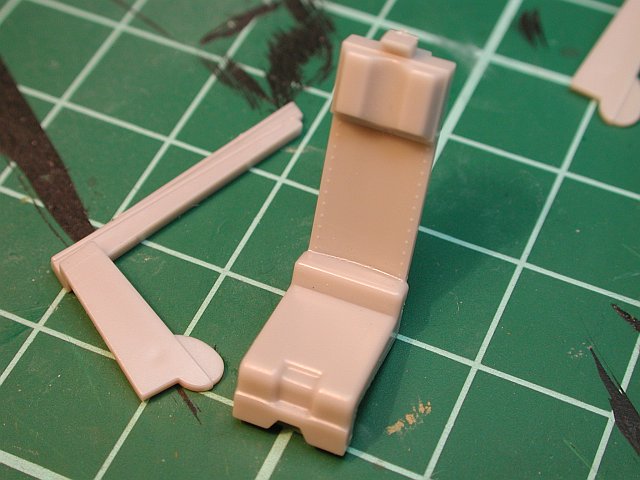
Some progress on one of the seats. Still some work to do here. Note how the plastic seat cushion (and lumbar support) have been removed. These will be replaced with Milliput epoxy putty.

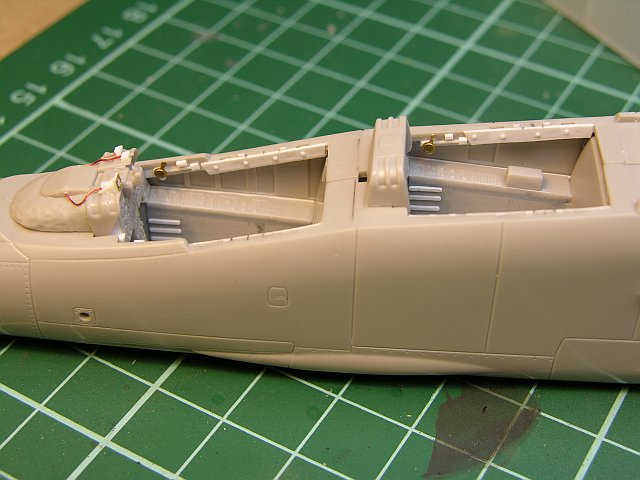
When looking at my reference, I noticed that the cockpit sidewalls and sills have some obvious detail that is missing in the kit. This photo shows two port fuselage halves stacked on top of each other, looking down into the cockpit (if that makes sense). The lower fuselage half (from my F-1 kit) is un-modified.

Here is the same T-2 fuselage half as viewed from the inside (hopefully this makes the previous photo make sense). More minor detailing will be added once these parts dry

As with most aircraft models, the kit manufacturers seem to think you can't see down under the consoles. Perhaps they are right, but I just don't like the empty look. Here I've added some plastic card to box in the area between the pilots legs

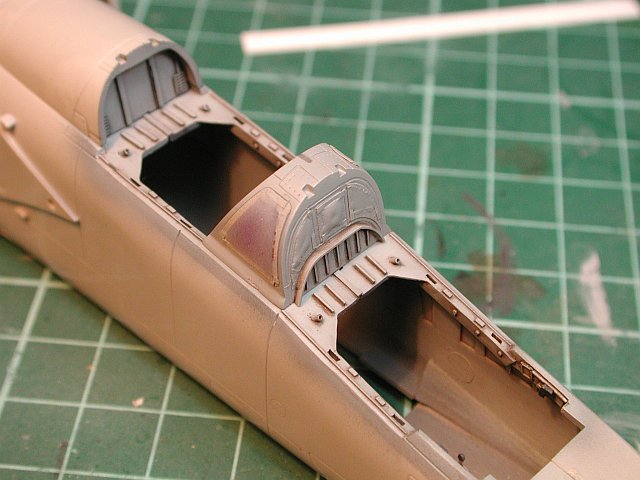
Work has continued on the cockpit area with the front cockpit instrument panel shroud (cover) being thinned out to be more in scale. This photo shows the left side shroud has been thinned whilst the right side is as provided by Hasegawa

The rear cockpit panel is a pretty good fit. The only thing needed here was two 20thou strips to lift the whole panel so it fit snuggly into the shroud. As you can see the shroud is also not to scale, but to modify it would result in a bad fit of the panel. In this case I'll take the easy way out (ie leave it alone)

The front panel needed more attention than the rear. With the thinned shroud (and perhaps without it) it was possible to see 'behind' the panel and this just looked silly (it looks empty because it is). Here I have started boxing in the front panel using plastic strip. This panel (like the rear) has also been raised by two 20thou spacers

A better view of the boxing in of the front panel. Some trimming will be needed to get the shroud to fit correctly

Detailing on the cockpit has continued, with the sills and sidewalls benefiting from plasticard and Reheat PE accessories. Just about every surface of the cockpit tub needed plasticard spacers to get a snug fit with the fuselage sides. It makes you realise how spoilt we are with the resin cockpits that are available these days
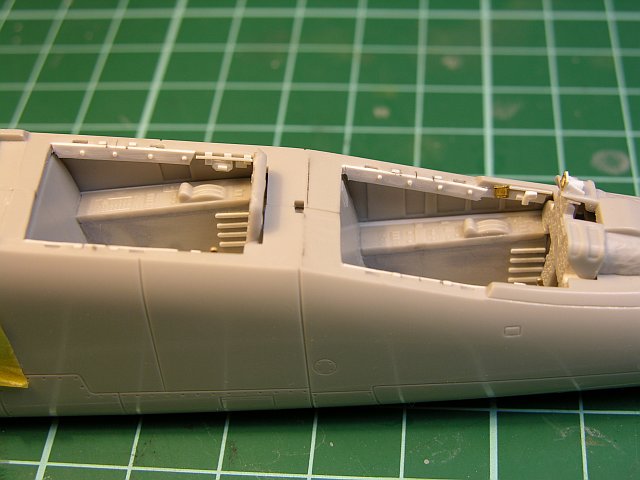
The starboard side also received some detailing treatment. I believe the handles present in both cockpits are the canopy actuators. Here I have used a couple of Reheat (now out of business) photo etch handles to replicate these
Using my reference for the T-2, there are several instruments and switch clusters on the top of the shroud. Even though my photos do not show how the wiring works, some assumptions have to be made by the modeller (call it creative license). This photo also shows clearly the amount of plasticard I needed to add to the left side of the cockpit tub to eliminate an annoying gap. (about 35thou)

Some simple enhancements to the tail wheel doors. The doors have been thinned to a more scale thickness and supports added from plastic rod

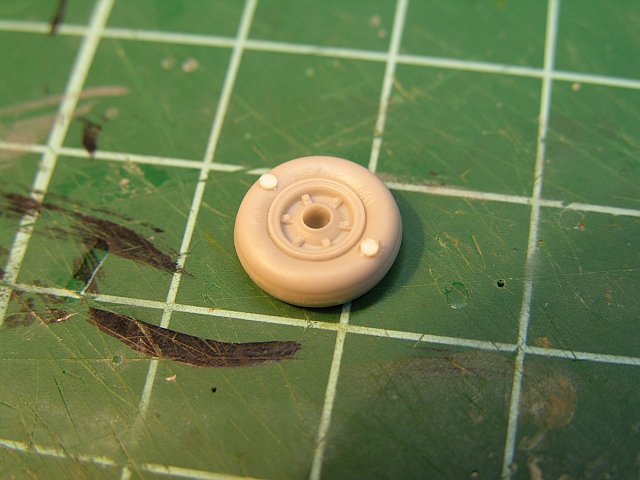
Needing a break from the cockpit, I cut out several of the other parts from the sprue. Here the nose wheel has had its ejection pin marks filled with some plastic disks, which will be sanded flat. Using plastic to fill even small holes like these is preferable I find to just using filler.
I was not really happy with the cloth effect on the front shroud that I have achieved with the Dremmel. I decided that a better solution was to use a section of tissue paper

With the tissue paper held in place, a mixture of diluted white glue was applied which softened the paper and allowed it to conform to the shape of the shroud. Once painted, I hope it looks more like cloth

As this kit will almost certainly never get a resin cockpit, I had to roll up my sleeves and scratch-build any details I wanted. The kit seats really are very basic, so I started with replacing the seat cushions and lumbar support on both seats with Milliput. Here you can also see the start of detailing work on the seat heads

After more detailed had been added from plasticard and wire, it was time for addition of harnesses. These have been fashioned from lead foil (from a wine bottle), and reheat PE buckles
A closer view of the front seat. Getting the belts to fall in a realistic way is not as easy as it might seem

The rear seat. Making your own belts has the advantage of allowing you to have two seats with different belt positions

I recently read an article about pre-shaded cockpits and decided to give it a try on the T-2. If you look closely at the edges of the grey paint, you can see the black undercoat. I'm not convinced I've got the whole pre-shading technique worked out yet

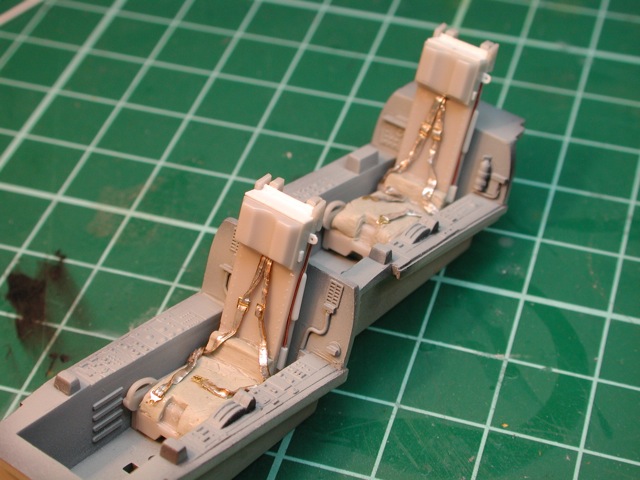
The two seats are complete. Test fitting in the cockpit revealed that the rear seat sat too high. The easiest way to rectify this was to trim some off the bottom of the seat. This problem was first detected when I did a test fit of the canopies and found that the rear canopy actuator strut (which attaches to the seat) was too high

Here we see the two seats in the cockpit tub. You can see that the modifications to the rear seat height have resulted in the rear canopy strut being in the correct position.

Earlier on I decided to detach the flaps and leading edge slats. Here we see the prominent gap left when the flap is re-attached in the down position

To realistically fill the gap, I have used 30 thou plastic rod, gluded to the leading edge of the flap. The curved edge of the rod will hopefully give a realistic result
The intake interiors need quite a bit of attention. Here you can see both intakes, with the closer one showing the nasty ejection pin holes that need to be filled as they are very close to the front edge of the intake and will be quite visible. I may yet decide to use intake covers

Work is underway to correct the intakes interiors. Plasticard (10 thou) has been used to fill the larger gaps. Super glue will be used to fill the remainder

Between the two T-2 cockpits is a glass section, that needs to masked and painted, but I also decided it could do with some more detailing. I need to attach a lip from 10 x 30 thou card to match the curved section (visible on the kit part as a raised line. I start by super gluing the plasticard to the center of the clear part and once this is dry I will carefully bend each end down and around the curve. Its often easier to tackle such jobs a bit at a time, rather than trying to get the plastic to conform to awkward shapes in one go

Here you can see the clear part with the lip in place and much more ribbing added. Once the rear cockpit has received the same treatment, the paint will be re-applied

Masking is one of my less favourite modeling tasks, so you can bet if I start masking, I must be motivated. To enable me to paint the framing on this center section along with the cockpit proper, I needed to mask it first

With the clear windows masked up, its time for a coat of paint. Its very important (as I have found) with these long term projects to document the paints you use. Luckily I had noted the color I used to paint the interior. Humbrol H126
The cockpit has received its final detail painting, wash and dry brushing. I think it looks ok for a kit cockpit

The rear pit. Notice in the bottom of the tub how I have removed (with a dremel) the locating post for the seat. This was to allow the rear seat to sit much lower than Hasegawa designed. Why ? Well the canopy actuator is attached to the back of the seat and when I test fitted the rear seat it made the canopy sit too high (by about 3mm). Closer examination of reference material also showed that the rear seat sits visibly lower (when compared to the sill). In addition to trimming the tub, I also had to remove quite a bit from the bottom of the seat (oh the joys)

The fuselage halves have now been joined and here we see the cockpit tub, shroud and some canopy details

Another view of the rear cockpit

The join of the fuselage insert behind the canopy was not too flash. Here you can see some trusty super glue being used as a filler. Super Glue is my preferred choice of filler when I know I have to re-scribe

The main gear legs have some very noticeable ejection pin marks which I have filled with plastic disks

When I pulled the kit out of storage, here is what it looked like. I need to break the back of the construction to ensure I don't stall again

When they were available from HLJ, I picked up one of the Finemolds brass pitot sets for the F-1/T-2 kits. Here you can clearly see the difference the brass makes to the pitot located on the leading edge of the vertical stabiliser. The nose pitot likewise is very nice

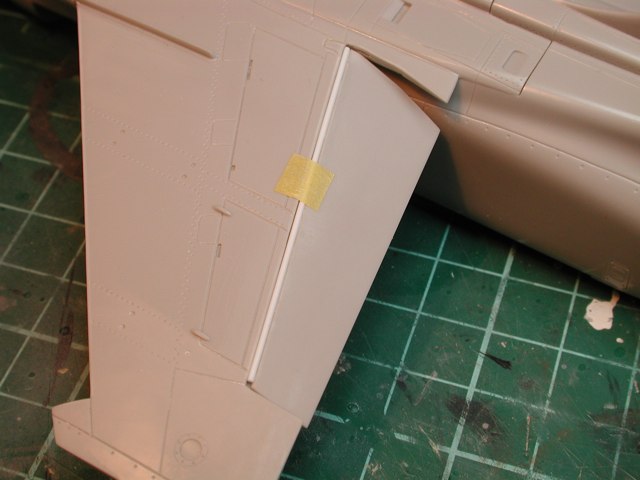
The intakes have blow-in doors (similar to the Harrier) for ground running. I am rescribing the top and bottom doors (lost during construction) using some Pactra tape as a guide

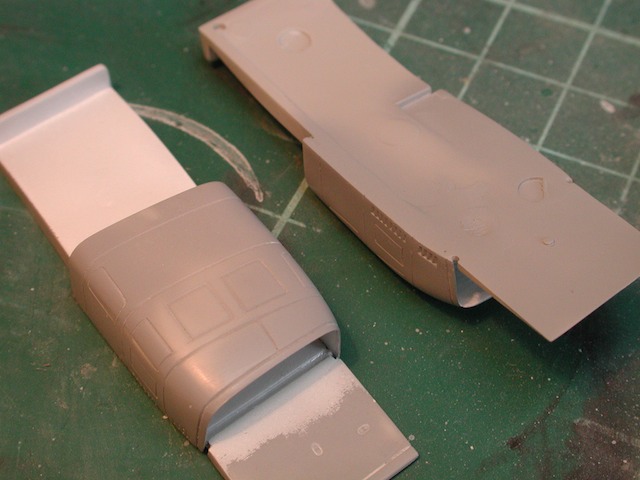
The bottom of the fuselage consists of 3 inserts. Initially I assumed this was to allow Hasegawa to build different variants of the F-1/T-2 family, but after examining my other kits (yes I have more of these :) I decided that was not the reason. Its basically that the model has a lot of panel line detail on the centerline of the aircraft and they have engineered the kit in such a way to place the join seams away from that area. Look at the pic below to see what I mean

Here you can see all that detail I mentioned on the center line. Imagine having to sand and rescribe all that lot. Hasegawa instead moved the join to the side. The only downside is that you know have two seams to work on (you get nothing for free)

The insert above the main gear bays is short by about 0.5mm. This will need to be filled with plastic card

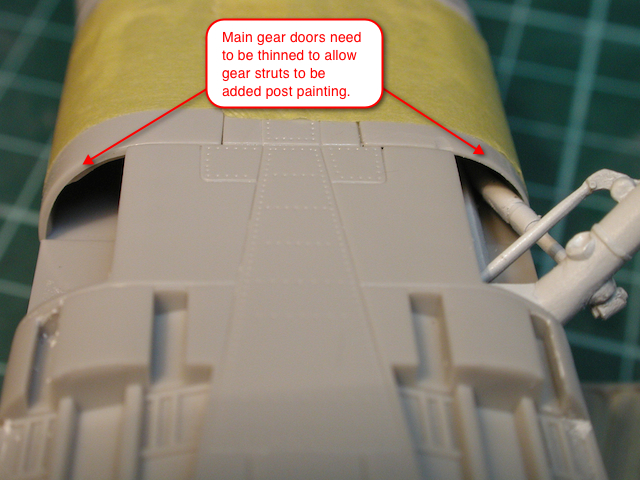
If at all possible I like to leave the landing gear off till the very end of a build. The T-2 is one of those aircraft where the gear doors (main and nose) are only open when the gear is cycled. The catch on this model is that the gear has struts that are attached to mounting points which are under the closed doors. You can see the right strut here. To enable me to slot the gear into place after the door was closed, I determined that I needed to the thin the edge of the gear doors. You can see from the pics that I have done the right door only so far
The thinning of the gear door interior was done with my trusty Dremmel and a sharp knife. I'm not worried about making it tidy as you won't see it

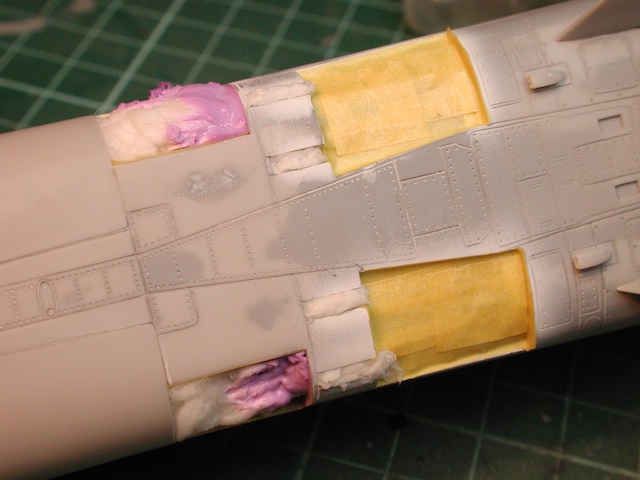
Here we see the end result (under a coat of primer) of the seam work on the fuselage underside panels

The nose has no inserts so all the panel lines need to be rescribed once sanding is completed

Here we see the completed work on the panel just forward of the main gear bays. That nasty gap has now gone

The intakes have been joined (having been pre-painted). The fit of these parts in general is not all that good. The good news is that they look like they mate to the fuselage quite well
A good rule to abide by is "measure twice, glue once". Here I am once again test fitting the main gear and doors to ensure everything still fits as planned

Small vents benefit from some detailing by opening up their mouth. In 1/48 these guys are pretty darn small. A #80 drill is used to start and the tip of a sharp blade used to carefully open it up

A good alternative to painting metallic finishes, is the use of Bare-Metal Foil. Here I am using a small section of the self-adhesive Chrome foil on the actuator strut for one of the airbrakes

Here are the two airbrake actuator struts. The Bare-Metal foil is quick and very effective

With all the initial seam work complete, its time for a coat of white in the main wheel wells and airbrakes. I thought I would try some Mr Color Flat White. Like all the other Mr Color paints, it airbrushes nicely and covers well

As with most Hasegawa kits, the fit of panels like the main gear doors sometimes needs a little bit of attention. In truth, I made work for myself here because I over sanded the doors and caused a larger gap that needed card to fill it

With the main gear doors now glued in place, a final test fitting to make sure its all going to work as planned. Its takes a bit of twisting and fiddling but the main gear can be made to fit into place

The intakes have been painted and masked prior to fitting to the fuselage. Masking these off now is a lot easier than after they are attached

The main gear wells and airbrake interiors have been masked
As I mentioned before, the fit of the intakes is quite good, but still I chose to completely fill the seam with super glue and re-scribe the panel line

I've decided to make up some accessories (figures and fuel carts) to go with the model. Here we can see the various parts (after cleanup) of a Verlinden resin fuel cart. I've no idea if the Japanese use this particular type of fuel tender, but call it poetic license

This whole small model only took about an hour to complete. Some brass pins to give it strength and super glue to hold it together

Here we can see the final result of the intake mating to the fuselage. A clean result has been achieved

With the fuselage construction mostly complete, its time to mate the wing. The fit is pretty good with only some minimal adjusting needed to get a snug fit

With the wing in place, its time to fit the flaps and slats. I had done a fair amount of pre-work on getting the angles right on the control surfaces so by this stage it was pretty much add glue and attach

The LEX (Leading Edge Extensions) on the kit are a separate part to the wing proper. Unfortunately the fit to the fuselage was not what I had hoped for. Once the styrene glue had dried, I used my tried and true technique of using super glue as a filler to completely fill up the seam. Leave it 24hrs to cure properly, sand flat and re-scribe the panel line

Here is what the control surfaces look like from the bottom. The small gaps visible on the joins will be filled with Milliput and then lightly re-scribed. I also decided kinda last minute to add some drop tanks so I need to setup the pylons. Here I am test fitting one to ensure the flaps etc do not interfere

Returning to the seats, I sprayed a shot of Insignia Red on the headrests and now am masking them up in readiness to apply the seat base color

Wanting to add a couple of suitable ground crew and pilots, I could not find modern any "Japanese" figures, so have resorted to the Hasegawa USAF set. As these figures seem to be set around the Vietnam era, the pilot figure I liked had a typically US forage cap. The Japanese pilots I have seen photos of all seem to were baseball caps when in their flight suits. Some modifications to his head will be needed.

First step in the basic modification is to remove his current hat. Next I gotta figure out how to make a baseball cap. (scratches head)

Whilst I was cruising around Hannants website, I came across an Eduard PE set for the T-2. Up until now I had not realised that anyone had done one. I chucked in an order (of course) and on this particular model will probably only use a small portion of it (most is in and around the cockpit, which as you know I have all but finished now.)

The best thing about the PE set was all the goodies for the canopies. I had planned to make or re-use bits from the spares box for all this, but as Eduard had already provided it, why not go that way

Moving closer to attaching the windshield I need to finish up the HUD. The reflector glass is made from some clear acetate sheet, whilst a drop of Humbrol Clear Green is applied to the lens glass to give it the right look

The windshield is attached with super glue and lightly sanded in. I have (as usual) masked and painted the interior of the clear parts. This time on the windshield I did not bother masking all the way forward as you will not see it from the inside. Obviously when I mask the outside I will do it completely

A later photo of the wing and LEX seam work under a coat of primer. Its all come up fine now

The main landing lights are supplied as clear parts. I have dipped them in Future and once dry applied a circular disc of tape to the front lens. I intend to spray a coat of Alclad Chrome to the body of the light to see if I can simulate their shiny reflective interior
I realised that I was pretty much ready to start the painting process. Here I have applied an initial coat of Alclad Stainless Steel the tail aft of the exhausts. Once dry this will receive a light coat of Future to seal and protect it prior to masking

The pylons have now been glued to the wings. Getting the right angle proved to be a bit of a challenge as the T2 wing is very angled from root to tip, whereas the pylons are vertical

And so it is back to my least favourite (but most essential) part of this hobby. Masking. With the windscreen and other parts of the cockpit all buttoned down it's time to get the Tamiya tape out

From the front to the back, there is always plenty of things to be masked. The tail directly aft of the exhaust is natural metal and I have already applied the Alclad and a light coat of Future

I prefer (where possible) to attach lights to the model before painting and mask to protect them. Here is the red navigation light in the vertical stabiliser

Oh yes, more masking. This time both the top and bottom of the horizontal stabs. Quite tricky as there are some very fine pieces of tape needed for this job

With the initial masking complete, I have applied the first base color. I was going to use Mr Color paints, but had problems sourcing the right colors in a timely fashion (bizarre I know considering I have been working on this model since 2006 !!!). Instead I fell back to my tried and true Humbrol Super Enamels. The two tone scheme on this Aggressor T-2 is FS36375 (Humbrol H127) and FS36118 Gunship Gray (Humbrol H125)

With the Blu-Tac in place for the camo demarcation, some segments of tape are cut and placed along the snake to protect the base color

Here we see the result once the blu-tac is removed. The demarcations are soft, but not soft enough. I knew this before I started but do not trust my hand enough to free-hand camo patterns such as this

I once again loaded up the brush with the base H127 color and firstly went over the demarcation by hand. This helped soften it. Next, I thinned the paint heavily and proceeded to fade the Gunship Gray as many of the photos I have seen of these Aggressors, you can hardly tell there are two colors !!!. Anyway, here is the end result. You can see the obvious difference to the pic above

There are not too many photos I have found of the T-2 cockpit. Here is one of the best and it's actually from an F-1. It's what I used as a guide for painting my seats

Here are the seats, with the main painting finished. A few bits and pieces followed by a wash and these guys are done. I'm starting to think I may get this kit finished

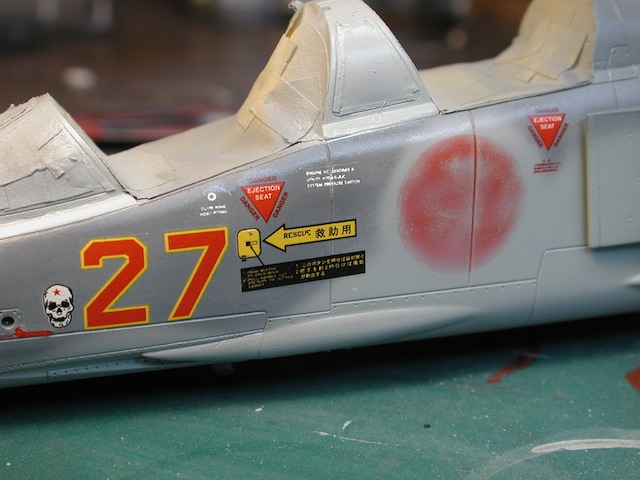
An overall shot of the main camo paint completed. Pretty happy with how its turned out. Next challenge is to paint the hinomaru's as they are heavily toned down on the aggressors an the decals that Hasegawa supply are just plain wrong

For those of you wanting to build an aggressor T-2 like me, here are a couple of photos that may help. My main concern was with the way the aggressors had oversprayed and toned down the Hinomaru's. Hasegawa provide perfectly round, deep red and white decals, which as you can see from these photos, just won't cut it

What the JASDF seem to have done, is paint out the white border of the Hinomaru and then oversrpray the center red. I decided that I did not want to use the decal at all, and so now whilst I was painting was the best time to tackle this task

As I wanted to simulate the rough, soft painting over of the white border with the airbrush, I decided to use a "soft mask" which is raised off the surface of the model by about 4mm. Here I have used some cardboard and held it off the surface using small blobs of blutac

A quick squirt of the lighter gray and you can see that the outline of the circle is soft. So far so good

There are 6 Hinomarus on the model. Wing top and bottom (x4) and front fuselage (x2). Here is the right side one for which I used the same cardboard mask

The next step was to paint the red circle in the middle of the gray one. Challenge here is to get the mask to be correctly aligned with the existing painted circle. I had a thought that I could cut out the circular mask and keep the center bit. Here I have lightly applied the circle (to be discarded) and I can place it perfectly in the center of the previously painted grey circle

Next step is to carefully apply the outer mask and line it up with the inner mask. Again do this lightly for now

Now we remove the inner mask and burnish down the outer mask. Confident that it is perfectly located to position the circle in the middle. Simple, but effective

A fairly light coat of Humbrol Insignia Red has been applied. Even though I did this lightly, it could have been lighter

Last step (once paint dry) was to lightly sand the red away using micromesh cloth and then overspray the whole thing with heavily thinned gray

Here is the result on the port wing top. I was quite happy with the result

A quick overall shot showing progress. The Hinomarus took quite a bt of time, but it's important to get them right

Of course the lower wings have them as well

Like Canadian F-18's (and probably other aircraft) the JASDF Aggressors have fake canopies painted on the fuselage underside. Hasegawa provide decals for this, but I felt a better result would be gained by masking and painting

A quick shot of Tamiya NATO Black and here we see the result. Pretty straightforward really

While painting the fake canopy on the bottom, I also masked up and did the anti-glare panel on top

Leaving this task for as long as possible, as I was now ready to paint the radome, I attached the brass (Finemolds) pitot tube using super glue

The radome was masked and sprayed Tamiya Semi-Gloss black. Its useful here to take note of the obvious difference in shades between the two Tamiya "Blacks"

With all the painting done, its time to start decaling. I first applied a coat of Future for glossiness. I have noted over my last few models, that the Future mix I have been using is not really giving me the coverage I need for decaling. This time, I changed the mix ratio from 1:1 to 2:1 (Future to Thinner). I also applied a few more coats where the major decals where to be applied.
The wing walkways are supplied as decals and the Hinomaru's obscure a section of them. Because I had painted my Hinomaru's, I had to either cut the decal before I applied it or after I had laid it down. I opted for the later, which was a mistake as I needed to hit the decal with some softening solution to get it to snuggle down into the panel lines and rivet detail. This meant it was far more difficult to cut and remove cleanly than I had anticipated. I made a bit of a mess to be honest and now it will take time to fix it up. Oh well, live and learn

When I am forced to use kit decals, I always like to trim as much carrier film away as possible. If you look closely, you can see where I have trimmed the film around each number in the tail code. This also means that I apply each number separately, which is more work (and more risk of a stuff up) but the end result is well worth it IMO.

Here we see the tailcode applied to the model. As these decals are quite thick (especially the red ones) I hit them with a liberal dose of softening solution (Daco Strong actually). The responded well and snuggled down into the recessed detail

Learning my lesson with the walkway on the left wing, I precut it on the right wing. Much better :P

Decaling is now complete. I'll leave it overnight to dry properly and then seal with Future.

Not a huge amount of decals on this model. I had to search the spares box for some white stencilling as Hasegawa only provide black stencilling which is wrong for the Aggressor birds (look closely at the pics above)

The drop tanks have been painted with the standard colors used on the F-1. I have seen enough photos of grey T-2's carrying these "borrowed" camo tanks. I reckon it will make the model more interesting as well with a bit of color

The main gear doors, nose gear door and airbrake interiors have been painted. Hasegawa do not call out for the edges of the main gear upper doors to be red as seen here. They are wrong as all photos I have seen of both F-1's and T-2's clearly show them was red

First up after the decaling and clear coating is the panel wash. I decided to use my normal "Burnt Umber" method as the darker camo grey would have hidden anything more "grey" for the wash.The coverage of the wash was good with only a few panel lines not co-operating as usual. It goes without saying that I did deepen and sharpen most of the panel lines on the kit before painting as experience has shown that Hasegawa 1/48 panel lines are nice, but if you want to panel wash, need to be a bit deeper and sharper

The underside really lifted with a wash as there is a myriad of panel and rivet detail provided

For the white parts (wheel well, airbrakes, etc) I switched from Burnt Umber to Dark Gray (Model Master 1788 Euro I Gray). I think this is more subtle than Burnt Umber for white parts

For the metal sections around the exhaust I opted for a straight black wash as I wanted the detail to stand out and I expect these areas to be more grimy than others

And so we come to the end. I have attached all the gear, tanks, canopies etc (mostly with Super Glue). I even speed painted a couple of figures using the very nice Vallejo Acrylic paints. RBF tags are from the pre-painted Eduard set and the base is one of my existing display ones. All up very happy with the result.
