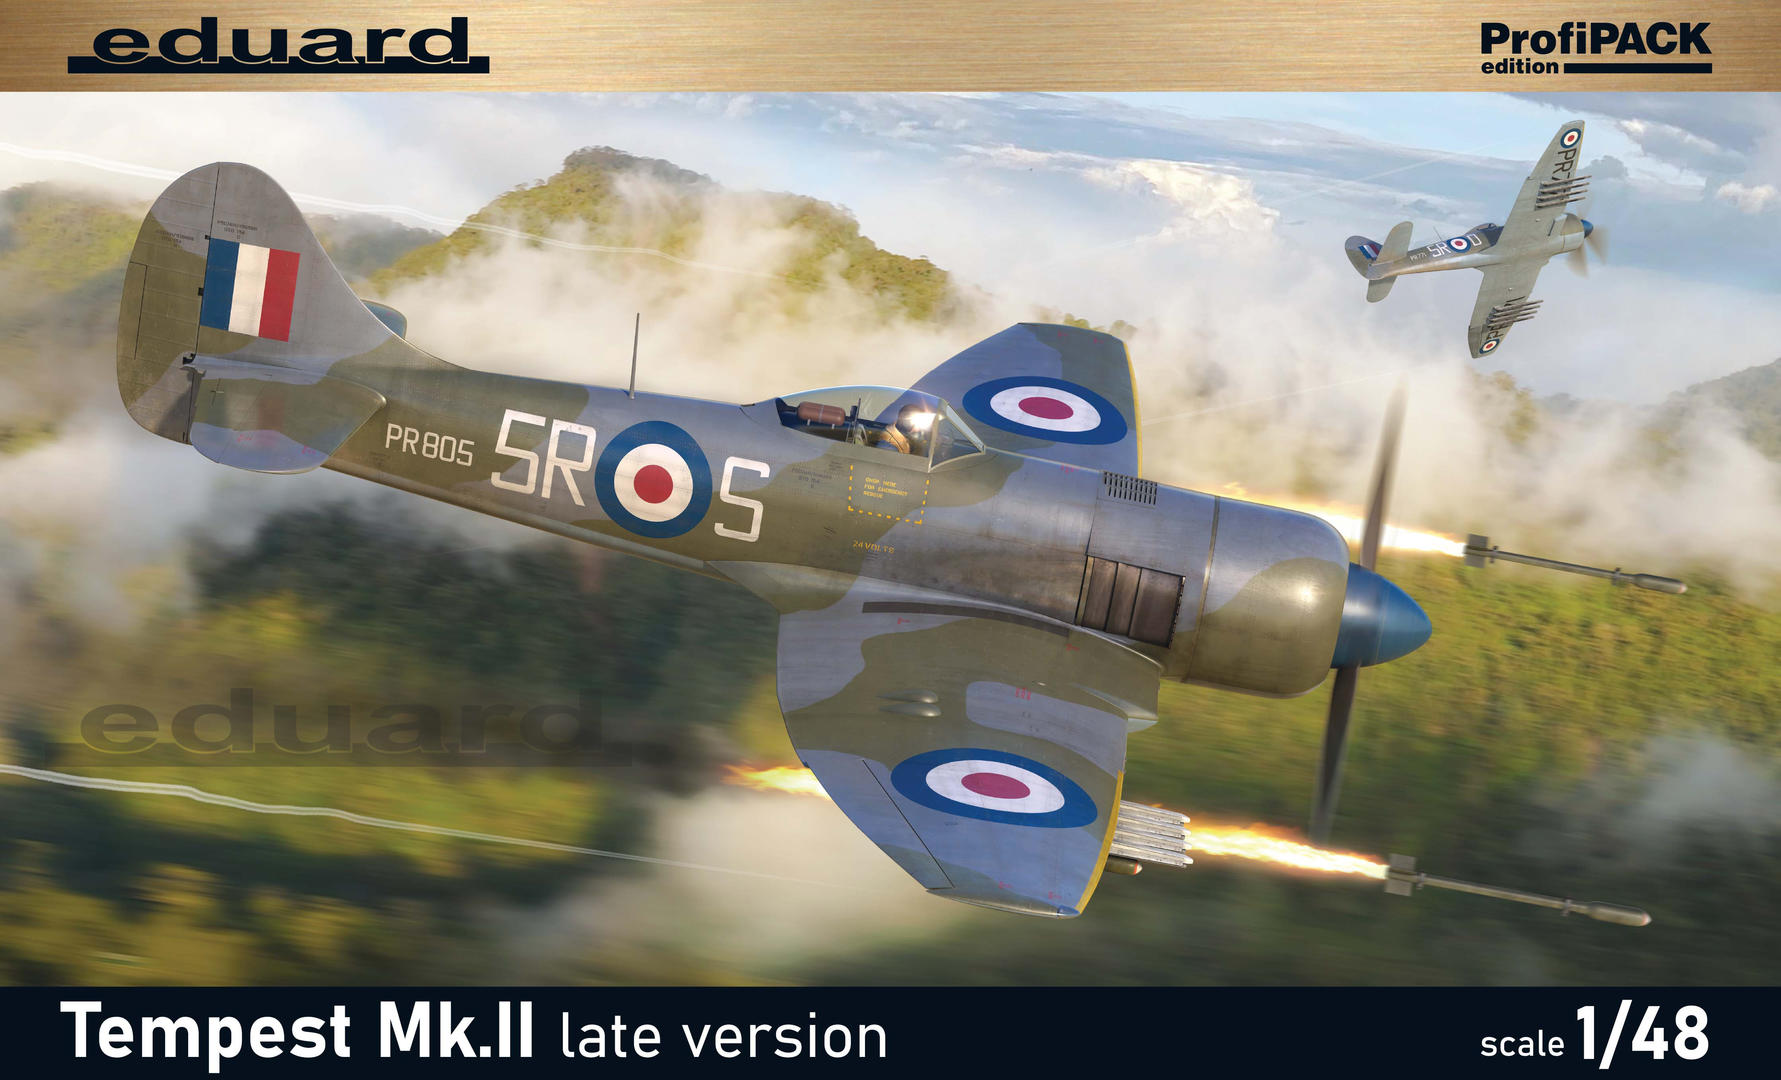
Tempest Mk.II Late
Eduard (82125)
1:48
Started: Apr 2022
Finished: Sep 2022
Link to Gallery
Following on from their excellent new tool Tempest Mk.V, Eduard has now released the Mk.II radial engined Tempest in 1:48 scale.
As you would imagine Eduard have re-used as much as they can from the original Mk.V sprues. Due to the significant changes between the Mk.V and Mk.II Tempests this turns out to be a lot less sprues than you might first imagine. All new wings and fuselage are provided as well as several upgraded (corrected) parts compared to the earlier Mk.V kit.
Being a profipack release, this kit comes with a small pre-colored photo etch fret (covering mostly the cockpit), a pre-cut mask set (for the canopy but also some fuselage markings for one of the included schemes). Finally, the kit includes a very large decal sheet containing six interesting and colorful marking options covering both RAF and foreign (Pakistan & India) operators.

The Tempest Mk.II had been intended to be powered by the 2,250hp Sabre Mk IVA in-line liquid cooled engine. Sir Sydney Camm however felt that the radial engined Tempest Mk.II would offer the ultimate in performance for the Typhoon/Tempest line and, as a result, considerable effort was made to improve the efficiency of the 2,210 hp Centaurus air cooled radial engine.
Hawker engineers redesigned the Tempest II with a modified Centaurus IV, which incorporated much captured German technology. This resulted in what was probably the cleanest radial engined fighter of Second World War.
Orders were raised to 330 for Bristol and 1800 for Hawker, however at the end of the war most of them were cancelled. Hawker managed to finish 402 aircraft, while Bristol completed only 50 aircraft. All production aircraft were fitted with the Centaurus V engine, the short-barrelled Hispano Mk. V cannons and the standard Mk V tail-unit. All of Bristols aircraft and Hawkers first batch were built as fighters, while the rest of Hawkers production were built as
fighter-bombers with strengthened wings. [https://www.hawkertempest.se]


COLORS & MARKINGS - Eduard 1:48 Tempest Mk.II Late (82125)
As with most of their Profipack boxings, Eduard include six marking options in this kit. Each of the six represents a post war Tempest II ranging from 1946 to 1951 and includes four RAF aircraft, one Pakistan AF and one Indian AF aircraft. I was immediately drawn to the colorful (and unusual) Pakistani scheme with its desert scheme and white chevrons. As it turned out I also had a liking for the Indian colors with the orange and black markings contrasting nicely with the overall silver finish.


The provided decal sheet is one of the biggest I have ever seen in a 1/48 scale Eduard box. It literally only just fits and the stencils are contained on a second smaller sheet. I assume (as with all Eduard decals since 2019) that these are the "removable carrier film" style which I have not yet used myself but will finally get to try them out on this build. I will almost certainly use a couple of the spare decals on the sheet to conduct some tests of how best to remove the carrier film without damaging the decal themselves.

BUILD - Eduard 1:48 Tempest Mk.II Late (82125)
Eduard provides three options for the main instrument panel. All plastic with hand painted raised dials, plastic with some raised dials and decals and lastly (in the profipack only) a full set of pre-painted photoetch. I decided to go with the photoetch option but found that the assembled part was quite flimsy. A simple solution presented itself by instead of part E30 I used the plastic parts (L8,L21 & L22) from option two and sanded off all the raised detail. The PE parts were then easily glued to the plastic.

The plastic parts will be painted Tamiya XF-85 Rubber Black (my favourite "scale black") and then the PE parts attached using Ammo Ultra Glue. I use Ultra Glue for almost all my PE work these days as it is far more forgiving than CA glue and dries quite strongly.

The main cockpit parts were primed in black and then a light coat of AK Real Color RC293 RAF Cockpit Gray Green. Various washes were applied in and around the raised details. As I had experience building the Mk.V Tempest previously I knew that very little of the cockpit interior would be visible on the finished model so no extra scratch-built parts were added this time around.

I'm always interested in new products and had recently came across Mr Hobby Weathering Colors. These appear to be pre-mixed enamel based weathering washes and come in a small range of browns, grays and blacks. I used a selection of these in an around the cockpit. On the seat cushion I applied some WC04 Sandy Wash, likewise on the foot supports. These products behave a bit like oil washes and can be worked and removed with artists white spirit.


The PE fret includes a nice set of pre-painted belts and these looked overly clean so a light wash was also applied so they better blended in with the rest of the parts. The PE instrument panel looked very realistic once fitted into the cockpit but unfortunately will be virtually invisible once the fuselage is buttoned up


Eduard likes to make a large number of optional upgrades for its kits and the Tempest Mk.II was no exception. These days I am a bit more selective on which options I use as generally speaking the Eduard plastic is often more than good enough. In the case of the exhaust stubs I decided that Brassin replacement parts would save me a lot of work (drilling out the kit plastic parts) and look heaps better.

A before and after comparison of the exhausts highlights the benefits of the brassin parts. These are drop in replacements with no surgery needed. The are also very reasonably priced which also makes the decision to use them easier.

With the cockpit complete it's time to seal up the fuselage. Anyone who has built any of the recent Eduard 1/48 kits will know that the surface detail is very fine and easily damaged. We need to keep this in mind when working on repairing the seam joins. For areas that will require some panel line re-scribing I like to use CA (Super) Glue mixed with some Talc (or VMS) filler. This helps the CA to act as a superior filler allowing better sanding and scribing. Where no scribing is needed, perhaps only rivets, I am happy to use Tamiya Basic Grey putty where the seam needs filling. To protect the surrounding surface detail from putty/sanding damage I apply some sacrificial tape along the seam.

In the process of sanding the rear fuselage upper & lower seams its to be expected that you will lose most of the rivet detail. This is of course unavoidable in most cases as the putty and sanding just has to be done to remove the join. This requires us to then re-instate the rivets to best match what was there originally. A good set of rivet wheels will come in handy here and I prefer to use those from Galaxy Models.


Whilst the provided plastic grill looks quite good, nothing in plastic can match the scale thickness of photoetch brass or steel. The PE part can be simply glued over the top of the plastic grill or you can cut out the plastic grill as I have done and replace it with the PE part. The part needs to curved slightly to match the fuselage contour and to achieve this you need to roll it gently over a curved surface to minimise the chance of kinking of the PE.

Are you enjoying and finding value in this content? If so, please consider supporting my work by Buying Me A Coffee. Your support ensures that I can continue to provide high-quality, accessible content now and in the future, keeping this space free from distractions and focused entirely on the hobby we all love. Every little bit helps, and I truly appreciate your generosity!

Because of the close fitting engine cowling very little of the Centaurus V engine can be seen from the front of the model when complete. You could probably get away with just painting it black but almost as easy is a coat of Alclad 101 and a heavy wash to give it some depth.

The engine cowling ring is a press fit onto the forward fuselage with a gap free result. It's these sorts of details that make building Eduard kits such a delight. Panel lines and rivets have been tidied up by hand using a sewing needle and pin vise.

Getting ready to close up the wings, the wheel wells were assembled and received a coat of Gray-Green as per the interior colors. Here I have applied some Mr Weathering grime colors to the left wheel bay whilst the right remains clean. This helps to show how even a light wash can bring more life and depth to your models. You don't need to go super heavy with the weathering to obtain some benefit.

Whilst browsing for extra goodies for this kit I came across a new 3D printed option for the landing flaps. Having used the full PE set on the Mk.V build I was curious to see what Eduard's home printed parts looked like. The surface detail is well done with rivet and ribbing detail pretty much to scale.

The Tempest employs a "split landing flap" configuration where only the lower half of the wing is extended (or splits away) for landing. Split flaps produce slightly more lift than plain flaps, but like their plain counterparts, they also produce a lot of drag.

First step in fitting the new flaps is to remove the closed plastic flaps from the kit wing. There are a number of ways to achieve this and for this particular kit I chose to repeatedly score along the panel lines (shown in red) with a fresh #11 blade. A razor saw would be less risky but very hard when you get to those corners and inside lines near the fuselage.

With the molded in flaps removed the upper wings can now be glued in place. Learning from my Mk.V build this time I opened up the rectangular hole for the boarding ladder. This was backed with some plasticard into which the extended ladder will eventually be attached.

Next step is to mate the wings to the fuselage. This highlighted a small problem with the upper wings which no longer matched cleanly to the fuselage wing root. This was because by cutting away the lower flap the upper wing now drooped lower than it should. To correct this I needed a way to push the upper wing back up to align properly with the fusleage. A couple of temporary shims were made up from plasticard and provided enough support while the glue dried along the join. This proved to be a simple and effective way to address this unforeseen challenge created by the flap removal.

When viewed from the top, the result of the shim doing a good (temporary) job can be seen. Here the wing and fuselage are now properly aligned.

If you have built the Eduard Mk.V Tempest kit you will have likely run into problems with the rear wing to fuselage seam (I know I did). Eduard have re-designed this part in the Mk.II kits and the join is now about 1 cm further to the rear. This is definitely an improvement and I extend my thanks to Eduard for the effort.

With the main parts now solidly joined its time to deal with the lower seam and install the photo-etch interior parts for the landing flaps. It was pretty much unavoidable losing most of the panel line and rivet detail in the seam area and as this not a natural panel line it must be sanded flush.

Working slowly with my Tamiya Scriber and Galaxy Model rivet wheels the lost surface detail was reconstructed and the results checked with a light wash of Tamiya Panel Liner (Black).

Eduard provides separate control surfaces in the kit (which is nice) but does not cater for attaching them in an off-center position. I always try and model my WW2 aircraft with relaxed elevators and so needed to do some small surgery to the kit parts to droop them as shown here. Its a small detail but one that adds some character to the finished model.

Are you enjoying and finding value in this content? If so, please consider supporting my work by Buying Me A Coffee. Your support ensures that I can continue to provide high-quality, accessible content now and in the future, keeping this space free from distractions and focused entirely on the hobby we all love. Every little bit helps, and I truly appreciate your generosity!
With the main assembly complete its time to prepare for painting starting with masking and plastic preparation (removing sanding grit, oil from your hands etc)

Masking open cockpits often requires some interesting gymnastics with tape and other materials. I've found that using the thinnest tape (either pre-cut or cut it myself) and using that to specifically mask out the edges is the best way to overcome tricky shapes and tight curves often found around windscreens and cockpit/canopy frames. I also find that liquid masking fluid is your friend here to fill up those little gaps left between small pieces of tape.

When it comes to masking don't just limit yourself to tape. One technique that I learned is to use the packing foam that comes with resin aftermarket sets (like Eduard Brassin etc) for masking interior opening like wheel-wells and cockpits. The thing I like about this foam is that its quite dense and soft and will easily conform to just about any shape you need and won't damage the existing parts or paint. Another material I use for awkward interiors (like intakes) is wet tissue paper. When you wet a tissue it does not fall apart but becomes very soft and flexible, enabling you to insert it into intakes and exhausts with ease. Once the water dries the paper is very sturdy and very paint proof. To remove the paper once you no longer need the mask just add a couple of drops of water onto it and it becomes soft and flexible once again.

Of the six marking options provided in this kit, the one that jumped off the page for me personally was the attractive Pakistani Air Force markings. The desert scheme combined with the white chevrons and green/yellow colors of the RPAF national insignia combined with the obvious potential for heavy weathering made this a no brainer for me. As I happened to have two of the Eduard Tempest Mk.II kits I decided to also build the second one in Royal Indian Air Force (RIAF) colors as a interesting contrast (and stable pal) to the Pakistan bird.

The details surrounding the operation of the Hawker Tempest by the Royal Pakistan Air Force (RPAF) is one of the least known topics in the history of the aircraft. The tale begins with the Royal Indian Air Force which, following partition and establishment of the RPAF, had to be shared between the two countries. Following lengthy negotiations it was agreed that Pakistan will take over 35 Tempest Mk.IIs out of the Royal Indian Air Force’s inventory inherited from the RAF. Tempests were selected by the RPAF, because they were considered more suitable for harsh and hot weather conditions than liquid cooled Spitfire VIIIs & XIVs, also operated by the RIAF. Spitfires were well known for tendency to overheating in hot weather areas, even in tropicalised variants.

Painting commenced with an overall coat of Mr Finishing Surfacer 1500 Black. As I am not a fan of panel line pre-shading I find the overall black gives me the best undercoat when using lighter top coats. To help avoid a monotone finish I like to use some of the various pre-cut airbrush masks to quickly give a random mottling to the various paint layers. In this case as I knew my top coat was to be Azure Blue, so I used two mottle layers, one a light grey and the second a dark blue. I was hoping these would end up being slightly visible (but not overpowering) under a thin coat of the Azure Blue by MRP.

MRP is my main goto paint these days. The paint is an acrylic lacquer and comes pre-thinned in the bottle for airbrushing only. This is easily the best paint I have ever airbrushed and the coverage you get is amazing. One thing I have learnt over the years when it comes to painting models is that "less is more" so now each layer I apply is done sparingly and then slowly built up as needed. In this picture you can just see some of the underlying mottling plus the darker areas because of the black undercoat. There is no super airbrush skills needed to achieve this effect, anyone who can load an airbrush can do it. Speaking of airbrushes, for this overall type of painting I use my trusty Iwata Revolution HP-CR Gravity Feed Dual Action which has a 0.5mm needle.

Over top of the base Azure Blue layer I next applied random patches of a lightened (with White) mix. I typically focus on the center of panels, small access hatches to achieve what I hope is a finish with more visual depth. Basically I am trying to avoid a monotone finish. Bearing in mind that we are really only still at the start of what the finished model will look like after our panel line washes, weathering, decaling and flat coat etc which are all still to come.

Satisfied with the paint on the underside, more masking is now needed to prepare for the top colors. One fortunate thing about RAF WW2 paint schemes is that most (if not all) of the demarcation lines are hard. This means we can accurately rely on masking tape for the edges. To make life much easier when laying out the actual edge itself I once again turn to the thinnest tape I can find, which in this case is Tamiya 1mm. Using such a thin tape works best because you have far better control where it sits on the model surface, which in this case is the thin wing leading edge and around the cowling curves. As I've done, once you have your edge sorted, you can then use larger pieces of tape to back fill to protect from overspray.

The masking for the rear fuselage is pretty straightforward until you get to the very rear, just in front of the rudder. Based on the painting instructions the mask needs to curve around pretty tightly and its probably going to be hard to do with even the thinnest Kabuki tape. It's at times like these I reach for my Tamiya Masking Tape for Curves. Made from vinyl it's ideal for those tricky and difficult curves we sometimes run into. I also chose to use some Mr. Masking Sol liquid mask to better mask off the rounded section behind the tail-wheel.

The first color down is Middle Stone, one of the standard RAF WW2 desert scheme colors. A guide I've always liked to follow is to start painting with the lightest shade working to the darkest as this helps with coverage challenges. These days this is not so necessary because of the superior covering abilities of acrylic lacquer paints like MRP and similar brands. You can get excellent coverage with only a couple of light coats of paint, even with troublesome colors like yellow and red.

Acrylic lacquer paints, such as MRP, cover extremely well even using a super thin coat. The surface detail on Eduard kits is beautifully delicate and can therefore be all to easily covered over if too much paint is applied, so light coats are essential. For the first color of any multi-color camouflage scheme I apply it using the painting pattern as a guide and include a little overlap.

When it comes to the demarcation for the second (or third) color I use different methods depending on whether the transition is hard or soft or somewhere in between. Pretty much all WW2 RAF paint schemes use a hard mask and I like to use rolled sausages of Blu Tack laid onto the model surface. Depending on how sharp you need the transition to be you can vary the size of the rolled Blu Tack with thicker rolls generating softer (less sharp) edges.

The Blu Tack tackes care of the edge of the pattern but unless you are the worlds finest airbrusher you will want to use some tape to backfill against overspray. I like to cut Tamiya tape into smaller squares and work along the Blu Tack rolls being sure to overlap and cover up any spots where overspray could get through. With this (somewhat lengthy) task complete its time to load up the second color, RAF Dark Earth.

Once the second color is dry (pretty quick with lacquers) the Blu Tack rolls and tape is removed and my Tempest is starting to come to life. If you look closely at the edges of the Dark Earth you can see its hard but not as sharp as using tape. I use this method a lot, even for soft camo as my freehand airbrushing is not that good.
Are you enjoying and finding value in this content? If so, please consider supporting my work by Buying Me A Coffee. Your support ensures that I can continue to provide high-quality, accessible content now and in the future, keeping this space free from distractions and focused entirely on the hobby we all love. Every little bit helps, and I truly appreciate your generosity!

Next up are the double white chevrons on each wing (top and bottom) and rear fuselage. Eduard provides decals for these but whenever possible I prefer to mask and paint any kind of markings on the model as you have a lot more control over the coverage and it ensures all that lovely rivet detail is preserved. Decals (especially white) tend to be thick and end up being unreliable in how well they will sink down into the recessed details, often leaving you with a patchy result. Initially I intended to mask the chevrons by hand and had there only been one band I would have done that. Two bands introduces additional spacing complexity and I therefore decided to make my own masks using the decals as a template. Using the free Silhouette Studio software I imports a scan of the decal sheet and traced the chevron decals. This was then sent to the Silhouette Portrait cutter which cut the masks from a sheet of Oramask 810 vinyl stencil film. This probably sound complicated but the whole process took about 15mins from start to finish.

My plan with the vinyl masks was to use them as a template as to where the chevrons needed to be. The undersides was going to me the more complicated so I started there. To ensure the masking all lined up across the undercarriage doors and landing flaps I loosely tacked these in place and then laid my vinyl masks over the top. The vinyl was then cut along the edges between the flaps and gear doors so that when these were taken off the location of the chevron was preserved.

The fuselage chevron Oramask 810 bands were likewise placed on the model and I then used them as a guide to apply thin 1mm strips of Tamiya tape along the outside edges. When I was happy with the edges the vinyl mask template was removed and discarded. As it turned out the tail band was the trickiest of all to get everything lined up and ensure the bands did not look wonky from the top, bottom or either side. Trying to mask these without the help of the vinyl templates would have been a dogs breakfast.

With the edges masked off the vinyl template is removed and the masking completed by backfilling to protect from overspray. Certainly more work than just slapping the decals on but I was confident the end result would be superior.

The underside took more work as those chevrons went across not only the wing but the flaps and gear doors. I consider masking to one of the core skills every modeller should master. I see too many folks becoming reliant on pre-cut masks for canopies and camouflage schemes and when they need to tackle something that is not "out of the box" they struggle. Keep those skills fresh by challenging yourself to tackle modelling problems the old fashioned way, every now and then.

I tend to be a bit paranoid when it comes to overspray. Not that I am heavy handed with the airbrush but I have found that when you are so focused on laying paint down on one part of the model you tend to forget whats behind it (and therefore in the airflow firing line). To me it makes sense to spend one minute more adding some extra tape rather than ending up with overspray and having to fix it (which is always more work).

Most white paints tend to require several coats to achieve an opaque cover. Whilst this is also true of the newer lacquer paints the thickness of each layer tend to be much less than traditional acrylic or enamel paints. What this means is that you don't run the risk of excessive build up (and hence an edge). MRP-135 Insignia White was used and I applied 2-3 light coats to achieve the coverage you see here.

As I mentioned earlier the main benefit I like about painted on markings is that it preserves the surface detail far better than any decal could. This photo reinforces that even the finest surface rivets (raised and recessed) are still very visible even under three (primer, color and chevron) coats of paint.

It continues to surprise me just how effective the packing foam is as a paint mask. It looks like paint from the airbrush would get through but it doesn't which is ideal as foam is cheap and reusable

With the chevrons sorted its time to move onto the last few bits of painting. One additional benefit of painting over decaling for such markings is that you can far more realistically weather (chip, distress, sand etc) paint compared to a decal..

Have you ever wondered why some RAF aircraft have a yellow strip on the wing leading edge? Apparently it was introduced in 1941, along with the switch to Dark Green/Ocean Grey/Medium Sea Grey camouflage. It was intended to assist RAF fighter pilots to distinguish friend from foe immediately in the difficult head-on position of battle. As no similar markings was ever carried be the Luftwaffe's aircraft, it is probable that they found it equally useful.The strip was only 4 inches in width so don't get carried away with how much you mask on the top and bottom.

As I had my MRP paints out I decided to use MRP-051 RLM 04 as it was not a bright yellow. I wanted the yellow to be visible but not distracting. The MRP allowed me to apply the yellow directly over the camouflage colors without the need for a white undercoat first.

The last painting task was to deal with the interior of the open landing flaps. I could have painted and masked these earlier but to be honest I forgot and its just as easy to do it last anyway. First step was to clean off all the overspray and for this I used a pointed cotton bud (the cosmetic style) dipped in some All Purpose Thinners. This stuff is pretty strong so I had to be careful not to spill any on the lower wing. As you can see it did a fantastic job of cleaning the brass.

Once again I turned to Mr Finishing Surfacer 1500 for the primer coat for two reasons. First I wanted that black base coat for visual contrast and second I needed a purpose built primer paint that could reliably grip the metal parts (and not flake off later).

The flap interior on Tempests was painted the same grey-green as the cockpit and wheel wells. AK Real Color is another favourite I seem to be using more of lately as I find the aircraft range to be wide and the paint covers and airbrushes beautifully.

With all the tape removed we can finally see the end result of all that painting. So far so good, everything seems to falling into place.

Are you enjoying and finding value in this content? If so, please consider supporting my work by Buying Me A Coffee. Your support ensures that I can continue to provide high-quality, accessible content now and in the future, keeping this space free from distractions and focused entirely on the hobby we all love. Every little bit helps, and I truly appreciate your generosity!
As the model is now pretty much ready for decaling its time to start thinking about a clear gloss coat. In this case the MRP paint comes out of the bottle with a nice semi-gloss finish and I was tempted to forego the clear gloss, however, during my testing of the new Eduard decals (and how best to remove the carrier film) I noticed that MRP reacts very badly to Mr Mark Softer decal solution. Because of this I decided it was safer to just put a protective coat over the whole model like I normally do. Tamiya LP-9 from their new lacquer range is my current favourite so a couple of light coats went down just in case.

After my testing of the new Eduard decals I concluded that when applying them to the model surface they can (and should) be treated as any other decals. To this end I soaked them in warm water for about 15secs and then when they released from the backing paper slid them onto a generous coat of MicroScale Micro Sol. After a few seconds the decal starts to soften and wrinkle at the edges as shown here. This is normal and is no cause for alarm. At this point you can clearly see the carrier film which extends beyond the edge of the roundel and serial code.

As the decal softens it settles over the surface detail, be it raised or recessed. Depending on the decal colors and how thick they are I often find it helpful to gently coax the decal into panel lines. For this I have found the best tool to be a sharpened tooth pick which I run along the panel line. You can see here that the decal has pulled down into many, but not all, of the recessed rivets. At this point the carrier film is still visible around the outside of the roundel. If you are happy that the clear carrier is hidden sufficiently then you could leave the decal alone and move onto the next step in your build. For me, I wanted to push ahead and see if that carrier film could now be removed completely leaving only the decal itself.

First step in removing the carrier film is to flood the decal with mineral spirits. Here is Australia we call this form of gentle solvent "White Spirits" and it can be purchased in art supply stores or even in larger quantities via hardware shops. Do not use any stronger solvent for this (avoid thinners of any kind) or you risk eating through the paint and decal. The solvent seems to go to work softening only the carrier film pretty much straight away. I found that leaving it sit on the decal surface for about 1 minute was more than adequate to begin the removal.

I found that the best place to start to gently push the decal is from an edge, pushing inwards. For roundels work all the around the circumference pushing the wet cotton bud inwards and you will see the gooey carrier film start to roll up. Once it starts I found it comes away very easily so you don't need to push hard or use sharp tools like tweezers.

Eventually you will have collected all the carrier film into a small ball which can now be picked up and disposed of. Wipe over the decal one last time to soak up any excess solvent but be careful not to linger too long or push to hard because the decal ink is exposed now and is quite fragile.

If you start to see any ink or color from the decal appear on your cotton bud stop immediately, lest you damage the decal. All that is left now is to leave the surface to dry (I left the solvent overnight to evaporate).

As a second example, here is the national insignia on the tail. The same technique was used as per the wing roundel where we start by flooding the dried decal surface with mineral spirits.
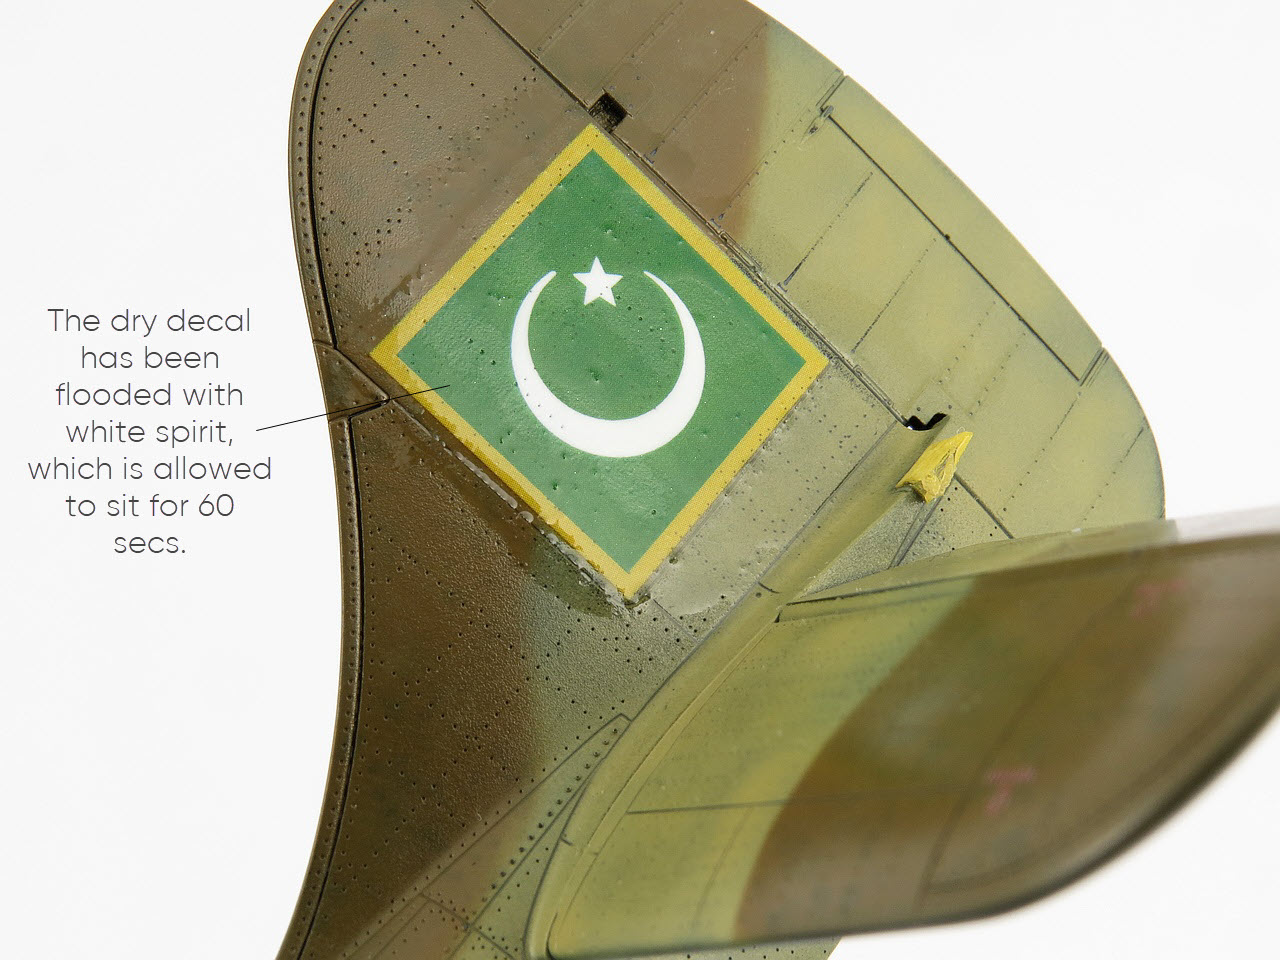
I once again pushed the carrier film starting from the left side working across to the right, gathering the softened carrier material as I went.

After a final wipe with a dry paper towel (I use the cheap paper serviettes as these tend to be a little softer than the absorbent paper towels) the decal is ready for a clear coat to protect it from the upcoming panel line wash and weathering.

The same technique was used on ALL the decals on the model, including the myriad of stencils. In some cases a little of the stencil lettering did come away but not enough for me to consider this technique a failure. After a while I developed a feel for how much pressure and how quickly to use the cotton bud. The decals were next sealed with a coat of Mr.COLOR GX100 Super Clear III to ensure the ink was protected moving forward.

Panel washing is one of my favourite points in a model build because it's where the model starts to gain some character. Up until now its all been very sterile and precise. The panel wash and weathering washes are far more organic and I tend to follow my gut far more from this point onwards. My favourite panel line wash is the Tamiya Panel Line Access Color range and to get the various shades I like mean I blend two or more colours from the Tamiya range, most commonly Dark Brown and Black. To remove the dried panel wash I once again turn to white spirits (so you can see why I buy it in 4 litre bottles !!)

As I wanted to show this Tempest as well worn, I had previously applied a coat of Aluminium to the cowling lip and wing roots. Over this was applied a light coat of water based hairspray which was now used to remove realistic chips of the camouflage paint. For this I like to use a wooden toothpick to help simulate scratching. This is not a perfect science and you never really know how the paint will flake off, but that's part of the idea as it's meant to look random (like in real life).

The very fine surface detail on these Eduard kits responds perfectly to the panel wash process. The detail becomes visible without becoming overpowering. At the moment the model looks interesting but still a bit bland for what I was after.

In my last few builds I have taken a liking to the Mr.COLOR Weathering Color range. I find they are easy to use and give a similar result as artist oils for blending. First step is to apply the color straight out of the bottle onto the parts of the model you want to show weathering. Access to good photos of your subject are helpful here, but not essential as we can always make educated guesses. I leave the weathering color for about 30mins by which time it is not cured but also not longer wet.

Next I use a soft bristle brush (same you would use for detail painting) and dip it into the mineral "white" spirits. Using a dabbing or stabbing motion the brush is used to loosen the pigment and blend it into the places you need it. Like most artistic endeavours this takes a bit of practise to achieve the level of control we want and when you inevitably make mistakes just wipe it all off with a clean cotton bud and start again. I like to use at least two different shades of pigment on top of each other to get some visual variety to the finish.

Are you enjoying and finding value in this content? If so, please consider supporting my work by Buying Me A Coffee. Your support ensures that I can continue to provide high-quality, accessible content now and in the future, keeping this space free from distractions and focused entirely on the hobby we all love. Every little bit helps, and I truly appreciate your generosity!
Once happy with the weathering on top and bottom it's time to seal it all in with a coat of flat clear. For this I have found Mr.COLOR GX114 Super Smooth Clear to be brilliant. Lacquer based clears tend to dry fast and hard and in this case it really is super smooth. The paint masks can also now be removed and any problems fixed before pressing on.

Various shades of Mr.Color Weathering was used on the undercarriage doors and the tyres themselves to achieve a grimy finish. Nothing looks more suspicious than perfectly clean black tyres on a dirty aircraft. I even remembered this time to sand some flat spots on the wheels, just enough so they don't look funny.

The spinner is the same Azure Blue as the underside on the Pakistani Tempests. The propellers have been painted in Tamiya XF-85 Rubber Black and a light chipping applied using a kitchen scourer, which work well as it provides nicely random scratches. The grime on the spinner is once again Mr.Color Weathering blended in with a brush.

The Tempests could be fitted with wing drop tanks and a pair of these are included in the kit by Eduard. The real tanks used a clear acrylic material on the pylon and to simulate this Eduard have molded the tanks in clear plastic.

The undercarriage is one of the last items I tend attach. Eduard are very good at engineering the gear strut and attachment point in the wing to result in a solid fit with the correct alignment. Once the strut was secured and dry I fitted the wheels and rotated them to get the flat spot in the right place. The 3D printed resin landing flaps are attached using CA glue. Thankfully the white chevrons lined up perfectly between the flaps and wings (not that I ever had any doubt).


The last few delicate parts are finally attached. The pitot tube on the port wingtip was fabricated using steel tube (to replace the kit plastic part which broke off the wing back at the start of the build).

For the exhaust staining I used a very thin mix of Tamiya XF-1 Black and XF-9 Hull Red. For this I thin using pure IPA (Isopropyl Alcohol) rather than normal thinners as this allows the acrylic pigment to build up slowly when so heavily thinned.

As I was patting myself on the back for how nice the walkway chipping looked it occurred to me that on Hawker aircraft, such as the Typhoon and Tempest, the pilot boarded from the starboard and not port side. Doh, one for next time :(

Overall I'm really happy with how the model turned out and that I was able to capture the look I had in my mind when I first started the build. The Tempest Mk.II was (and still is) one of the most attractive propeller driven aircraft ever built.

Are you enjoying and finding value in this content? If so, please consider supporting my work by Buying Me A Coffee. Your support ensures that I can continue to provide high-quality, accessible content now and in the future, keeping this space free from distractions and focused entirely on the hobby we all love. Every little bit helps, and I truly appreciate your generosity!
CONCLUSION - Eduard 1:48 Tempest Mk.II Late (82125)
Another excellent kit by Eduard. I've pretty much now convinced myself that you really don't need to fill up your shopping cart with all the resin, 3D and photo-etch extras that Eduard make for these kits when what they provide you in the box is already so good.
The main thing I learned in this build was how to reliably and consistently deal with their new removable carrier film decals. I love the idea of getting rid of any and all carrier film once the decal is on the model. However if doing so has significant risks to damage or destruction of said decals then that is a worry. In both my Tempest builds I managed to remove all the carrier film with only minor (self inflicted) problems, all of which were overcome. So I'd say that's a success and certainly something I'll be doing on future Eduard builds.
I see that Eduard have now released the Ultimate version of their Tempest II kit, with ten marking options and a a pictorial book about service Tempest Mk.IIs in RAF Royal Indian Air Force and Royal Pakistan Air Force written by Chris Thomas. I really don't need any more Tempests but this one sounds too good to miss.

ASSEMBLY INSTRUCTIONS - Eduard 1:48 Tempest Mk.II Late (82125)


